Chapter 4. Code Reuse: Functions and Modules

Reusing code is key to building a maintainable system.
And when it comes to reusing code in Python, it all starts and ends with the humble function. Take some lines of code, give them a name, and you’ve got a function (which can be reused). Take a collection of functions and package them as a file, and you’ve got a module (which can also be reused). It’s true what they say: it’s good to share, and by the end of this chapter, you’ll be well on your way to sharing and reusing your code, thanks to an understanding of how Python’s functions and modules work.
Reusing Code with Functions
Although a few lines of code can accomplish a lot in Python, sooner or later you’re going to find your program’s codebase is growing...and, when it does, things quickly become harder to manage. What started out as 20 lines of Python code has somehow ballooned to 500 lines or more! When this happens, it’s time to start thinking about what strategies you can use to reduce the complexity of your codebase.
Like many other programming languages, Python supports modularity, in that you can break large chunks of code into smaller, more manageable pieces. You do this by creating functions, which you can think of as named chunks of code. Recall this diagram from Chapter 1, which shows the relationship between functions, modules, and the standard library:

In this chapter, we’re going to concentrate on what’s involved in creating your own functions, shown at the very top of the diagram. Once you’re happily creating functions, we’ll also show you how to create a module.
Introducing Functions
Before we get to turning some of our existing code into a function, let’s spend a moment looking at the anatomy of any function in Python. Once this introduction is complete, we’ll look at some of our existing code and go through the steps required to turn it into a function that you can reuse.
Don’t sweat the details just yet. All you need to do here is get a feel for what functions look like in Python, as described on this and the next page. We’ll delve into the details of all you need to know as this chapter progresses. The IDLE window on this page presents a template you can use when creating any function. As you are looking at it, consider the following:
Functions introduce two new keywords:
defandreturnBoth of these keywords are colored orange in IDLE. The
defkeyword names the function (shown in blue), and details any arguments the function may have. The use of thereturnkeyword is optional, and is used to pass back a value to the code that invoked the function.Functions can accept argument data
A function can accept argument data (i.e., input to the function). You can specify a list of arguments between the parentheses on the
defline, following the function’s name.Functions contain code and (usually) documentation
Code is indented one level beneath the
defline, and should include comments where it makes sense. We demonstrate two ways to add comments to code: using a triple-quoted string (shown in green in the template and known as a docstring), and using a single-line comment, which is prefixed by the # symbol (and shown in red, below).

Geek Bits

Python uses the name “function” to describe a reusable chunk of code. Other programming languages use names such as “procedure,” “subroutine,” and “method.” When a function is part of a Python class, it‘s known as a “method.”. You’ll learn all about Python’s classes and methods in a later chapter.
What About Type Information?
Take another look at our function template. Other than some code to execute, do you think there’s anything missing? Is there anything you’d expect to be specified, but isn’t? Take another look:


It doesn’t know, but don’t let that worry you.
The Python interpreter does not force you to specify the type of your function’s arguments or the return value. Depending on the programming languages you’ve used before, this may well freak you out. Don’t let it.
Python lets you send any object as a argument, and pass back any object as a return value. The interpreter doesn’t care or check what type these objects are (only that they are provided).
With Python 3, it is possible to indicate the expected types for arguments/return values, and we’ll do just that later in this chapter. However, indicating the types expected does not “magically” switch on type checking, as Python never checks the types of the arguments or any return values.
Naming a Chunk of Code with “def”
Once you’ve identified a chunk of your Python code you want to reuse, it’s time to create a function. You create a function using the def keyword (which is short for define). The def keyword is followed by the function’s name, an optionally empty list of arguments (enclosed in parentheses), a colon, and then one or more lines of indented code.
Recall the vowels7.py program from the end of the last chapter, which, given a word, prints the vowels contained in that word:
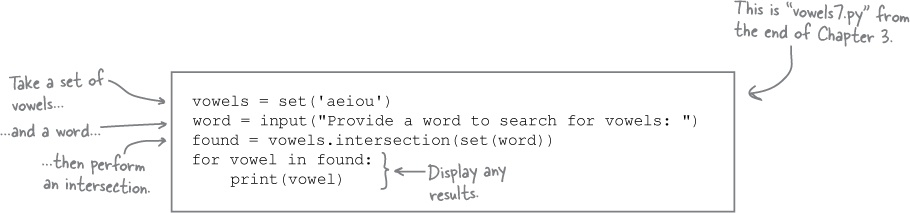
Let’s imagine you plan to use these five lines of code many times in a much larger program. The last thing you’ll want to do is copy and paste this code everywhere it’s needed...so, to keep things manageable and to ensure you only need to maintain one copy of this code, let’s create a function.
Take the time to choose a good descriptive name for your function.
We’ll demonstrate how at the Python Shell (for now). To turn the above five lines of code into a function, use the def keyword to indicate that a function is starting; give the function a descriptive name (always a good idea); provide an optionally empty list of arguments in parentheses, followed by a colon; and then indent the lines of code relative to the def keyword, as follows:

Now that the function exists, let’s invoke it to see if it is working the way we expect it to.
Invoking Your Function
To invoke functions in Python, provide the function name together with values for any arguments the function expects. As the search4vowels function (currently) takes no arguments, we can invoke it with an empty argument list, like so:
>>> search4vowels()
Provide a word to search for vowels: hitch-hiker
e
i
Invoking the function again runs it again:
>>> search4vowels()
Provide a word to search for vowels: galaxy
a
There are no surprises here: invoking the function executes its code.
Edit your function in an editor, not at the prompt
At the moment, the code for the search4vowels function has been entered into the >>> prompt, and it looks like this:

In order to work further with this code, you can recall it at the >>> prompt and edit it, but this becomes very unwieldy, very quickly. Recall that once the code you’re working with at the >>> prompt is more than a few lines long, you’re better off copying the code into an IDLE edit window. You can edit it much more easily there. So, let’s do that before continuing.
Be sure you’ve saved your code as “vsearch.py” after copying the function’s code from the shell.
Create a new, empty IDLE edit window, then copy the function’s code from the >>> prompt (being sure not to copy the >>> characters), and paste it into the edit window. Once you’re satisfied that the formatting and indentation are correct, save your file as vsearch.py before continuing.
Use IDLE’s Editor to Make Changes
Here’s what the vsearch.py file looks like in IDLE:

If you press F5 while in the edit window, two things happen: the IDLE shell is brought to the foreground, and the shell restarts. However, nothing appears on screen. Try this now to see what we mean: press F5.
The reason for nothing displaying is that you have yet to invoke the function. We’ll invoke it in a little bit, but for now let’s make one change to our function before moving on. It’s a small change, but an important one nonetheless.
Let’s add some documentation to the top of our function.
To add a multiline comment (a docstring) to any code, enclose your comment text in triple quotes.
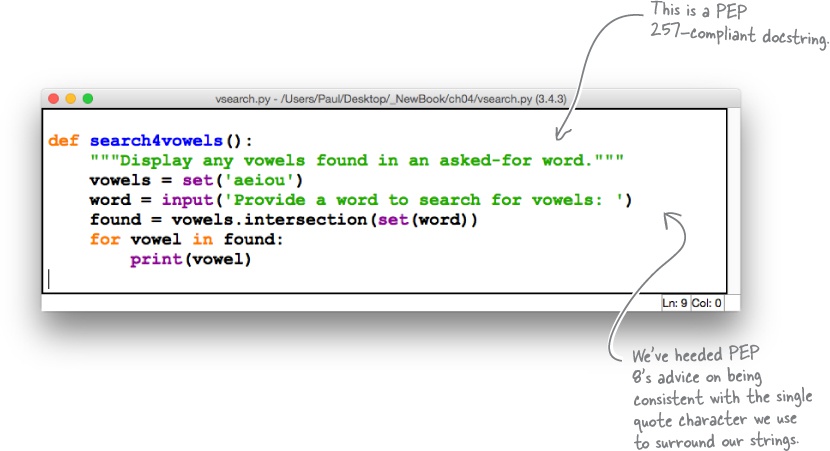
Here’s the vsearch.py file once more, with a docstring added to the top of the function. Go ahead and make this change to your code, too:

What’s the Deal with All Those Strings?
Take another look at the function as it currently stands. Pay particular attention to the three strings in this code, which are all colored green by IDLE:

Understanding the string quote characters
In Python, strings can be enclosed in a single quote character ('), a double quote character ("), or what’s known as triple quotes (""" or ''').
As mentioned earlier, triple quotes around strings are known as docstrings, because they are mainly used to document a function’s purpose (as shown above). Even though you can use """ or ''' to surround your docstrings, most Python programmers prefer to use """. Docstrings have an interesting characteristic in that they can span multiple lines (other programming languages use the name “heredoc” for the same concept).
Strings enclosed by a single quote character (') or a double quote character (") cannot span multiple lines: you must terminate the string with a matching quote character on the same line (as Python uses the end of the line as a statement terminator).
Which character you use to enclose your strings is up to you, although using the single quote character is very popular with the majority of Python programmers. That said, and above all else, your usage should be consistent.
Be consistent in your use of string quote characters. If possible, use single quotes.
The code shown at the top of this page (despite being only a handful of lines of code) is not consistent in its use of string quote characters. Note that the code runs fine (as the interpreter doesn’t care which style you use), but mixing and matching styles can make the code harder to read than it needs to be (which is a shame).
Follow Best Practice As Per the PEPs
When it comes to formatting your code (not just strings), the Python programming community has spent a long time establishing and documenting best practice. This best practice is known as PEP 8. PEP is shorthand for “Python Enhancement Protocol.”
There are a large number of PEP documents in existence, and they primarily detail proposed and implemented enhancements to the Python programming language, but can also document advice (on what to do and what not to do), as well as describe various Python processes. The details of the PEP documents can be very technical and (often) esoteric. Thus, the vast majority of Python programmers are aware of their existence but rarely interact with PEPs in detail. This is true of most PEPs except for PEP 8.
Find the list of PEPs here: https://www.python.org/dev/peps/.
PEP 8 is the style guide for Python code. It is recommended reading for all Python programmers, and it is the document that suggests the “be consistent” advice for string quotes described on the last page. Take the time to read PEP 8 at least once. Another document, PEP 257, offers conventions on how to format docstrings, and it’s worth reading, too.
Here is the search4vowels function once more in its PEP 8– and PEP 257– compliant form. The changes aren’t extensive, but standardizing on single quote characters around our strings (but not around our docstrings) does look a bit better:
Of course, you don’t have to write code that conforms exactly to PEP 8. For example, our function name, search4vowels, does not conform to the guidelines, which suggests that words in a function’s name should be separated by an underscore: a more compliant name is search_for_vowels. Note that PEP 8 is a set of guidelines, not rules. You don’t have to comply, only consider, and we like the name search4vowels.
That said, the vast majority of Python programmers will thank you for writing code that conforms to PEP 8, as it is often easier to read than code that doesn’t.
Let’s now return to enhancing the search4vowels function to accept arguments.
Functions Can Accept Arguments
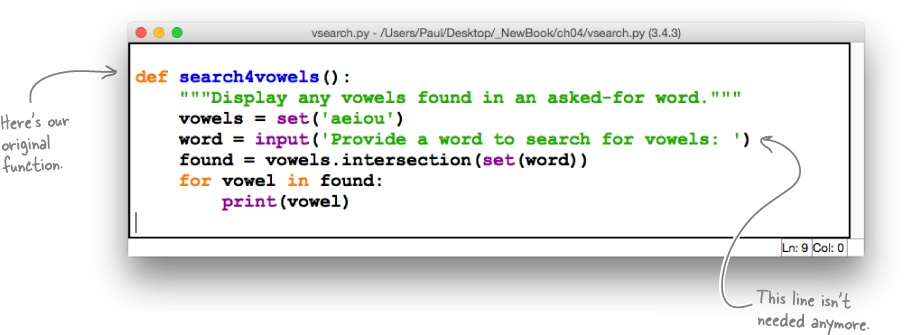
Rather than having the function prompt the user for a word to search, let’s change the search4vowels function so we can pass it the word as input to an argument.
Remember: “suite” is Python-speak for “block.”
Adding an argument is straightforward: you simply insert the argument’s name between the parentheses on the def line. This argument name then becomes a variable in the function’s suite. This is an easy edit.
Let’s also remove the line of code that prompts the user to supply a word to search, which is another easy edit.
Let’s remind ourselves of the current state of our code:
Applying the two suggested edits (from above) to our function results in the IDLE edit window looking like this (note: we’ve updated our docstring, too, which is always a good idea):

Be sure to save your file after each code change, before pressing F5 to take the new version of your function for a spin.


Functions Return a Result
As well as using a function to abstract some code and give it a name, programmers typically want functions to return some calculated value, which the code that called the function can then work with. To support returning a value (or values) from a function, Python provides the return statement.
When the interpreter encounters a return statement in your function’s suite, two things happen: the function terminates at the return statement, and any value provided to the return statement is passed back to your calling code. This behavior mimics how return works in the majority of other programming languages.
Let’s start with a straightforward example of returning a single value from our search4vowels function. Specifically, let’s return either True or False depending on whether the word supplied as an argument contains any vowels.
This is a bit of a departure from our function’s existing functionality, but bear with us, as we are going to build up to something more complex (and useful) in a bit. Starting with a simple example ensures we have the basics in place first, before moving on.

The truth is...
Python comes with a built-in function called bool that, when provided with any value, tells you whether the value evaluates to True or False.
Not only does bool work with any value, it works with any Python object. The effect of this is that Python’s notion of truth extends far beyond the 1 for True and the 0 for False that other programming languages employ.
Let’s pause and take a brief look at True and False before getting back to our discussion of return.

Every object in Python has a truth value associated with it, in that the object evaluates to either True or False.
Something is False if it evaluates to 0, the value None, an empty string, or an empty built-in data structure. This means all of these examples are False:

Every other object in Python evaluates to True. Here are some examples of objects that are True:

We can pass any object to the bool function and determine whether it is True or False.
Critically, any nonempty data structure evaluates to True.
Returning One Value
Take another look at our function’s code, which currently accepts any value as an argument, searches the supplied value for vowels, and then displays the found vowels on screen:

Changing this function to return either True or False, based on whether any vowels were found, is straightforward. Simply replace the last two lines of code (the for loop) with this line of code:

If nothing is found, the function returns False; otherwise, it returns True. With this change made, you can now test this new version of your function at the Python Shell and see what happens:

If you continue to see the previous version’s behavior, ensure you’ve saved the new version of your function, as well as pressed F5 from the edit window.
Geek Bits
Don’t be tempted to put parentheses around the object that return passes back to the calling code. You don’t need to. The return statement is not a function call, so the use of parentheses isn’t a syntactical requirement. You can use them (if you really want to), but most Python programmers don’t.
Returning More Than One Value
Functions are designed to return a single value, but it is sometimes necessary to return more than one value. The only way to do this is to package the multiple values in a single data structure, then return that. Thus, you’re still returning one thing, even though it potentially contains many individual pieces of data.
Here’s our current function, which returns a boolean value (i.e., one thing):

It’s a trivial edit to have the function return multiple values (in one set) as opposed to a boolean. All we need to do is drop the call to bool:

We can further reduce the last two lines of code in the above version of our function to one line by removing the unnecessary use of the found variable. Rather than assigning the results of the intersection to the found variable and returning that, just return the intersection:

Our function now returns a set of vowels found in a word, which is exactly what we set out to do.
However, when we tested it, one of our results has us scratching our head...
Let’s take this latest version of the search4vowels function for a spin and see how it behaves. With the latest code loaded into an IDLE edit window, press F5 to import the function into the Python Shell, and then invoke the function a few times:

What’s the deal with “set()”?
Each example in the above Test Drive works fine, in that the function takes a single string value as an argument, then returns the set of vowels found. The one result, the set, contains many values. However, the last response looks a little weird, doesn’t it? Let’s have a closer look:

You may have expected the function to return {} to represent an empty set, but that’s a common misunderstanding, as {} represents an empty dictionary, not an empty set.
An empty set is represented as set() by the interpreter.
This may well look a little weird, but it’s just the way things work in Python. Let’s take a moment to recall the four built-in data structures, with a eye to seeing how each empty data structure is represented by the interpreter.
Recalling the Built-in Data Structures
Let’s remind ourselves of the four built-in data structures available to us. We’ll take each data structure in turn, working through list, dictionary, set, and finally tuple.
Working at the shell, let’s create an empty data structure using the data structure built-in functions (BIFs for short), then assign a small amount of data to each. We’ll then display the contents of each data structure after each assignment:
BIF is short-hand for “built-in function.”

Note
Even though sets are enclosed in curly braces, so too are dictionaries. An empty dictionary is already using the double curly braces, so an empty set has to be represented as “set()”.
Before moving on, take a moment to review how the interpreter represents each of the empty data structures as shown on this page.
Use Annotations to Improve Your Docs
Our review of the four data structures confirms that the search4vowels function returns a set. But, other than calling the function and checking the return type, how can users of our function know this ahead of time? How do they know what to expect?
A solution is to add this information to the docstring. This assumes that you very clearly indicate in your docstring what the arguments and return value are going to be and that this information is easy to find. Getting programmers to agree on a standard for documenting functions is problematic (PEP 257 only suggests the format of docstrings), so Python 3 now supports a notation called annotations (also known as type hints). When used, annotations document—in a standard way—the return type, as well as the types of any arguments. Keep these points in mind:
Function annotations are optional
It’s OK not to use them. In fact, a lot of existing Python code doesn’t (as they were only made available to programmers in the most recent versions of Python 3).
Function annotations are informational
They provide details about your function, but they do not imply any other behavior (such as type checking).
Let’s annotate the search4vowels function’s arguments. The first annotation states that the function expects a string as the type of the word argument (:str), while the second annotation states that the function returns a set to its caller (-> set):

Annotation syntax is straightforward. Each function argument has a colon appended to it, together with the type that is expected. In our example, :str specifies that the function expects a string. The return type is provided after the argument list, and is indicated by an arrow symbol, which is itself followed by the return type, then the colon. Here -> set: indicates that the function is going to return a set.
For more details on annotations, see PEP 3107 at https://www.python.org/dev/peps/pep-3107/.
So far, so good.
We’ve now annotated our function in a standard way. Because of this, programmers using our function now know what’s expected of them, as well as what to expect from the function. However, the interpreter won’t check that the function is always called with a string, nor will it check that the function always returns a set. Which begs a rather obvious question...
Why Use Function Annotations?
If the Python interpreter isn’t going to use your annotations to check the types of your function’s arguments and its return type, why bother with annotations at all?
The goal of annotations is not to make life easier for the interpreter; it’s to make life easier for the user of your function. Annotations are a documentation standard, not a type enforcement mechanism.
In fact, the interpreter does not care what type your arguments are, nor does it care what type of data your function returns. The interpreter calls your function with whatever arguments are provided to it (no matter their type), executes your function’s code, and then returns to the caller whatever value it is given by the return statement. The type of the data being passed back and forth is not considered by the interpreter.
What annotations do for programmers using your function is rid them of the need to read your function’s code to learn what types are expected by, and returned from, your function. This is what they’ll have to do if annotations aren’t used. Even the most beautifully written docstring will still have to be read if it doesn’t include annotations.
Use annotations to help document your functions, and use the “help” BIF to view them.
Which leads to another question: how do we view the annotations without reading the function’s code? From IDLE’s editor, press F5, then use the help BIF at the >>> prompt.

Functions: What We Know Already
Let’s pause for a moment and review what we know (so far) about Python functions.

Functions are named chunks of code.
The
defkeyword is used to name a function, with the function’s code indented under (and relative to) thedefkeyword.Python’s triple-quoted strings can be used to add multiline comments to a function. When they are used in this way, they are known as docstrings.
Functions can accept any number of named arguments, including none.
The
returnstatement lets your functions return any number of values (including none).Function annotations can be used to document the type of your function’s arguments, as well as its return type.
Let’s take a moment to once more review the code for the search4vowels function. Now that it accepts an argument and returns a set, it is more useful than the very first version of the function from the start of this chapter, as we can now use it in many more places:

This function would be even more useful if, in addition to accepting an argument for the word to search, it also accepted a second argument detailing what to search for. This would allow us to look for any set of letters, not just the five vowels.
Additionally, the use of the name word as an argument name is OK, but not great, as this function clearly accepts any string as an argument, as opposed to a single word. A better variable name might be phrase, as it more closely matches what it is we expect to receive from the users of our function.
Let’s change our function now to reflect this last suggestion.
Making a Generically Useful Function
Here’s a version of the search4vowels function (as it appears in IDLE) after it has been changed to reflect the second of the two suggestions from the bottom of the last page. Namely, we’ve changed the name of the word variable to the more appropriate phrase:

The other suggestion from the bottom of the last page was to allow users to specify the set of letters to search for, as opposed to always using the five vowels. To do this we can add a second argument to the function that specifies the letters to search phrase for. This is an easy change to make. However, once we make it, the function (as it stands) will be incorrectly named, as we’ll no longer be searching for vowels, we’ll be searching for any set of letters. Rather than change the current function, let’s create a second one that is based on the first. Here’s what we propose to do:
Give the new function a more generic name
Rather than continuing to adjust
search4vowels, let’s create a new function calledsearch4letters, which is a name that better reflects the new function’s purpose.Add a second argument
Adding a second argument allows us to specify the set of letters to search the string for. Let’s call the second argument
letters. And let’s not forget to annotateletters, too.Remove the
vowelsvariableThe use of the name
vowelsin the function’s suite no longer makes any sense, as we are now looking for a user-specified set of letters.Update the docstring
There’s no point copying, then changing, the code if we don’t also adjust the docstring. Our documentation needs be updated to reflect what the new function does.
We are going to work through these four tasks together. As each task is discussed, be sure to edit your vsearch.py file to reflect the presented changes.
Creating Another Function, 1 of 3
If you haven’t done so already, open the vsearch.py file in an IDLE edit window.
Step 1 involves creating a new function, which we’ll call search4letters. Be aware that PEP 8 suggests that all top-level functions are surrounded by two blank lines. All of this book’s downloads conform to this guideline, but the code we show on the printed page doesn’t (as space is at a premium here).
At the bottom of the file, type def followed by the name of your new function:

For Step 2 we’re completing the function’s def line by adding in the names of the two required arguments, phrase and letters. Remember to enclose the list of arguments within parentheses, and don’t forget to include the trailing colon (and the annotations):

With Steps 1 and 2 complete, we’re now ready to write the function’s code. This code is going to be similar to that in the search4vowels function, except that we plan to remove our reliance on the vowels variable.
Creating Another Function, 2 of 3
On to Step 3, which is to write the code for the function in such a way as to remove the need for the vowels variable. We could continue to use the variable, but give it a new name (as vowels no longer represents what the variable does), but a temporary variable is not needed here, for much the same reason as why we no longer needed the found variable earlier. Take a look at the new line of code in search4letters, which does the same job as the two lines in search4vowels:

If that single line of code in search4letters has you scratching your head, don’t despair. It looks more complex than it is. Let’s go through this line of code in detail to work out exactly what it does. It starts when the value of the letters argument is turned into a set:
This call to the set BIF creates a set object from the characters in the letters variable. We don’t need to assign this set object to a variable, as we are more interested in using the set of letters right away than in storing the set in a variable for later use. To use the just-created set object, append a dot, then specify the method you want to invoke, as even objects that aren’t assigned to variables have methods. As we know from using sets in the last chapter, the intersection method takes the set of characters contained in its argument (phrase) and intersects them with an existing set object (letters):

And, finally, the result of the intersection is returned to the calling code, thanks to the return statement:

Creating Another Function, 3 of 3
All that remains is Step 4, where we add a docstring to our newly created function. To do this, add a triple-quoted string right after your new function’s def line. Here’s what we used (as comments go it’s terse, but effective):

And with that, our four steps are complete and search4letters is ready to be tested.

Functions can hide complexity, too.
It is correct to observe that we’ve just created a one-line function, which may not feel like much of a “savings.” However, note that our function contains a complex single line of code, which we are hiding from the users of this function, and this can be a very worthwhile practice (not to mention, way better than all that copying and pasting).
For instance, most programmers would be able to guess what search4letters does if they were to come across an invocation of it in a program. However, if they came across that complex single line of code in a program, they may well scratch their heads and wonder what it does. So, even though search4letters is “short,” it’s still a good idea to abstract this type of complexity inside a function.
Save the vsearch.py file once more, and then press F5 to try out the search4letters function:

The search4letters function is now more generic than search4vowels, in that it takes any set of letters and searches a given phrase for them, rather than just searching for the letters a, e, i, o, and u. This makes our new function much more useful than search4vowels. Let’s now imagine that we have a large, existing codebase that has used search4vowels extensively. A decision has been made to retire search4vowels and replace it with search4letters, as the “powers that be” don’t see the need for both functions, now that search4letters can do what search4vowels does. A global search-and-replace of your codebase for the name “search4vowels” with “search4letters” won’t work here, as you’ll need to add in that second argument value, which is always going to be aeiou when simulating the behavior of search4vowels with search4letters. So, for instance, this single-argument call:
search4vowels("Don't panic!")
now needs to be replaced with this dual-argument one (which is a much harder edit to automate):
search4letters("Don't panic!", 'aeiou')It would be nice if we could somehow specify a default value for search4letters’s second argument, then have the function use it if no alternative value is provided. If we could arrange to set the default to aeiou, we’d then be able to apply a global search-and-replace (which is an easy edit).
Specifying Default Values for Arguments
Any argument to a Python function can be assigned a default value, which can then be automatically used if the code calling the function fails to supply an alternate value. The mechanism for assigning a default value to an argument is straightforward: include the default value as an assignment in the function’s def line.
Here’s search4letters’s current def line:
def search4letters(phrase:str, letters:str) -> set:This version of our function’s def line (above) expects exactly two arguments, one for phrase and another for letters. However, if we assign a default value to letters, the function’s def line changes to look like this:

We can continue to use the search4letters function in the same way as before: providing both arguments with values as needed. However, if we forget to supply the second argument (letters), the interpreter will substitute in the value aeiou on our behalf.
If we were to make this change to our code in the vsearch.py file (and save it), we could then invoke our functions as follows:

Not only do these function calls produce the same output, they also demonstrate that the search4vowels function is no longer needed now that the letters argument to search4letters supports a default value (compare the first and last invocations above).
Now, if we are asked to retire the search4vowels function and replace all invocations of it within our codebase with search4letters, our exploitation of the default value mechanism for function arguments lets us do so with a simple global search-and-replace. And we don’t have to use search4letters to only search for vowels. That second argument allows us to specify any set of characters to look for. As a consequence, search4letters is now more generic, and more useful.
Positional Versus Keyword Assignment
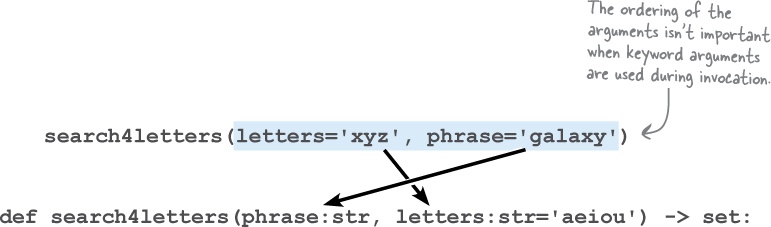
As we’ve just seen, the search4letters function can be invoked with either one or two arguments, the second argument being optional. If you provide only one argument, the letters argument defaults to a string of vowels. Take another look at the function’s def line:

As well as supporting default arguments, the Python interpreter also lets you invoke a function using keyword arguments. To understand what a keyword argument is, consider how we’ve invoked search4letters up until now, for example:

In the above invocation, the two strings are assigned to the phrase and letters arguments based on their position. That is, the first string is assigned to phrase, while the second is assigned to letters. This is known as positional assignment, as it’s based on the order of the arguments.
In Python, it is also possible to refer to arguments by their argument name, and when you do, positional ordering no longer applies. This is known as keyword assignment. To use keywords, assign each string in any order to its correct argument name when invoking the function, as shown here:
Both invocations of the search4letters function on this page produce the
same result: a set containing the letters x and y. Although it
may be hard to appreciate the benefit of using keyword arguments with our small
search4letters function, the flexibility this feature gives you becomes clear
when you invoke a function that accepts many arguments. We’ll see an example of one such
function (provided by the standard library) before the end of this chapter.
Updating What We Know About Functions
Let’s update what you know about functions now that you’ve spent some time exploring how function arguments work:
As well as supporting code reuse, functions can hide complexity. If you have a complex line of code you intend to use a lot, abstract it behind a simple function call.
Any function argument can be assigned a default value in the function’s
defline. When this happens, the specification of a value for that argument during a function’s invocation is optional.As well as assigning arguments by position, you can use keywords, too. When you do, any ordering is acceptable (as any possibility of ambiguity is removed by the use of keywords and position doesn’t matter anymore).

There’s more than one way to do it.
Now that you have some code that’s worth sharing, it is reasonable to ask how best to use and share these functions. As with most things, there’s more than one answer to that question. However, on the next pages, you’ll learn how best to package and distribute your functions to ensure it’s easy for you and others to benefit from your work.
Functions Beget Modules
Having gone to all the trouble of creating a reusable function (or two, as is the case with the functions currently in our vsearch.py file), it is reasonable to ask: what’s the best way to share functions?

It is possible to share any function by copying and pasting it throughout your codebase where needed, but as that’s such a wasteful and bad idea, we aren’t going to consider it for very much longer. Having multiple copies of the same function littering your codebase is a sure-fire recipe for disaster (should you ever decide to change how your function works). It’s much better to create a module that contains a single, canonical copy of any functions you want to share. Which raises another question: how are modules created in Python?
Share your functions in modules.
The answer couldn’t be simpler: a module is any file that contains functions. Happily, this means that vsearch.py is already a module. Here it is again, in all its module glory:

Creating modules couldn’t be easier, however...
Creating modules is a piece of cake: simply create a file of the functions you want to share.
Once your module exists, making its contents available to your programs is also straightforward: all you have to do is import the module using Python’s import statement.
This in itself is not complex. However, the interpreter makes the assumption that the module in question is in the search path, and ensuring this is the case can be tricky. Let’s explore the ins and outs of module importation over the next few pages.
How Are Modules Found?
Recall from this book’s first chapter how we imported and then used the randint function from the random module, which comes included as part of Python’s standard library. Here’s what we did at the shell:


What happens during module importation is described in great detail in the Python documentation, which you are free to go and explore if the nitty- gritty details float your boat. However, all you really need to know are the three main locations the interpreter searches when looking for a module. These are:
Your current working directory
This is the folder that the interpreter thinks you are currently working in.
Your interpreter’s site-packages locations
These are the directories that contain any third-party Python modules you may have installed (including any written by you).
The standard library locations
These are the directories that contains all the modules that make up the standard library.
Geek Bits
Depending on the operating system you’re running, the name given to a location that holds files may be either directory or folder. We’ll use “folder” in this book, except when we discuss the current working directory (which is a well-established term).
The order in which locations 2 and 3 are searched by the interpreter can vary depending on many factors. But don’t worry: it is not important that you know how this searching mechanism works. What is important to understand is that the interpreter always searches your current working directory first, which is what can cause trouble when you’re working with your own custom modules.
To demonstrate what can go wrong, let’s run though a small exercise that is designed to highlight the issue. Here’s what you need to do before we begin:
Create a folder called | |
Move your |
Running Python from the Command Line
We’re going to run the Python interpreter from your operating system’s command line (or terminal) to demonstrate what can go wrong here (even though the problem we are about to discuss also manifests in IDLE).

If you are running any version of Windows, open up a command prompt and follow along with this session. If you are not on Windows, we discuss your platform halfway down the next page (but read on for now anyway). You can invoke the Python interpreter (outside of IDLE) by typing py -3 at the Windows C:\> prompt. Note below how prior to invoking the interpreter, we use the cd command to make the mymodules folder our current working directory. Also, observe that we can exit the interpreter at any time by typing quit() at the >>> prompt:

This works as expected: we successfully import the vsearch module, then use each of its functions by prefixing the function name with the name of its module and a dot. Note how the behavior of the >>> prompt at the command line is identical to the behavior within IDLE (the only difference is the lack of syntax highlighting). It’s the same Python interpreter, after all.
Although this interaction with the interpreter was successful, it only worked because we started off in a folder that contained the vsearch.py file. Doing this makes this folder the current working directory. Based on how the interpreter searches for modules, we know that the current working directory is searched first, so it shouldn’t surprise us that this interaction worked and that the interpreter found our module.
But what happens if our module isn’t in the current working directory?
Not Found Modules Produce ImportErrors
Repeat the exercise from the last page, after moving out of the folder that contains our module. Let’s see what happens when we try to import our module now. Here is another interaction with the Windows command prompt:


The vsearch.py file is no longer in the interpreter’s current working directory, as we are now working in a folder other than mymodules. This means our module file can’t be found, which in turn means we can’t import it—hence the ImportError from the interpreter.
If we try the same exercise on a platform other than Windows, we get the same results (whether we’re on Linux, Unix, or Mac OS X). Here’s the above interaction with the interpreter from within the mymodules folder on OS X:

ImportErrors Occur No Matter the Platform
If you think running on a non-Windows platform will somehow fix this import issue we saw on that platform, think again: the same ImportError occurs on UNIX-like systems, once we change to another folder:


As was the case when we were working on Windows, the vsearch.py file is no longer in the interpreter’s current working directory, as we are now working in a folder other than mymodules. This means our module file can’t be found, which in turn means we can’t import it—hence the ImportError from the interpreter. This problem presents no matter which platform you’re running Python on.
Getting a Module into Site-packages
Recall what we had to say about site-packages a few pages back when we introduced them as the second of three locations searched by the interpreter’s import mechanism:
Your interpreter’s site-packages locations
These are the directories that contain any third-party Python modules which you may have installed (including any written by you).
As the provision and support of third-party modules is central to Python’s code reuse strategy, it should come as no surprise that the interpreter comes with the built-in ability to add modules to your Python setup.
Note that the set of modules included with the standard library is managed by the Python core developers, and this large collection of modules has been designed to be widely used, but not tampered with. Specifically, don’t add or remove your own modules to/from the standard library. However, adding or removing modules to your site-packages locations is positively encouraged, so much so that Python comes with some tools to make it straightforward.
Using “setuptools” to install into site-packages
As of release 3.4 of Python, the standard library includes a module called setuptools, which can be used to add any module into site-packages. Although the details of module distribution can—initially—appear complex, all we want to do here is install vsearch into site-packages, which is something setuptools is more than capable of doing in three steps:
Create a distribution description
This identifies the module we want
setuptoolsto install.Generate a distribution file
Using Python at the command line, we’ll create a shareable distribution file to contain our module’s code.
Install the distribution file
Again, using Python at the command line, install the distribution file (which includes our module) into site-packages.
Python 3.4 (or newer) makes using setuptools a breeze. If you aren’t running 3.4 (or newer), consider upgrading.
Step 1 requires us to create (at a minimum) two descriptive files for our module: setup.py and README.txt. Let’s see what’s involved.
Creating the Required Setup Files
If we follow the three steps shown at the bottom of the last page, we’ll end up creating a distribution package for our module. This package is a single compressed file that contains everything required to install our module into site-packages.
For Step 1, Create a distribution description, we need to create two
files that we’ll place in the same folder as our vsearch.py file.
We’ll do this no matter what platform we’re running on. The first file, which must be
called setup.py, describes our module in some detail.
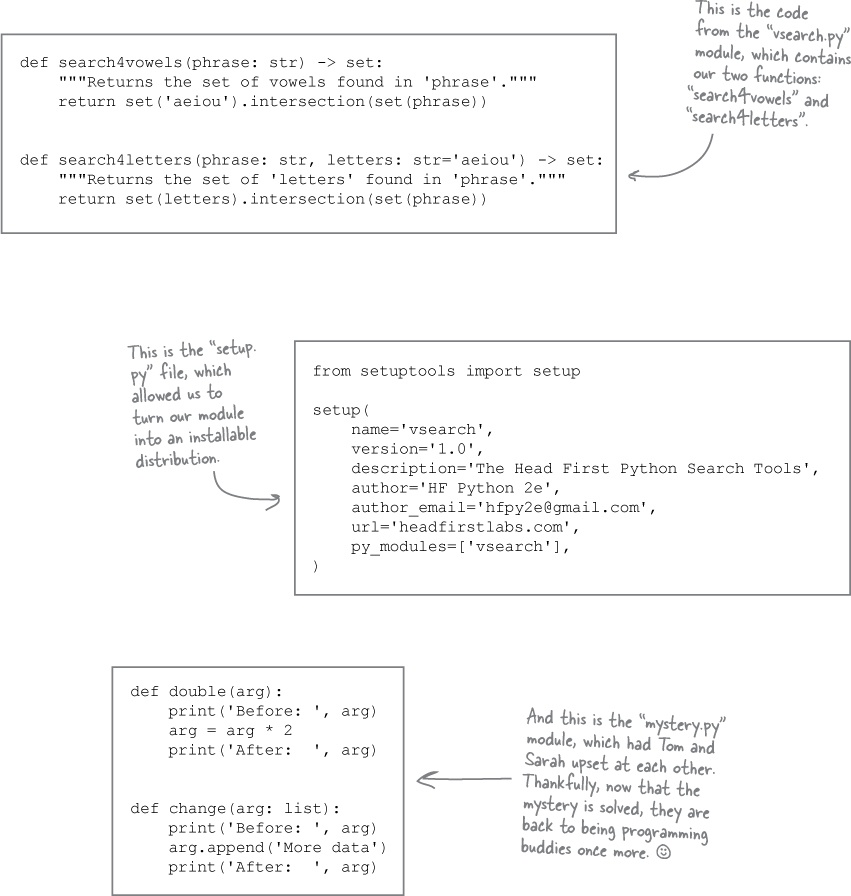
Find below the setup.py file we created to describe the module in the vsearch.py file. It contains two lines of Python code: the first line imports the setup function from the setuptools module, while the second invokes the setup function.
The setup function accepts a large number of arguments, many of which are optional. Note how, for readability purposes, our call to setup is spread over nine lines. We’re taking advantage of Python’s support for keyword arguments to clearly indicate which value is being assigned to which argument in this call. The most important arguments are highlighted; the first names the distribution, while the second lists the .py files to include when creating the distribution package:

In addition to setup.py, the setuptools mechanism requires the existence of one other file—a “readme” file—into which you can put a textual description of your package. Although having this file is required, its contents are optional, so (for now) you can create an empty file called README.txt in the same folder as the setup.py file. This is enough to satisfy the requirement for a second file in Step 1.
Creating the Distribution File
At this stage, you should have three files, which we have put in our mymodules folder: vsearch.py, setup.py, and README.txt.
We’re now ready to create a distribution package from these files. This is Step 2 from our earlier list: Generate a distribution file. We’ll do this at the command line. Although doing so is straightforward, this step requires that different commands be entered based on whether you are on Windows or on one of the UNIX-like operating systems (Linux, Unix, or Mac OS X).
Creating a distribution file on Windows
If you are running on Windows, open a command prompt in the folder that contains your three files, then enter this command:

The Python interpreter goes to work immediately after you issue this command. A large number of messages appear on screen (which we show here in an abridged form):

When the Windows command prompt reappears, your three files have been combined into a single distribution file. This is an installable file that contains the source code for your module and, in this case, is called vsearch-1.0.zip.
You’ll find your newly created ZIP file in a folder called dist, which has also been created by setuptools under the folder you are working in (which is mymodules in our case).
Distribution Files on UNIX-like OSes
If you are not working on Windows, you can create a distribution file in much the same way as on the previous page. With the three files (setup.py, README.txt, and vsearch.py) in a folder, issue this command at your operating system’s command line:

Like on Windows, this command produces a slew of messages on screen:

When your operating system’s command line reappears, your three files have been combined into a source distribution file (hence the sdist argument above). This is an installable file that contains the source code for your module and, in this case, is called vsearch-1.0.tar.gz.
You’ll find your newly created archive file in a folder called dist, which has also been created by setuptools under the folder you are working in (which is mymodules in our case).
With your source distribution file created (as a ZIP or as a compressed tar archive), you’re now ready to install your module into site-packages.
Installing Packages with “pip”
Now that your distribution file exists as a ZIP or a tarred archive (depending on your platform), it’s time for Step 3: Install the distribution file. As with many such things, Python comes with the tools to make this straightforward. In particular, Python 3.4 (and newer) includes a tool called pip, which is the Package Installer for Python.
Step 3 on Windows
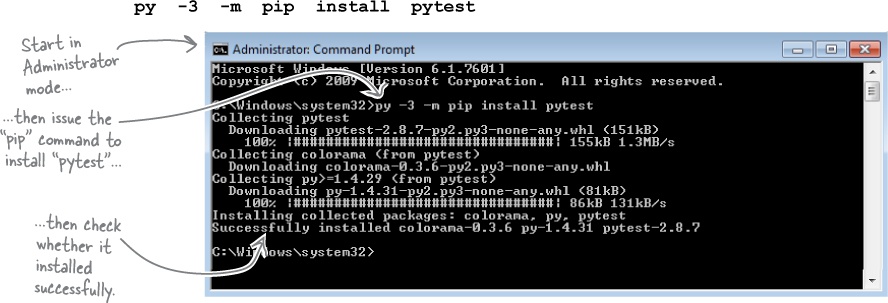
Locate your newly created ZIP file under the dist folder (recall that the file is called vsearch-1.0.zip). While in the Windows Explorer, hold down the Shift key, then right-click your mouse to bring up a context-sensitive menu. Select Open command window here from this menu. A new Windows command prompt opens. At this command prompt, type this line to complete Step 3:

If this command fails with a permissions error, you may need to restart the command prompt as the Windows administrator, then try again.
When the above command succeeds, the following messages appear on screen:


Modules: What We Know Already
Now that our vsearch module has been installed, we can use import vsearch in any of our programs, safe in the knowledge that the interpreter can now find the module’s functions when needed.
If we later decide to update any of the module’s code, we can repeat these three steps to install any update into site-packages. If you do produce a new version of your module, be sure to assign a new version number within the setup.py file.
Let’s take a moment to summarize what we now know about modules:
A module is one or more functions saved in a file.
You can share a module by ensuring it is always available with the interpreter’s current working directory (which is possible, but brittle) or within the interpreter’s site- packages locations (by far the better choice).
Following the
setuptoolsthree-step process ensures that your module is installed into site- packages, which allows you toimportthe module and use its functions no matter what your current working directory happens to be.
Giving your code away (a.k.a. sharing)
Now that you have a distribution file created, you can share this file with other Python programmers, allowing them to install your module using pip, too. You can share your file in one of two ways: informally, or formally.
To share your module informally, simply distribute it in whatever way you wish and to whomever you wish (perhaps using email, a USB stick, or via a download from your personal website). It’s up to you, really.
Any Python programmer can also use pip to install your module.
To share your module formally, you can upload your distribution file to Python’s centrally managed web-based software repository, called PyPI (pronounced “pie- pee-eye,” and short for the Python Package Index). This site exists to allow all manner of Python programmers to share all manner of third-party Python modules. To learn more about what’s on offer, visit the PyPI site at: https://pypi.python.org/pypi. To learn more about the process of uploading and sharing your distribution files through PyPI, read the online guide maintained by the Python Packaging Authority, which you’ll find here: https://www.pypa.io. (There’s not much to it, but the details are beyond the scope of this book.)
We are nearly done with our introduction to functions and modules. There’s just a small mystery that needs our attention (for not more than five minutes). Flip the page when you’re ready.
The case of the misbehaving function arguments
Tom and Sarah have just worked through this chapter, and are now arguing over the behavior of function arguments.

Tom is convinced that when arguments are passed into a function, the data is passed by value, and he’s written a small function called double to help make his case. Tom’s double function works with any type of data provided to it.
Here’s Tom’s code:
def double(arg):
print('Before: ', arg)
arg = arg * 2
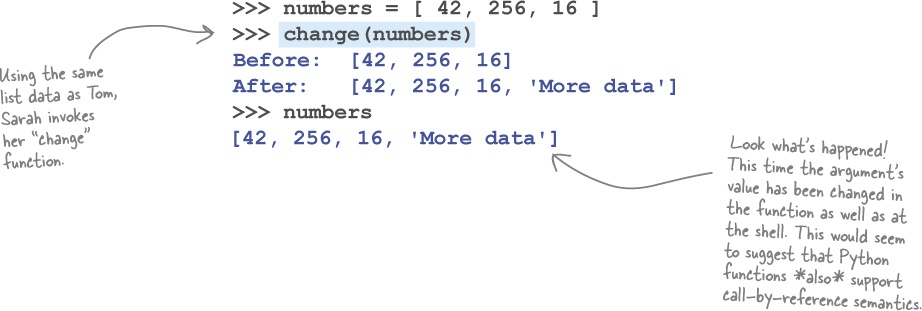
print('After: ', arg)Sarah, on the other hand, is convinced that when arguments are passed into a function, the data is passed by reference. Sarah has also written a small function, called change, which works with lists and helps to prove her point.
Here’s a copy of Sarah’s code:
def change(arg):
    print('Before: ', arg)
    arg.append('More data')
    print('After: ', arg)
We’d rather nobody was arguing about this type of thing, as—until now— Tom and Sarah have been the best of programming buddies. To help resolve this, let’s experiment at the >>> prompt in an attempt to see who is right: “by value” Tom, or “by reference” Sarah. They can’t both be right, can they? It’s certainly a bit of a mystery that needs solving, which leads to this often- asked question:
Do function arguments support by-value or by-reference call semantics in Python?
Geek Bits
In case you need a quick refresher, note that by-value argument passing refers to the practice of using the value of a variable in place of a function’s argument. If the value changes in the function’s suite, it has no effect on the value of the variable in the code that called the function. Think of the argument as a copy of the original variable’s value. By-reference argument passing (sometimes referred to as by-address argument passing) maintains a link to the variable in the code that called the function. If the variable in the function’s suite is changed, the value in the code that called the function changes, too. Think of the argument as an alias to the original variable.
Demonstrating Call-by-Value Semantics
To work out what Tom and Sarah are arguing about, let’s put their functions into their very own module, which we’ll call mystery.py. Here’s the module in an IDLE edit window:

As soon as Tom sees this module on screen, he sits down, takes control of the keyboard, presses F5, and then types the following into IDLE’s >>> prompt. Once done, Tom leans back in his chair, crosses his arms, and says: “See? I told you it’s call-by-value.” Take a look at Tom’s shell interactions with his function:

Demonstrating Call-by-Reference Semantics
Undeterred by Tom’s apparent slam-dunk, Sarah sits down and takes control of the keyboard in preparation for interacting with the shell. Here’s the code in the IDLE edit window once more, with Sarah’s change function ready for action:

Sarah types a few lines of code into the >>> prompt, then leans back in her chair, crosses her arms, and says to Tom: “Well, if Python only supports call- by-value, how do you explain this behavior?” Tom is speechless.
Take a look at Sarah’s interaction with the shell:
This is strange behavior.
Tom’s function clearly shows call-by-value argument semantics, whereas Sarah’s function demonstrates call-by-reference.
How can this be? What’s going on here? Does Python support both?
Solved: the case of the misbehaving function arguments
Do Python function arguments support by-value or by-reference call semantics?
Here’s the kicker: both Tom and Sarah are right. Depending on the situation, Python’s function argument semantics support both call-by-value and call-by-reference.
Recall once again that variables in Python aren’t variables as we are used to thinking about them in other programming languages; variables are object references. It is useful to think of the value stored in the variable as being the memory address of the value, not its actual value. It’s this memory address that’s passed into a function, not the actual value. This means that Python’s functions support what’s more correctly called by-object-reference call semantics.
Based on the type of the object referred to, the actual call semantics that apply at any point in time can differ. So, how come in Tom’s and Sarah’s functions the arguments appeared to conform to by-value and by-reference call semantics? First off, they didn’t—they only appeared to. What actually happens is that the interpreter looks at the type of the value referred to by the object reference (the memory address) and, if the variable refers to a mutable value, call-by-reference semantics apply. If the type of the data referred to is immutable, call-by- value semantics kick in. Consider now what this means for our data.
Lists, dictionaries, and sets (being mutable) are always passed into a function by reference— any changes made to the variable’s data structure within the function’s suite are reflected in the calling code. The data is mutable, after all.
Strings, integers, and tuples (being immutable) are always passed into a function by value— any changes to the variable within the function are private to the function and are not reflected in the calling code. As the data is immutable, it cannot change.
Which all makes sense until you consider this line of code:
arg = arg * 2
How come this line of code appeared to change a passed-in list within the function’s suite, but when the list was displayed in the shell after invocation, the list hadn’t changed (leading Tom to believe—incorrectly—that all argument passing conformed to call-by-value)? On the face of things, this looks like a bug in the interpreter, as we’ve just stated that changes to a mutable value are reflected back in the calling code, but they aren’t here. That is, Tom’s function didn’t change the numbers list in the calling code, even though lists are mutable. So, what gives?
To understand what has happened here, consider that the above line of code is an assignment statement. Here’s what happens during assignment: the code to the right of the = symbol is executed first, and then whatever value is created has its object reference assigned to the variable on the left of the = symbol. Executing the code arg * 2 creates a new value, which is assigned a new object reference, which is then assigned to the arg variable, overwriting the previous object reference stored in arg in the function’s suite. However, the “old” object reference still exists in the calling code and its value hasn’t changed, so the shell still sees the original list, not the new doubled list created in Tom’s code. Contrast this behavior to Sarah’s code, which calls the append method on an existing list. As there’s no assignment here, there’s no overwriting of object references, so Sarah’s code changes the list in the shell, too, as both the list referred to in the functions’ suite and the list referred to in the calling code have the same object reference.
With our mystery solved, we’re nearly ready for Chapter 5. There’s just one outstanding issue.
Can I Test for PEP 8 Compliance?

But not with Python alone, as the Python interpreter does not provide any way to check code for PEP 8 compliance. However, there are a number of third-party tools that do.
Before jumping into Chapter 5, let’s take a little detour and look at one tool that can help you stay on the right side of PEP 8 compliance.
Getting Ready to Check PEP 8 Compliance
Let’s detour for just a moment to check our code for PEP 8 compliance.

The Python programming community at large has spent a great deal of time creating developer tools to make the lives of Python programmers a little bit better. One such tool is pytest, which is a testing framework that is primarily designed to make the testing of Python programs easier. No matter what type of tests you’re writing, pytest can help. And you can add plug-ins to pytest to extend its capabilities.
One such plug-in is pep8, which uses the pytest testing framework to check your code for violations of the PEP 8 guidelines.
Recalling our code
Let’s remind ourselves of our vsearch.py code once more, before feeding it to the pytest/pep8 combination to find out how PEP 8–compliant it is. Note that we’ll need to install both of these developer tools, as they do not come installed with Python (we’ll do that over the page).
Learn more about pytest from https://docs.pytest.org/en/latest/.
Once more, here is the code to the vsearch.py module, which is going to be
checked for compliance to the PEP 8 guidelines:

Installing pytest and the pep8 plug-in
Earlier in this chapter, you used the pip tool to install your vsearch.py module into the Python interpreter on your computer. The pip tool can also be used to install third-party code into your interpreter.
To do so, you need to operate at your operating system’s command prompt (and be connected to the Internet). You’ll use pip in the next chapter to install a third-party library. For now, though, let’s use pip to install the pytest testing framework and the pep8 plug-in.
Install the Testing Developer Tools
In the example screens that follow, we are showing the messages that appear when you are running on the Windows platform. On Windows, you invoke Python 3 using the py -3 command. If you are on Linux or Mac OS X, replace the Windows command with sudo python3. To install pytest using pip on Windows, issue this command from the command prompt while running as administrator (search for cmd.exe, then right-click on it, and choose Run as Administrator from the pop-up menu):
If you examine the messages produced by pip, you’ll notice that two of pytest’s dependencies were also installed (colorama and py). The same thing happens when you use pip to install the pep8 plug-in: it also installs a host of dependencies. Here’s the command to install the plug-in:

How PEP 8–Compliant Is Our Code?
With pytest and pep8 installed, you’re now ready to test your code for PEP 8 compliance. Regardless of the operating system you’re using, you’ll issue the same command (as only the installation instructions differ on each platform).
The pytest installation process has installed a new program on your computer called py.test. Let’s run this program now to check our vsearch.py code for PEP 8 compliance. Make sure you are in the same folder as the one that contains the vsearch.py file, then issue this command:
py.test --pep8 vsearch.pyHere’s the output produced when we did this on our Windows computer:

Whoops! It looks like we have failures, which means this code is not as compliant with the PEP 8 guidelines as it could be.
Take a moment to read the messages shown here (or on your screen, if you are following along). All of the “failures” appear to refer—in some way—to whitespace (for instance, spaces, tabs, newlines, and the like). Let’s take a look at each of them in a little more detail.
Understanding the Failure Messages
Together, pytest and the pep8 plug-in have highlighted five issues with our vsearch.py code.
The first issue has to do with the fact that we haven’t inserted a space after the : character when annotating our function’s arguments, and we’ve done this in three places. Look at the first message, noting pytest’s use of the caret character (^) to indicate exactly where the problem is:

If you look at the two issues at the bottom of pytest’s output, you’ll see that we’ve repeated this mistake in three locations: once on line 2, and twice on line 7. There’s an easy fix: add a single space character after the colon.
The next issue may not seem like a big deal, but is raised as a failure because the line of code in question (line 3) does break a PEP 8 guideline that says not to include extra spaces at the end of lines:

Dealing with this issue on line 3 is another easy fix: remove all trailing whitespace.
The last issue (at the start of line 7) is this:

There is a PEP 8 guideline that offers this advice for creating functions in a module: Surround top-level function and class definitions with two blank lines. In our code, the search4vowels and search4letters functions are both at the “top level” of the vsearch.py file, and are separated from each other by a single blank line. To be PEP 8–compliant, there should be two blank lines here.
BTW: Check out http://pep8.org/ for a beautifully rendered version of Python’s style guidelines.
Again, it’s an easy fix: insert an extra blank line between the two functions. Let’s apply these fixes now, then retest our amended code.
Confirming PEP 8 Compliance
With the amendments made to the Python code in vsearch.py, the file’s contents now look like this:

When this version of the code is run through pytest’s pep8 plug-in, the output confirms we no longer have any issues with PEP 8 compliance. Here’s what we saw on our computer (again, running on Windows):

Conformance to PEP 8 is a good thing
If you’re looking at all of this wondering what all the fuss is about (especially over a little bit of whitespace), think carefully about why you’d want to comply to PEP 8. The PEP 8 documentation states that readability counts, and that code is read much more often than it is written. If your code conforms to a standard coding style, it follows that reading it is easier, as it “looks like” everything else the programmer has seen. Consistency is a very good thing.
From this point forward (and as much as is practical), all of the code in this book will conform to the PEP 8 guidelines. You should try to ensure your code does too.
Note
This is the end of the pytest detour. See you in Chapter 5.
Get Head First Python, 2nd Edition now with the O’Reilly learning platform.
O’Reilly members experience books, live events, courses curated by job role, and more from O’Reilly and nearly 200 top publishers.

