Chapter 1. Beginning Git: Get Going with Git
You need version control. Every software project begins with an idea, implemented in source code. These files are the magic that powers our applications, so we must treat them with care. We want to be sure that we keep them safe, retain a history of changes, and attribute credit (or blame!) to the rightful authors. We also want to allow for seamless collaboration between multiple team members.
And we want all this in a tool that stays out of our way, springing into action only at the moment of our choosing.
Does such a magical tool even exist? If you’re reading this, you might have guessed the answer. Its name is Git! Developers and organizations around the world love Git. So what is it that makes Git so popular?
Why we need version control
You might have played video games that take more than one sitting to complete. As you progress through the game, you win and lose some battles, and you might acquire some weaponry or an army. Every so often you might try more than once to finish a particular challenge. Many games allow you to save your progress. So now, say you’ve just slain the fire dragon, and next on the agenda is fighting your way to the massive treasure trove.
You decide, just to be safe, to save your progress and then continue the adventure. This creates a “snapshot” of the game as it stands right now. The good news is that now, even if you meet an untimely demise when you run into the wretched acid-spitting lizards, you won’t have to go back to square one. Instead, you simply reload the snapshot you took earlier and try again. Fiery dragons begone!
Version control allows you to do the same with your work—it gives you a way to save your progress. You can do a little bit of work, save your progress, and continue working. This “snapshot” is a way to record a set of changes—so even if you’ve made changes to a bunch of files in your project, it’s all in one snapshot.
Which means if you make a mistake or perhaps are not happy with the current tack, you can just revert back to your previous snapshot. On the other hand, if you are happy, you just create another snapshot and keep chugging along.
And there’s more. A version control system like Git allows you to confidently collaborate with your fellow developers over the same set of files, without stepping on each others’ toes. We will get into details about this in later chapters, but for now it should be enough to know this.
You can think of Git as your memory bank, safety net, and collaboration platform all built into one!
Understanding version control, and Git in particular—understanding what it is capable of and the effect it has on how we work—can help make us really, and we mean really, productive.

Congratulations!
Your company has just been awarded the contract to build HawtDawg—the first-ever dating app for humans’ furriest best friend. However, it’s a dog-eat-dog world out there, and with the competition sniffing around, we don’t have much time to waste!
Cubicle Conversation
Marge: We should consider using a version control system.
Sangita: I have heard of version control systems, though I have never had a chance to use one. But we don’t exactly have a lot of time here.
Marge: Getting started with Git is super easy. You just create a Git repository and you are off to the races.
Sangita: I create a what now?
Marge: A Git repository is a folder that is managed by Git. Let me take a step back. You are going to need to house all the files for this project somewhere on your computer, right?
Sangita: I prefer to keep all relevant files pertaining to my project, including source, build, and documentation, in one folder. That way, they are easy to find.
Marge: Great! Once you create that folder, you use Git to initialize a repository inside the folder. It’s that simple.
Sangita: And what does that do?
Marge: Well, whenever you start a new project that you want to manage with Git, you run a Git command that readies the folder so that you can start to use other Git commands inside that folder. Think of it as turning the key in your car to start the engine. It’s the first step so you can now start to use your car.
Sangita: Hmm. OK...
Marge: It’s just one command, and now your folder is “Git enabled.” Just like kick-starting your engine—you can now put your project in gear.
Sangita: Ah! That makes sense.
Marge: Hit me up if you need something. I will be right here if you need me.
Got Git?

We’re not going to get much further if you haven’t installed Git yet. If you haven’t taken the time to install Git, now is the time. Head back to the section titled “You’re going to have to install Git” in the introduction to get started.
Even if you have Git installed, it will help to catch up with a new version of Git just to be sure that everything we discuss in this book works as expected.
Start your engines...
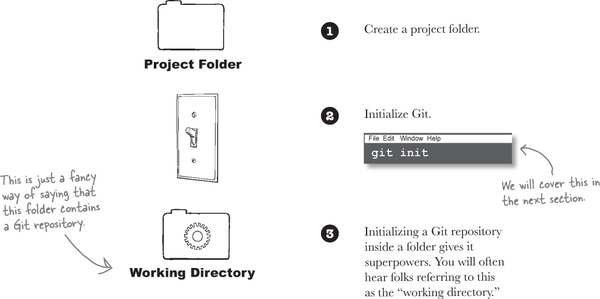
Consider any project you have worked on; it typically involves one or more files—these may be source code files, documentation files, build scripts, what have you. If we want to manage these files with Git, then the first step is to create a Git repository.
So what exactly is a Git repository? Recall that one reason to use a version control system is so we can save the snapshots of our work periodically. Of course, Git needs a place to store these snapshots. That place would be in the Git repository.
The next question is—where does this repository live? Typically we tend to keep all the files for a project in one folder. If we are going to use Git as our version control system for that project, we first create a repository within that folder so that Git has a place to store our snapshots. Creating a Git repository involves running the git init command inside the top folder of your project.
We will go deeper into the details soon, but for now, all you need to know is, without creating a Git repository, you really can’t do much with Git.
No matter how big your project is (in other words, no matter how many files or subdirectories your project has), the top (or root) folder of that project needs to have git init run to get things started with Git.
A quick tour of the command line: knowing where you are with pwd
One thing you are going to be using a lot while working the exercises in this book is the command line, so let’s spend a little time getting comfortable with it. Start by opening a terminal window like we did in the introduction, and navigate to a location on your hard drive. As a reminder, on the Mac you’ll find the Terminal.app under Applications > Utilities folder. On Windows navigate using the Start button, and you should see Git Bash under the Git menu option. You will be greeted with a prompt, and that is your cue that the terminal is ready to accept commands.
Note
If this sounds unfamiliar, be sure to go back to the introduction. We’ve listed some instructions for you under the “You’re going to have to install Git” section.

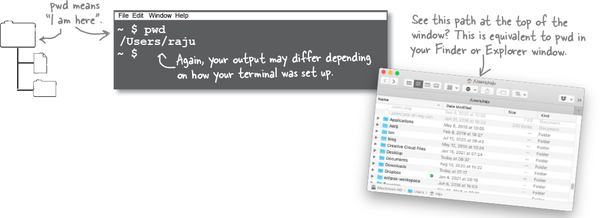
Let’s start with something easy. Type pwd and hit return; pwd stands for “print working directory” and it displays the path of the directory the terminal is currently running in. In other words, if you were to create a new file or a new directory then they would show up in this directory.
More on the command line: creating new directories with mkdir
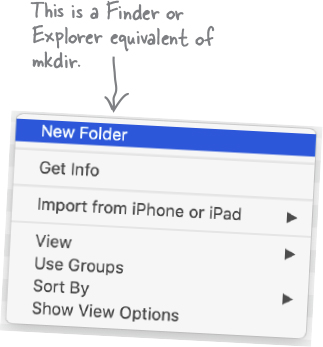
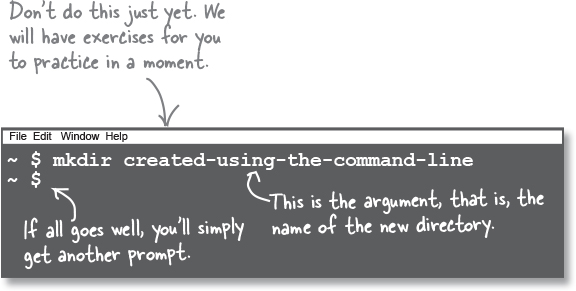
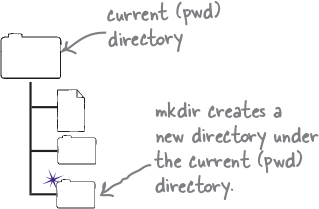
Knowing the location of the current directory in the terminal using pwd is super useful because almost everything you do is relative to the current directory, which includes creating new folders. Speaking of new folders, the command for creating new folders is mkdir, which stands for “make directory.”
Unlike pwd, which simply tells you the path of the current directory, mkdir takes an argument, which is the name of the directory you wish to create:
(Even) More on the command line: listing files with Is
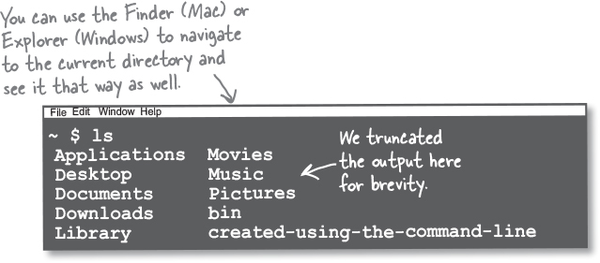
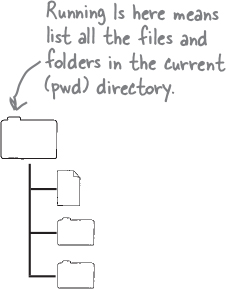
The output of mkdir isn’t very encouraging, to say the least. But as long as you did not get any errors, it did its job. To confirm if something did happen, you can list all the files in the current directory. The listing command is named ls (short for list).
ls by default only lists regular files and folders. Every so often (and we are going to need this soon enough) you want to see hidden files and folders as well. To do that, you can supply ls with a flag. Flags, unlike arguments, are prefixed with a hyphen (to differentiate them from arguments). To see “all” files and folders (including hidden ones) we can use the “A” (Yep! Uppercase “A”) flag, like so:

More on the command line (almost there): changing directories with cd
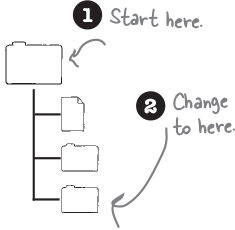
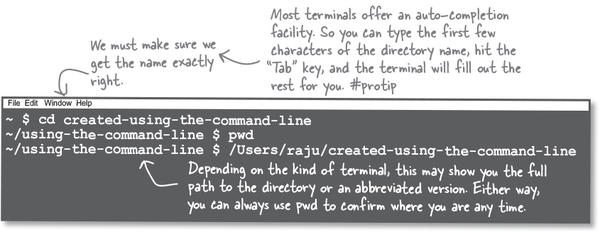
Next, moving around! We created a new directory, but how do we navigate to it? For that, we have the cd command, which stands for “change directory.” Once we change directories, we can use pwd to make sure that we indeed did move locations.
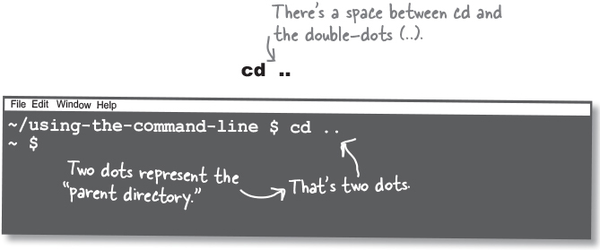
cd navigates to a subdirectory under the current directory. To hop back up to the parent directory, we can also use cd, like so:
Always keep track of your working directory (using pwd)—most operations on the command line are relative to this directory.
No argument there
Command-line functions like pwd and mkdir are the “commands” we are invoking. Some commands, like mkdir and cd, expect you to tell them what you want to create or where to go. The way we supply those is by using “arguments.”

You might be wondering why we chose to use hyphens instead of spaces. Turns out, using spaces in arguments can get rather tricky. You see, the command line uses this to separate the command from its arguments. So, it can be super confusing to the command line if your arguments also have spaces in them.
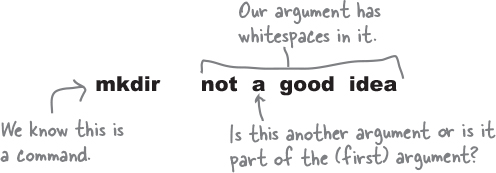
For the command line, whitespace acts as a separator. But if we put spaces in the arguments, it’s hard for the command line to discern whether you are passing in multiple arguments or one argument with multiple words.
So, anytime you have whitespace in an argument and you wish to treat it as one argument, you need to use quotes.

As you can see, it’s easy to trip up when you use whitespaces in arguments. Our advice? Try to avoid whitespace in filenames and paths.
Note
For example, it’s better to have C:\my-projects\ than C:\my projects\ as your path.

Great question. The command line does not really care if you use double quotes or single quotes. The thing to remember is that you need to be consistent. If you start the argument name with single quotes, end it with a single quote. Likewise for double quotes.
Typically, most folks using the command line tend to prefer double quotes and so do we; however, there is one situation where you will be forced to use double quotes, and that is if your argument has a single quote in it.
Notice that in this case we are using a single quote in the word sangita’s:

The opposite is also true if you need to use a double quote in your argument, in which case you’ll need to surround your argument with single quotes.
However, we alluded to this; it’s best if we avoid whitespace in our arguments, particularly in the names of directories and files. Anytime you need a space, simply use a hyphen or an underscore. This helps you avoid using quotes (of any kind) when supplying arguments.
Cleaning up
Now that you are done with this section, we suggest you clean up the folders you created like my-first-commandline-directory and any others. For this, just use the Explorer or the Finder window and delete them. While the command line offers you ways to do this, deleting files using the command line usually bypasses the trash can. In other words, it’s hard to recover if you accidentally delete the wrong folder.
In the future, when you get more familiar with the command line, perhaps you might use the appropriate command to delete files, but for now, let’s play it safe.
Creating your first repository
Let’s spend a little time to get acquainted with Git. You already have Git installed, so this will give us a chance to make sure everything is set up and get a sense of what it takes to create a Git repository. To do that, you will need a terminal window. That’s it!
Start by opening a terminal window like we did in the previous exercise. Just to keep things easier to manage, we suggest you create a headfirst-git-samples folder to house all the examples in this book. Within that, go ahead and create a new folder for our first exercise for Chapter 1, called ch01_01.

Now that we are in a brand-new directory, let’s create our first Git repository. To do this, we simply run git init inside our newly created folder.
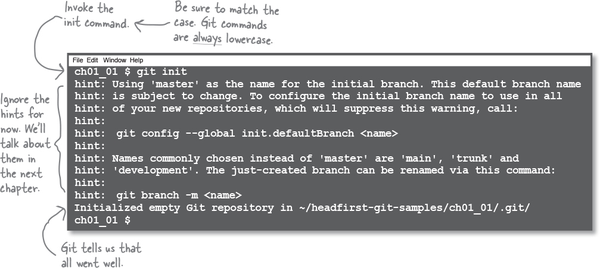
That was pretty painless, wasn’t it? And there you have it—your first Git repository.
Inside the init command

So what exactly did we just accomplish? The git init command might not look like much, but it sure packs a punch. Let’s peel back the covers to see what it really did.
To begin with, we started with a new, empty directory.

Using the terminal, we navigated to the folder location and invoked the magic words, git init, where init is short for initialize. Git realizes we are asking it to create a repository at this location, and it responds by creating a hidden folder called .git and stuffs it with some configuration files and a subfolder where it will store our snapshots when we ask it to.

One way to confirm this happened is by listing all the files using our terminal, like so.
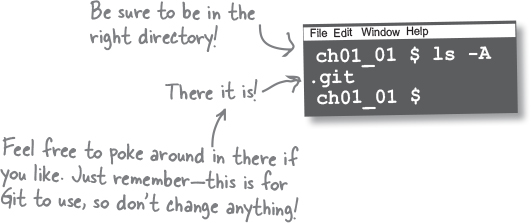
This hidden folder represents the Git repository. Its job is to store everything related to your project, including all commits, the project history, configuration files, what have you. It also stores any specific Git configuration and settings that you might have enabled for this particular project.
Code Magnets

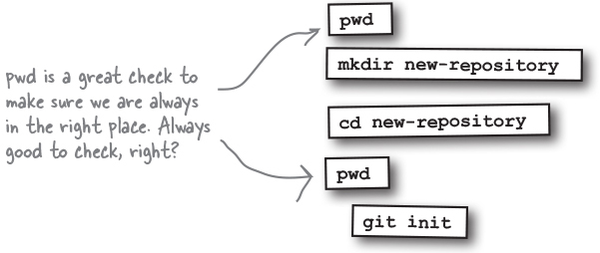
We have all the steps listed to create a new folder, change to it, and initialize to create a new Git repository. Being diligent developers, we often check to make sure we are in the correct directory. To help our colleagues we had the code nicely laid out on our fridge using fridge magnets, but they fell on the floor. Your job is to put them back together. Note that some magnets may get used more than once.

![]() Answers in “Code Magnets Solution”.
Answers in “Code Magnets Solution”.
Introduce yourself to Git
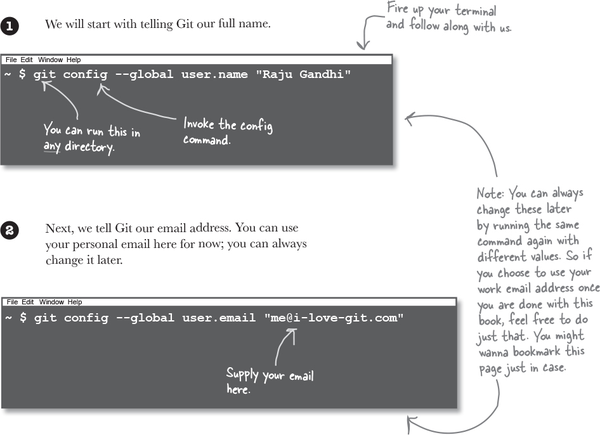
There is one more step before we get to work with Git and Git repositories. Git expects you to give it a few details about yourself. This way, when you do create a “snapshot,” Git knows who created it. And we are about to start talking about creating snapshots, so let’s knock this out right now. You only have to do this once, and this will apply to any and all projects that you work with on your machine.
We will start with our trusty old friend, the terminal, and follow along. Be sure to use your name and email instead of ours! (We know you love us, but we wouldn’t want to take credit for your work!) Start by opening a new terminal window. Don’t worry about changing directories—for this part of our setup it does not matter where you run this.
How you will use Git
Let’s get a sense of what a typical interaction with Git looks like. Remember how we spoke about video games allowing you to save your progress? Well, asking Git to “save your progress” involves “committing” your work to Git. Essentially, this means that Git stores a revision of your work. Once you do that, you can continue working away merrily till you feel it’s time to store another revision, and the cycle continues. Let’s see how this works.
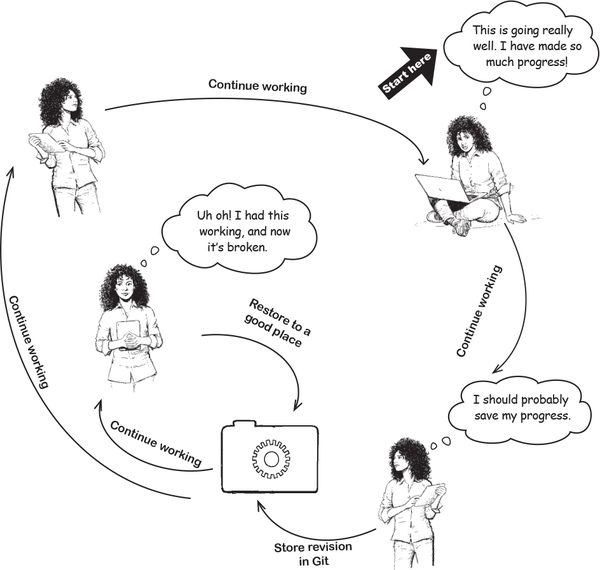
Putting Git to work
We are sure you raring to get started (we know we are!). So far, we have initialized a Git repository, told Git our name and email, and kinda sorta have a sense of how we usually work with Git. So how about we actually put Git to work. We will start small and just put Git through its paces—we will see how to “take a snapshot” in Git by creating a “commit.”
For the sake of this exercise, let’s pretend to start working on a new project. We usually start with a checklist so we can keep track of everything we have to do. As we progress with the project, we keep checking things off (gotta keep that dopamine flowing!), and as we learn more about the project, we keep adding to it. Naturally, this file is version controlled with the rest of the files in the project, for which we will use Git.
Let’s break down what we are going to do, step-by-step.
Step One:
Create a new project folder.
Note
These two steps should be pretty familiar to you.
Step Two:
Initialize a Git repository within that folder.
Note
These two steps should be pretty familiar to you.
Step Three:
Create our checklist with a few items to get us started.
Step Four:
Store a snapshot of our checklist in Git by committing the file.
Note
Now that’s what we have been waiting for!
Meanwhile, back at the HawtDog Dating Service...
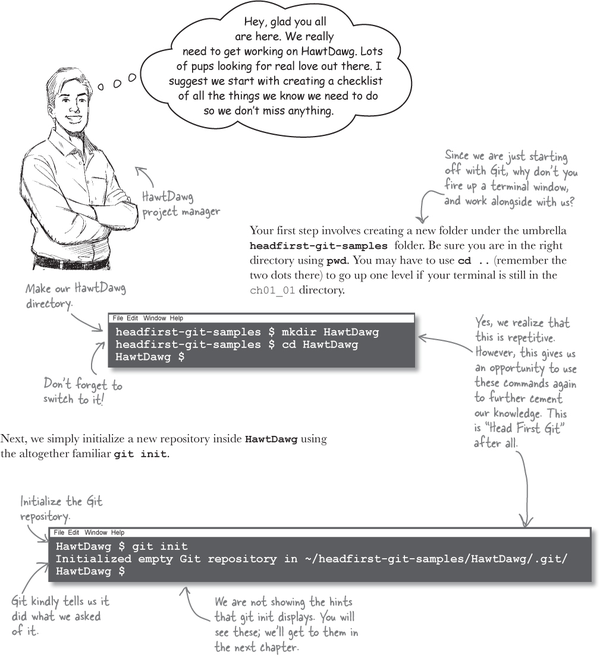
Working with the HawtDawg Git repository
Next, create a new document in your favorite text editor, and type in the following lines of text. If you followed the instructions in the introduction to install Visual Studio Code, then just like the terminal, you will find Visual Studio Code.app under the Applications folder. In Windows, just click on the Start menu and you should see Visual Studio Code listed under all the applications installed on your machine.
Note
To create a new file, simply click on the File menu item at the top and pick “New File.”

Save the file as Checklist.md in the HawtDawg directory.
Note
To save the file, select File from the top menu, select Save, and then navigate to where you created the HawtDawg directory.
Now we are ready to commit our work. This involves two Git commands, namely git add and git commit.
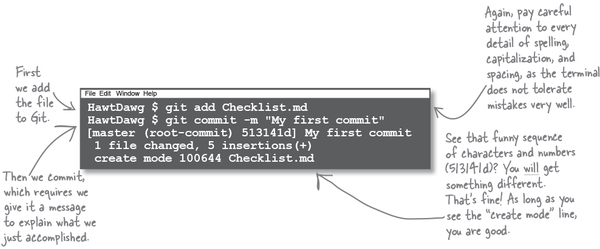
Notice that the git add command takes as its argument the name of the file you wish to add to Git. And the git commit command has a flag, -m, followed by the commit message. The -m stands for “message” and is a mechanism for you to provide a meaningful reminder as to why you made this change.
Note
You can also use the longhand version of -m, like so—git commit --message followed by the message. We like the shorter version though.
What exactly does it mean to commit?

We learned that committing to Git is a two-step process. You first add the files and then commit.
The first thing to know is that only the files that you add are committed. Let’s say you had two files, Checklist.md and README.md, but you only added Checklist.md. When you create a commit, Git will only store the changes made to Checklist.md.
Now, when we commit, Git uses a specialized algorithm to safely tuck away everything that we added to its memory. When we say we “committed” our changes to Git, what that translates into is that Git creates a commit object that it stores inside the .git folder. This commit object is “stamped” by a unique identifier. You might recall that we got 513141d when we made our commit in our last exercise (you certainly saw something different)—this is actually a much longer string containing numbers and letters that looks something like this:

This identifier is computed using a bunch of metadata, including your full name, the time as it was when you made the commit, the commit message you provided, and information derived from the changes you committed.
Let’s explore what goes in a commit some more.
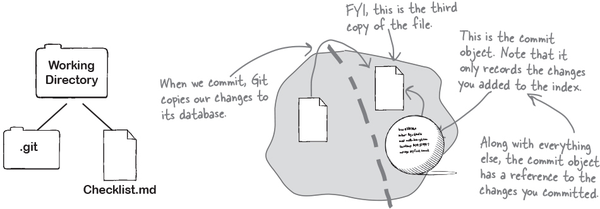
The commit object does not actually store your changes—well, not directly, anyway. Instead, Git stores your changes in a different location in the Git repository and simply records (in the commit) where your changes have been stored. Along with recording where it stored your changes, the commit records a bunch of other details:
A pointer to the location inside the .git folder where Git has stored your changes, called a tree.
This is another set of alphanumeric characters, the details of which are a topic for another book.
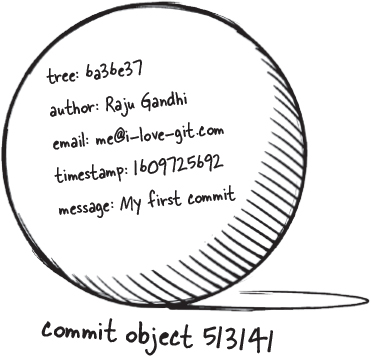
The “author” info—that is, your name and email address.
In an earlier exercise we provided Git with our full name and our email. This is also recorded in the Git so that you can claim full credit for the marvelous work you put in.
Note
This is why it’s important to introduce yourself to Git.
The time the commit was made, represented in seconds elapsed since January 1, 1970.
Git also records the time when you made the commit, along with the time zone your machine is located in.
The commit message you supplied when you invoked git commit -m.
Note
There is a little bit more than what we listed here, but we can leave that aside for now.
Commit objects are stored by Git in binary format, making them very hard for humans to read but super safe and efficient for Git.
Look before you leap

You just made your first commit. Making a commit involves two separate commands—git add followed by git commit. You are probably wondering why it takes two commands to make a commit in Git—why does Git make us jump through all these hoops so we can store a revision of our work in Git?
The answer lies in the design of the Git repository. Remember that the Git repository is housed in the .git folder that gets created when you run git init.
The Git repository itself is divided into two parts—the first part is called the “index,” and the second part is what we will refer to as the “object database.”
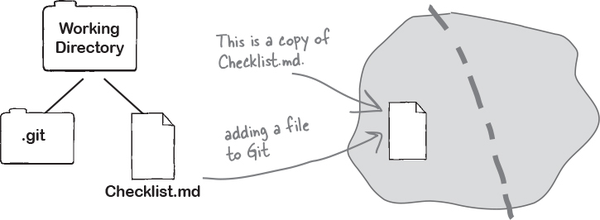
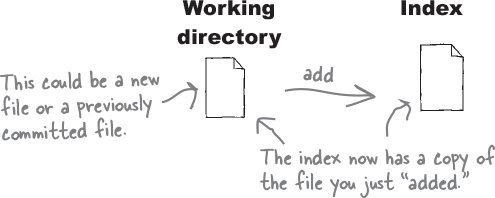
When we run git add <filename>, Git makes a copy of the file and puts it in the index. We can think of the index as the “staging area,” wherein we can put things till we are sure we want to commit to them.
Now when we run the git commit command, it takes the contents of the staging area and stores those in the object database, also known as Git’s memory bank. To put it another way, the index is a place to temporarily house changes. Typically, you make some changes, add them to the index, and then decide if you are ready to commit—if yes, then you make a commit. Otherwise, you can continue making changes, add more changes to the staging area, and then when you feel you are in a good place, commit.
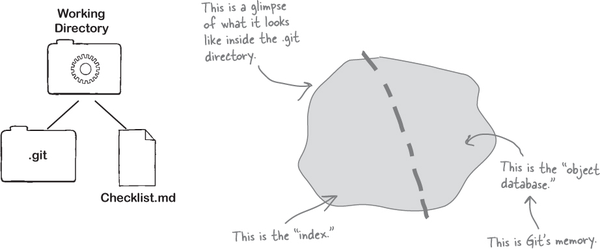
The three stages of Git
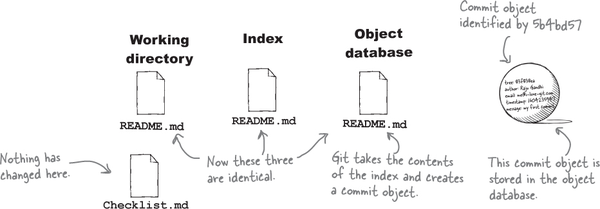
Let’s start at the top. We have a working directory with just one file.
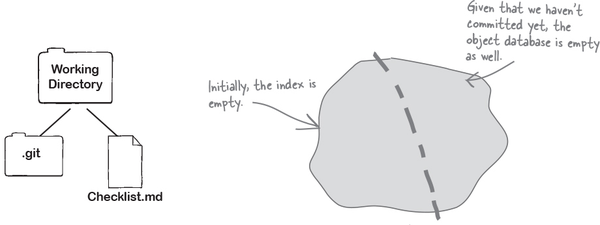
When we
git add Checklist.md, Git stores a copy of that file in the index.Note
Hold on to this thought—we will come back to it in the following pages.
Finally, when we commit, Git creates a commit object that records the state of the index in its memory.

Great question!
We mentioned earlier that the index can be thought of as a staging area. It gives you a way to collect everything you need for the next commit, because Git only creates a snapshot of the changes you’ve added to the index.
Consider a scenario where you are working on a new feature or fixing a bug. As you navigate the project you notice a typo in a documentation file and, being the good teammate that you are, you fix it. However, this fix is completely unrelated to your original task. So how do you separate the documentation fix from your original task?
Simple.
You finish the task you were working on, and you only add the files that were affected by that change to the index. And then you commit, giving it an appropriate message. Remember, Git only commits the files that were added to the index.
Next you git add the file in which you fixed the typo and make another commit, this time providing a message that describes your fix.
You see how this allows you to make a bunch of changes, some related and some unrelated, and yet choose which changes make up the next commit!
An analogy that might help would be one of cooking. You are having friends over, and you are feverishly preparing a bunch of delicious dishes. You may start by chopping up everything you know you will need. However, once you start putting things on the stove, you may choose to collect everything you need for that particular dish so they are right there when you need them. You leave everything else by the cutting board. Chefs refer to this as mise en place.
The index is your mise en place.

Git in the command line
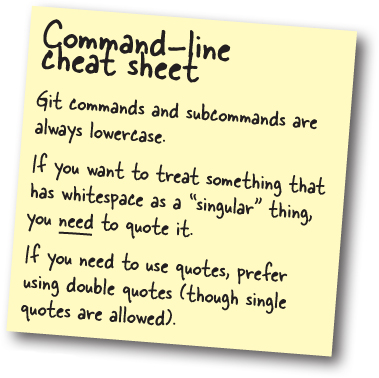
We covered some of the idiosyncrasies of the command line previously. This time around let’s make sure we understand how we use Git at the command line. As you have seen, Git uses the git command, usually followed by a “subcommand,” like add or commit, and finally followed by arguments to the subcommand.

Since we are using the command line, the same rules that we discussed previously apply. Anytime you have whitespace in an argument, and you wish to treat it as one argument, you need to use quotes. Consider a very different scenario where we named our file “This is our Checklist.md”. In this case, we will have to use quotes when invoking git add, like so:

Finally, git commit takes both a flag, -m, and a message. -m is a flag, and here, we should not put a space between the hyphen and m.
Note
Like many flags, -m is short for --message. You can use either, but we are lazy so we prefer the shorter version.

A peek behind the curtain
We are going to let you in on Git’s little secret. When you add (one or more files) to Git’s index, Git doesn’t touch any of the files in your working directory. Instead, it copies the contents of those files to the index. This is an important point because it is crucial to how Git tracks the content of our files.
Note
We alluded to this in the previous pages.
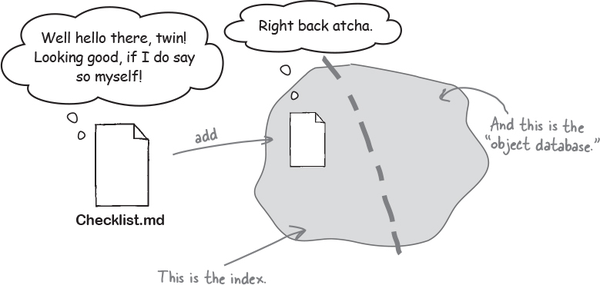
So what happens when we commit? Well, as we know, Git takes the contents of the index, tucks those safely into its memory bank, and represents that version with a commit object. This means that now Git has a third copy of your files contents in its object database!
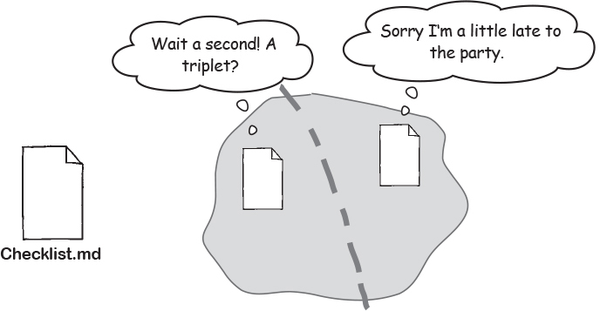
There can be up to three copies of any file in your working directory.
The multiple states of files in a Git repository
Here is what a typical interaction with Git looks like: you make some edits to one or more files, then add them to the index, and when you are ready, you commit them. Now, as you are going through this workflow, Git is attempting to track the state of your files so it knows which files are part of your working directory, which files have been added to the index, and which files have already been committed to its object store.
Throughout, keep in mind that Git is moving copies of your file from the working directory, to the index, to its object database.
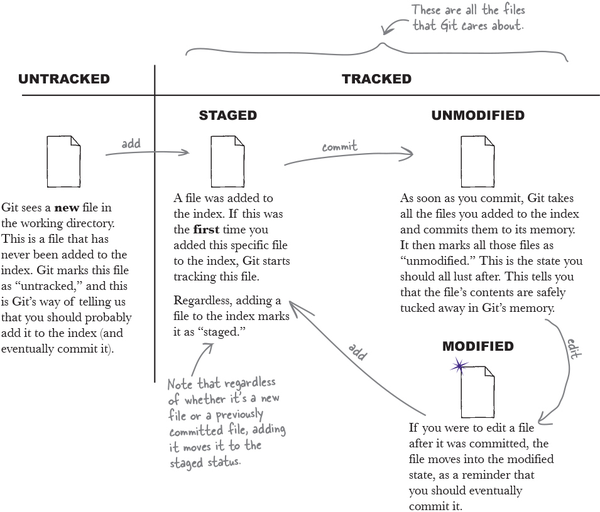
But there’s more. A file may move through all the various stages, but it could be in more than one state simultaneously!
A typical day in the life of a new file
When we add a new file to a Git repository, Git sees the file but also chooses not to do anything till we explicitly tell it to. A file that Git has never seen before (that is, a file that has never been added to the index) is marked as “untracked.” Adding the file to the index is our way of telling Git, “Hey! We’d really like you to keep an eye on this file for us.” Any file that Git is watching for us is referred to as a “tracked” file.
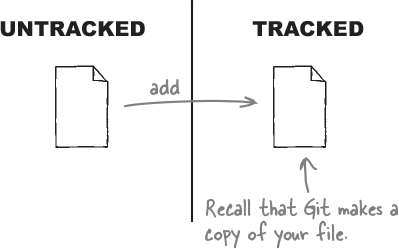
The object database is the “source of truth”
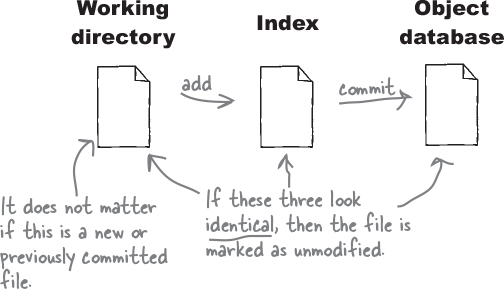
This time, consider adding a file to the index and then immediately making a commit. Git stores the contents of the index in its object database and then marks the file as “unmodified.”
Why unmodified, you ask? Well, Git compares the copy it has in its object database with the one in the index and sees they are the same. It also compares the copy in the index with the one in the working directory and sees that they are the same. So the file has not been modified (or is unmodified) since the last commit.
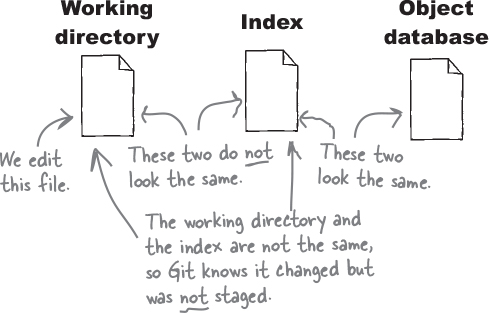
Of course, it follows that if we were to make a change to a file that we had previously committed, Git sees a difference between the file in the working directory and the index but no difference between the index and the object database. So Git marks the file as “modified,” but it also marks it as “not staged” because we haven’t added it to the index yet.
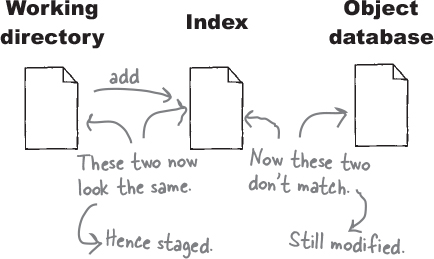
Next, if we were to add the modified file again to the index, Git sees that the index and the working directory are the same, so the file is marked “staged,” or in other words, it is both modified and staged.
And we complete the circle—if we commit, the contents of the index will be committed, and the file will be marked as “unmodified.”
BE Git

Recall that any file in your working directory is either untracked or tracked. Also, a tracked file can be either staged, unmodified, or modified.
In this exercise, assume you just created a new repository. Can you identify the state of the files for each of the following steps?
![]() Answers in “BE Git Solution”.
Answers in “BE Git Solution”.
You create a new file in the repository called Hello.txt.
| Untracked | Tracked | Staged | Unmodified | Modified |
|---|---|---|---|---|
You add Hello.txt to the index (using git add).
| Untracked | Tracked | Staged | Unmodified | Modified |
|---|---|---|---|---|
You commit all the changes that you staged (using git commit).
| Untracked | Tracked | Staged | Unmodified | Modified |
|---|---|---|---|---|
You edit Hello.txt with some new content.
| Untracked | Tracked | Staged | Unmodified | Modified |
|---|---|---|---|---|
The index is a “scratch pad”
Let’s revisit the role of the index. We know that as we edit files in our working directory, we can add them to the index, which marks the file as “staged.”

Of course, we can continue editing the file even after adding it to the index. Now, we have two versions of the file—one in the working directory and one in the index.
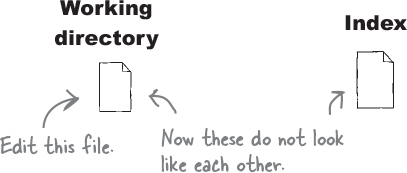
Now if you add the file again, Git overwrites the index with the latest changes reflected in that file. In other words, the index is a temporary scratch pad—one you can use to stuff edits into till you are sure you want to commit.
Note
These are important points. Take a moment for them to sink in before moving on.
There’s another subtle aspect to the index—there is no command to “empty” the index. Every time you add a file, Git copies the file to the index, and when you commit, Git copies your changes again. Which means, as you continue to add files to the index, you are either overriding a previous copy of a file (if it was already there), or you are adding new files to the index. So the index keeps growing! Now, this isn’t something you need to worry about, but once we talk about the diff command in Chapter 3, this is something to keep in mind.
Note
These are important points. Take a moment for them to sink in before moving on.
To give you a sense of how we tend to work, we usually add the files we wish to commit to the index when we feel we are ready. We then make sure that everything looks good, and if so, make a commit. On the other hand, if we spot something (like a typo, or if we missed a minor detail), we make our edits, add those files again to the index, and then commit the files. Wash, rinse, repeat.
Computer, status report!
As you continue to work with Git, it’s often useful to check the status of the files in your working directory. One of the most useful commands in your Git arsenal is the git status command. This command is particularly useful as your project grows in size, with multiple files.
Note
Remember that the working directory is the directory containing the hidden .git folder.
So let’s explore how to use the status command: you’ll create Yet Another Git Repository™, except this time you will create multiple files in your repository. This will give you a chance to see what git status reports and get an intuitive sense of how Git works.
As you have done before, you will create a brand-new folder inside the umbrella headfirst-git-samples folder called ch01_03, and initialize a Git repository inside that folder.
Note
Since our last exercise was the second exercise, this is number 3.

Despite not having done anything, you can still check the status of our repository. The command, like others that we have used, is a Git command, called status. Let’s use that.
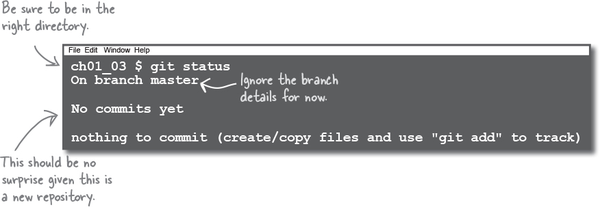
Your first ever usage of git status may seem like a little bit of a letdown, but it does give you a chance to get used to reading its output. Git nicely tells you that you have made no commits yet, and it gives us a useful hint on what you should do next.
Next, you will create the first of two files. Open a new document in your text editor, and type in the following lines of text.
Note
We’ve provided all the files you need in the chapter01 folder in the source code you downloaded for this book. Be sure to check there if you don’t feel like typing all this out.

Be sure to save the file as README.md in the ch01_03 directory.
Do the same thing to create another file called Checklist.md with the following text.

Whoa, easy tiger!

We have done quite a bit very quickly. Let’s recap what you have done so far. You created a new folder, and you initialized a brand new Git repository inside that folder. You then created two new files.
Now we will walk Git through its paces, and at every step, ask Git what it thinks is the status of the files. Ready?
You have set up everything to get started. Let’s see what git status has to report.
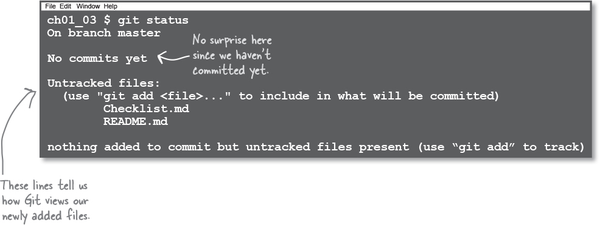
What we have:
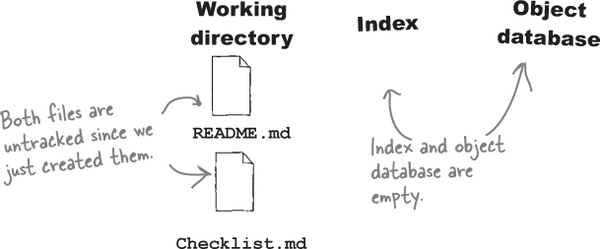
Recall that when you ask Git for the status of the repository, it tells you the state of all the files in your working directory. In this case, Git sees two new files that it has never seen before. So it marks them as “untracked”—in other words, Git has not been introduced to these files, so it is not watching these files just yet. The index is empty since we haven’t added either of the files to the index, and the object database has no commits—well, since we haven’t committed yet. Let’s change that!
We’ll start by introducing Git to one of our files. Go ahead and add README.md to Git, and then check the status again.
Note
Let Checklist.md be for now. We will come to it in a few.
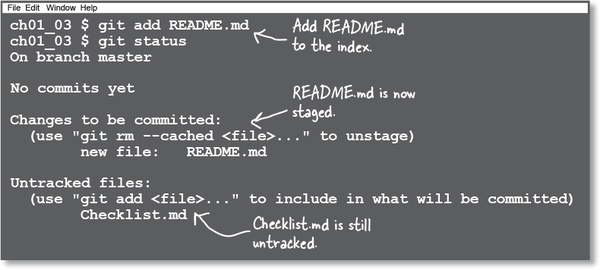
Adding the README.md file to Git’s index means now Git knows about this file. Two things changed—the README.md file is now being tracked by Git, and it is in the index, which means it’s also staged.
What we have:
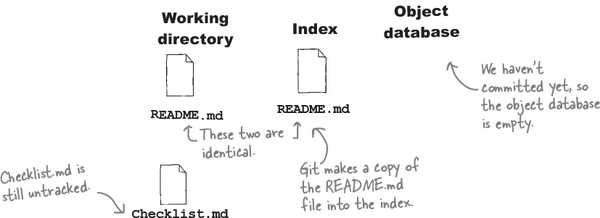
Git status is telling us that if make a commit right now, only the README.md will be committed. Which makes sense because only the changes that are staged get to participate in the next commit.
So let’s commit!
Git commits require that we pass in a message. Let’s keep it simple and use “my first commit”. Back to the terminal, you!
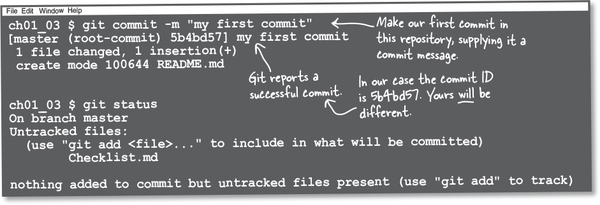
What we have:
You’ve made history!
In the last exercise you made two separate commits as you took both the README.md and Checklist.md files from being untracked, to being staged, and then finally committed to Git’s object database. At the end of it all, you repository now has two commits.
We know that Git commits record the changes you made and added to the index, along with some metadata—like information about the author (you) as well as the commit message. There is one final detail about commits that you ought to know about. For every commit that you make (other than the very first one in a repository), the commit also records the commit ID of the commit that came just before it.
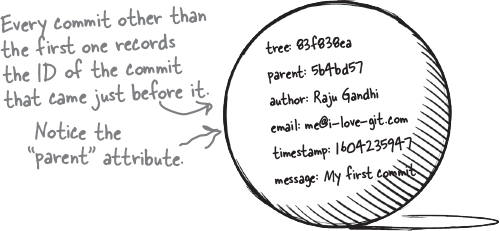
That is to say, the commits form a chain, much like the branch of a tree, or a string of Christmas lights. This means, given a commit ID, Git can trace its lineage by simply following the “parent” pointer. This is referred to as the commit history and is an integral piece to how Git works.
Note
In case you are wondering if this is foreshadowing what is to come, well, yes! How very astute of you!
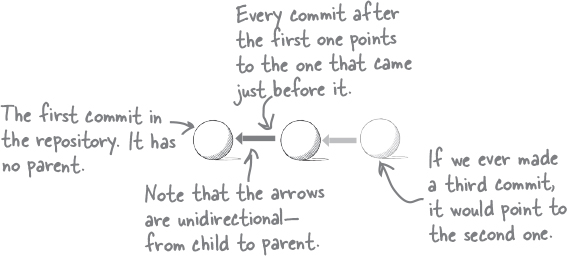
Just know that child commits refer back to their parents, but parents do not refer to their children. In other words, the pointers are unidirectional. However, there’s nothing to stop a commit from having multiple children or a commit from having multiple parents, as we’ll see in the next chapter.
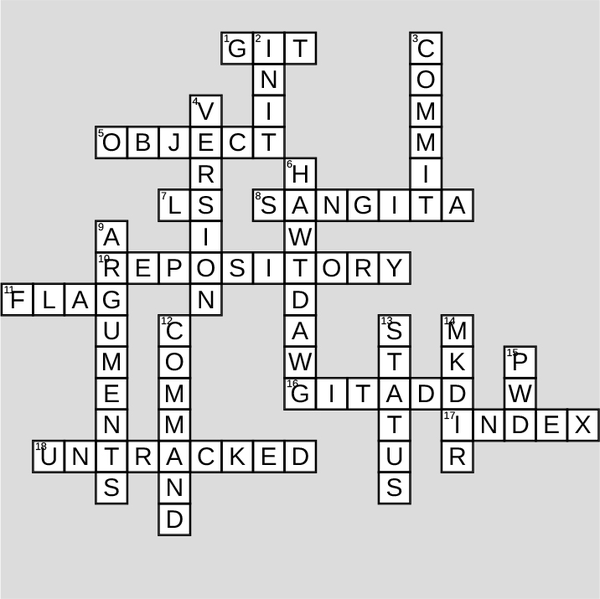
Crossword Init

You’ve done a lot in one chapter! Congratulations on getting started with Git. Time to relax with a crossword puzzle—you’ll find all of the answers somewhere in this chapter.

Across
1 What this book is all about
5 Git stores your commit message and other data in a commit _____
7 Command to list files
8 Marge is teaching her how to use Git
10 Where Git stores your files
11 Use a hyphen (or two) when you add it to a command
16 Command that tells Git to start tracking your file (2 words)
17 This is where your changes show up when you add them to Git
18 If Git isn’t watching it, your file is _____
Down
2 To get started, initialize a repository with the git _____ command
3 Take a “snapshot” of your work using the git ____ command
4 Git is a ___ control system
6 Every dog’s favorite dating app
9 Some commands need you to supply these
12 You can work with Git from the ____ line
13 Use the git ____ command to find out what’s going on
14 Terminal command to make a directory
15 Use this to find out where you are in the terminal
![]() Answers in “Crossword Init Solution”.
Answers in “Crossword Init Solution”.
Code Magnets Solution

We have all the steps listed to create a new folder, change to it, and initialize to create a new Git repository. Being diligent developers, we often check to make sure we are in the correct directory. To help our colleagues, we had the code nicely laid out on our fridge using fridge magnets, but they fell on the floor. Your job is to put them back together. Note that some magnets may get used more than once.
From “Code Magnets”.
BE Git Solution

Recall that any file in your working directory is either untracked or tracked. Also, a tracked file can be either staged, unmodified, or modified.
In this exercise, assume you just created a new repository. Can you identify the state of the files for each of the following steps?
From “BE Git”.
You create a new file in the repository called Hello.txt.

You add Hello.txt to the index (using git add).

You commit all the changes that you staged (using git commit).

You edit Hello.txt with some new content.

Crossword Init Solution

You’ve done a lot in one chapter! Congratulations on getting started with Git. Time to relax with a crossword puzzle—you’ll find all of the answers somewhere in this chapter.
From “Crossword Init”.
Get Head First Git now with the O’Reilly learning platform.
O’Reilly members experience books, live events, courses curated by job role, and more from O’Reilly and nearly 200 top publishers.


