Using the Push/Pull Tool
If you've ever seen those camping tents that spring from flat to fully formed, you have an idea how SketchUp's Push/Pull tool works. You start with a flat 2-D drawing, and you stretch it to whatever length you want. Push/Pull works its magic on any shape that forms a face.
In these steps, you use the Push/Pull tool to alter the simple box created earlier in this chapter. If you need a box model to start with, as shown in Figure 3-10, go to http://missingmanuals.com/cds and download the file box_finished.skp.
Open the file box_finished.skp, and then click the Iso button or Camera → Standard Views → Iso.
You may even want to use the Orbit tool to get a good view of three faces of the box.

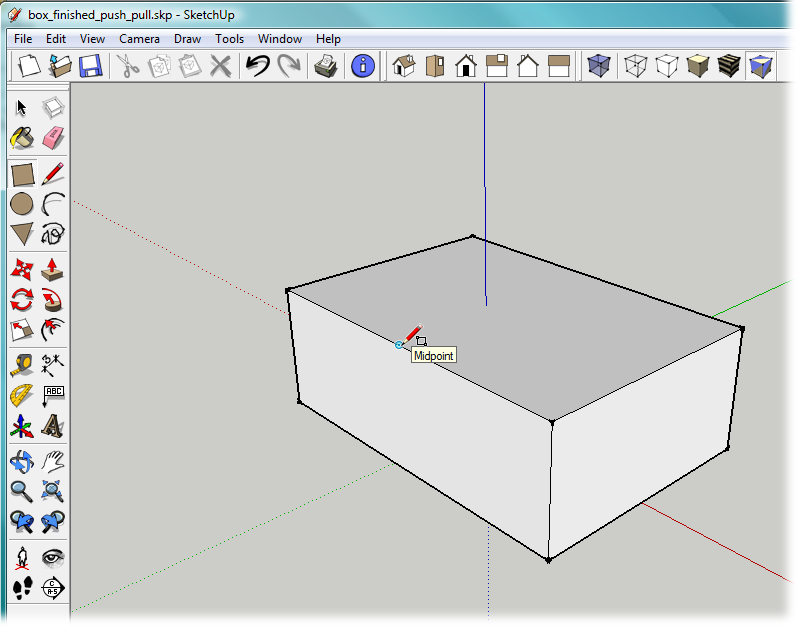
Figure 3-10. Each edge on the box has two endpoints and a midpoint. To find the midpoint, move the cursor slowly along the edge. The cursor snaps to the midpoint when it gets close, and you see a tooltip that says "Midpoint".
Choose the Rectangle (R) tool, and move the cursor over the different faces and points of the box.
When the cursor is over a face, a tooltip says "On Face". When the cursor is over an endpoint or midpoint, the marker at the tip of the pencil changes color, and you see appropriate tooltip messages. In the next step, you'll use an endpoint and a midpoint to draw a rectangle on the box's top surface.
With the Rectangle tool, click the front upper-right corner, and ...
Get Google SketchUp: The Missing Manual now with the O’Reilly learning platform.
O’Reilly members experience books, live events, courses curated by job role, and more from O’Reilly and nearly 200 top publishers.

