Chapter 4. Google App Engine
Google App Engine is a serverless compute solution that allows you to run your applications without having to manage the underlying infrastructure. App Engine supports a variety of programming languages including Node.js, Java, Ruby, C#, Go, Python, and PHP; you can even use a unsupported language by using containers. App Engine has two editions: Standard and Flexible. Flexible allows you to bring any library and framework to App Engine.
App Engine provides you with enterprise-ready deployment features such as application versioning, traffic splitting, security, monitoring, and debugging. With App Engine, all you need to focus on is your code; Google Cloud manages the underlying infrastructure. In this chapter, you will learn how to deploy your application with a CI/CD pipeline, secure it, map a custom domain, use ML APIs, and debug your application.
All code samples for this chapter are in this book’s GitHub repository. You can follow along and copy the code for each recipe by going to the folder with that recipe’s number.
You will need to make sure you have met the prerequisites before running through the recipes:
Signed up for a Google Cloud account, as described in Chapter 1.
Created a Google Cloud project, as described in Chapter 1.
Installed and configured gcloud, as described in Chapter 1.
Enabled the Cloud Functions and Cloud Build APIs.
gcloud services enable cloudbuild.googleapis.com
gcloud services enable \
   containerregistry.googleapis.com
4.1 Deploying a Hello World to App Engine (Standard)
Solution
Use the Google Cloud command line and your favorite editor to build a simple Express.js application to run on App Engine.
On your local workstation, create a temporary folder to hold the files you will need to create the Hello World application.
In your favorite IDE, create an app.js file in the root of the directory you created in step 1 and copy the following code to the file:
'use strict';
const express = require('express');
const app = express();
app.get('/', (req, res) => {
    res.status(200).send('Hello, world!').end();
});
const PORT = process.env.PORT || 8080;
app.listen(PORT, () => {
    console.log(`App listening on port ${PORT}`);
    console.log('Press Ctrl+C to quit.');
});
module.exports = app;
Now create an app.yaml file in the root of the same directory and copy the following code to the file. The app.yaml file defines the settings for your application, including the runtime of your code.
runtime: nodejs14
Now create a package.json file in the root of the same directory and copy the following code to the file:
{
  "name": "appengine-hello-world",
  "engines": {
    "node": ">=14.0.0"
  },
  "scripts": {
    "start": "node app.js"
  },
  "dependencies": {
    "express": "^4.17.1"
  }
}
In your terminal, run the following command in the root directory you created in step 1:
npm install
To deploy the application to App Engine Standard, run the following command:
gcloud app deploy
To view your deployed application, run the following command:
gcloud app browse
This will open the application in your default browser.
Discussion
You have successfully deployed your first App Engine application using Node.js. It is a simple Hello World application but demonstrates some of the basic concepts in deploying App Engine services. To review the differences between App Engine Standard and Flexible, jump to Table 4-1 that lists the differences.
4.2 Deploying a Hello World to App Engine (Flexible)
Solution
App Engine Flexible supports running a Docker container that can include custom runtimes or other source code written in a different programming language. Since App Engine Flexible supports running Docker containers, you will use the Flexible version of App Engine to deploy a simple Hello World.
On your local workstation, create a temporary folder to hold the files you will need to create the Hello World application.
In your favorite IDE, create a Dockerfile in the root of the directory you created in step 1 and copy the following code to the file:
FROM nginx
COPY nginx.conf /etc/nginx/nginx.conf
RUN mkdir -p /var/log/app_engine
RUN mkdir -p /usr/share/nginx/www/_ah && \
    echo "healthy" > /usr/share/nginx/www/_ah/health
ADD www/ /usr/share/nginx/www/
RUN chmod -R a+r /usr/share/nginx/www
Note
The FROM command builds a base image, using the official NGINX Docker image.
Create a new file named app.yaml in the root of your temporary directory and type the following code into it:
runtime: custom
env: flex
Now create a new file named nginx.conf, also in the root of your temporary directory you create, and type the following code into it:
events {
    worker_connections 768;
}

http {
    sendfile on;
    tcp_nopush on;
    tcp_nodelay on;
    keepalive_timeout 65;
    types_hash_max_size 2048;
    include /etc/nginx/mime.types;
    default_type application/octet-stream;
    access_log /var/log/app_engine/app.log;
    error_log /var/log/app_engine/app.log;
    gzip on;
    gzip_disable "msie6";
    server {
        listen 8080;
        root /usr/share/nginx/www;
        index index.html index.htm;
    }
}
Create a new folder called www in the root of your temporary directory.
Within the www folder, create a new file called index.html and copy the following code to it:
<!doctype html>
<html>
  <head>
    <title>Hello World!</title>
  </head>
  <body>
    <h1>Welcome to nginx!</h1>
    <p>Brought to you by Google App Engine.</p>
  </body>
</html>
Run the following command to deploy your application to App Engine:
gcloud app deploy
To view your deployed application, run the following command:
gcloud app browse
This will open the application in your default browser.
Discussion
You have successfully deployed a static web application running on an NGINX web server as a custom runtime on App Engine Flexible. App Engine Flexible is a perfect choice for applications that:
Need a custom runtime.
Depend on frameworks that are not supported by App Engine Standard.
Table 4-1 summarizes the differences between App Engine Standard and Flexible at a high level.
| Feature | Standard environment | Flexible environment |
|---|---|---|
| Instance startup time | Seconds | Minutes |
| SSH debugging | No | Yes |
| Scaling | Manual, basic, automatic | Manual, automatic |
| Scale to zero | Yes | No, minimum 1 instance |
| Modifying the runtime | No | Yes (through Dockerfile) |
| Deployment time | Seconds | Minutes |
| WebSockets | No | Yes |
| Supports installing third-party binaries | Yes | Yes |
4.3 Securing Your Application with Identity-Aware Proxy
Solution
Use the Google Cloud Identity-Aware proxy (IAP) to restrict access to only a set of predefined users. IAP provides a single point of control for managing user access to your applications. We will use the Cloud Hello World application created in Recipe 4.1 to secure it with IAP.
Go to the IAP page in the Google Cloud Console, as shown in Figure 4-1.
Note
If you haven’t configured your OAuth consent screen, you’ll need to configure it before continuing.
Select the resource you want to secure by checking the box to its left.
On the right-side panel, click Add Member.
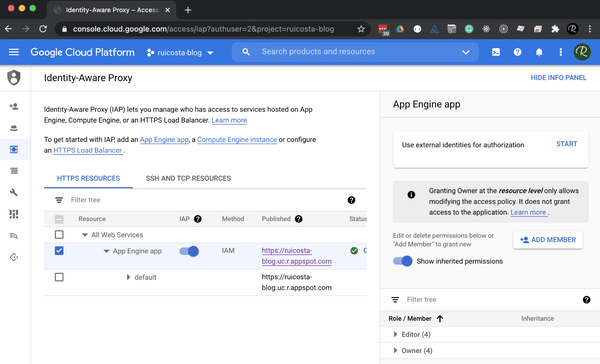
Figure 4-1. Identity-Aware Proxy configuration
Add the email addresses of groups or individuals to whom you want to grant access to your App Engine application. IAP Identity and Access Management (IAM) supports the following accounts:
Google Account
Google Group
Service account
G Suite domain
When you have added all the accounts that you want to provide access to your application, click Add.
On the IAP page, under HTTPS Resources, find the App Engine app you want to restrict access to and toggle the on/off switch in the IAP column; see Figure 4-2.
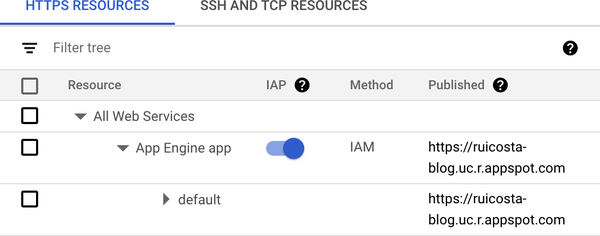
Figure 4-2. Enable Identity-Aware Proxy
Access the URL for your App Engine application. You should be prompted to sign in. If you’re not prompted, try to sign in with an Incognito window.
If you have authorized a user account and they sign in with the associated account, they will have full access to your application running on App Engine.
If you have not granted access to an account and they try to access your application, they will receive a You Don’t Have Access message.
Discussion
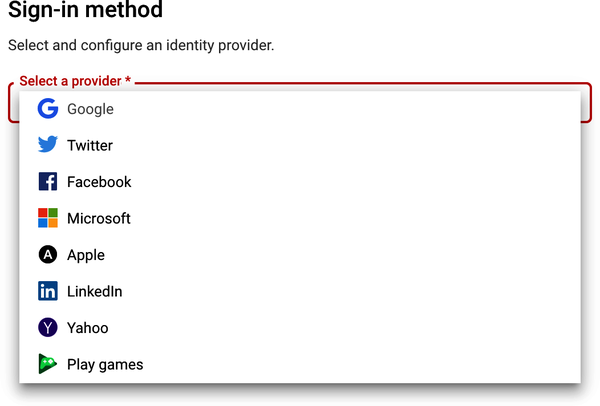
With the Google Cloud Identity-Aware Proxy, you can restrict access to your application running on App Engine, preventing unauthorized access to your resources. The Identity-Aware Proxy also supports external identities such as Google, Microsoft, Email/Password, and others that provide a robust set of sign-in options for your users to access your application (Figure 4-3).
4.4 Mapping Custom Domains with App Engine
Solution
Google Cloud provides the ability to map custom domains. It also can issue a managed certificate for SSL for HTTPS connections. You will use the cloud Hello World application created in Recipe 4.1 to enable your custom domain.
Note
You will require a custom domain for this recipe.
In the Google Cloud Console, go to App Engine > Settings > Custom Domains.
Click Add A Custom Domain.
If your domain name has been verified, the domain name will appear in the drop-down menu. Select the domain from the drop-down menu and click Continue.
If you haven’t verified your domain name, follow these steps to verify:
Select Verify A New Domain from the drop-down menu.
Enter your domain name and click Verify.
Enter the required information on the Webmaster page.
After you complete these steps on the Webmaster page, you will then return to the Add A New Custom Domain page in the Google Cloud Console.
In the “Point your domain to” section, add the domain or subdomain that you want to map. Click Save Mappings, as shown in Figure 4-4.
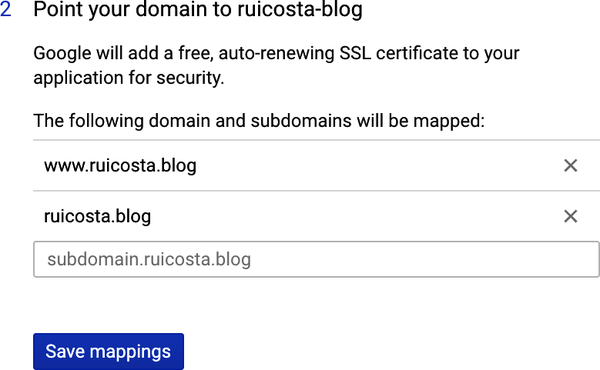
Figure 4-4. Domain mapping
Click Continue to see your domain’s DNS records.
Sign in to your domain registrar website and update your DNS records with the records displayed.
Test by opening your web browser to your newly mapped domain.
Note
It can take several minutes for the SSL certificate to be issued.
Discussion
By mapping a custom domain, you can enable your App Engine application to align with your branding as well as keep a secure site, since Google Cloud will provide an SSL certificate for your mapped domain. Google Cloud managed certificates do not support wildcard domains; if you require wildcard domains, you will need to use self-managed certificates.
4.5 Using the Google Cloud Translation Machine Learning APIs with App Engine
Solution
Google Cloud offers a Media Translation API that adds real-time audio translation to your applications. You will build two applications, a broadcast application and a client application in this recipe, using App Engine to host your application.
Figure 4-5 demonstrates a high-level architecture of the application you will be deploying.
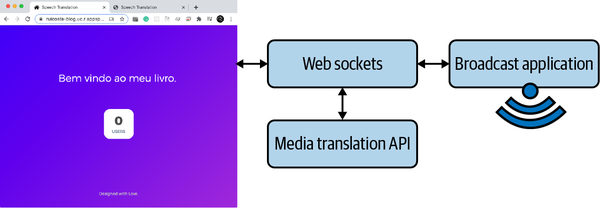
Figure 4-5. Translation application architecture
Figure 4-6 is the broadcast application the presenter uses.
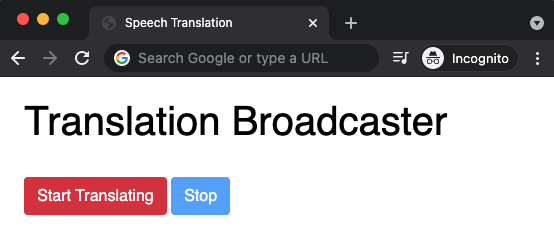
Figure 4-6. Broadcast application
Figure 4-7 is the client application where users can see the translation captions.
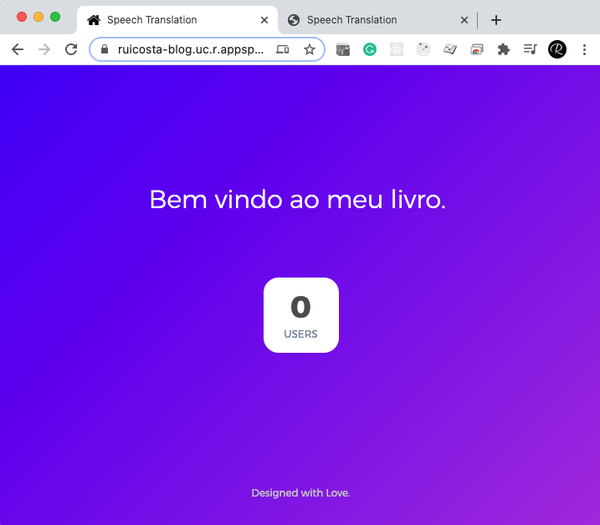
Figure 4-7. Client application
This recipe requires you to use the git clone command for this book’s code example repository.
In the cloned application, go to 04-appengine/4-5-media.
In your IDE, edit the client/client.js file and replace [PROJECT_ID] with your Google Cloud project:
const socket = io.connect('https://[YOUR_PROJECT_ID].uc.r.appspot.com');Repeat the process in step 2 but edit the broadcast/client.js file.
Enable the Media Translation API in the Google Cloud Console.
Deploy your App Engine application by running the
gcloud app deploycommand. In the app.js file in the root directory, you will notice the following Expres.js routes declared. The client path is for the users reading the translations from the person broadcasting. The person broadcasting would visit the root for the App Engine application:app.use('/', express.static('broadcast')) app.use('/client', express.static('client'))Once your application is deployed, visit the root path and open a new tab with the /client path.
In the broadcast application, click Start Translating and start speaking in English; watch the translation on the second tab. The translation is from English to Portuguese.
You can change the languages in the app.js file, lines 29 and 30:
  const sourceLanguage = 'en-US';
  const targetLanguage = 'pt-BR';
Discussion
In this recipe, you used an existing repository to deploy a translation application to App Engine. This application uses Express.js, WebSockets, and the Media Translation API to allow real-time audio to be translated to the language you define in the code. Since we are using WebSockets, we used App Engine Flexible, because Standard does not support WebSockets. WebSockets allowed the real-time communication of the broadcaster and users.
4.6 Building User Interfaces for Viewing Charts and Graphs
Solution
Use App Engine, along with Cube.js, BigQuery, and App Engine to build a user interface (Figure 4-8) for viewing charts and graphs from data stored in your BigQuery data set. BigQuery is a fully managed, serverless data warehouse.
Note
You will be using Cube.js, which is an open source analytical API platform.
You will also learn how to deploy React.js to App Engine, since the user dashboards will be running with the React.js framework.
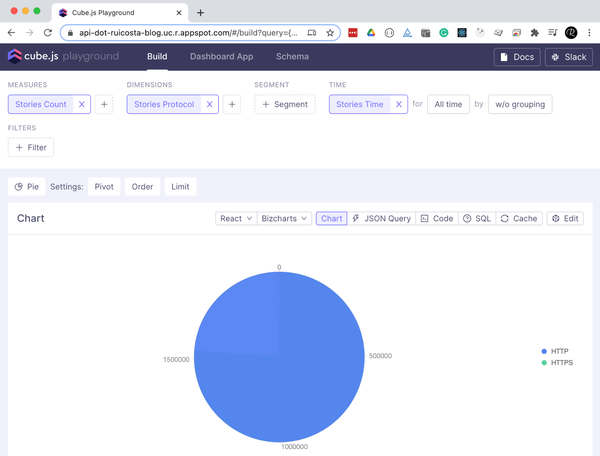
Figure 4-8. Cube.js running on App Engine
On your local workstation, create a temporary folder to hold the files you will need to create App Engine user dashboards.
In your temporary folder, using the Cube.js CLI, run the
npx cubejs-cli create real-time-dashboard -d bigquerycommand to create a new Cube.js application for BigQuery.You will need credentials to access BigQuery. In the Google Cloud Console, create a new service account. Add the BigQuery Data Viewer and BigQuery Job User roles to this service account and then generate a new JSON key file. Copy the JSON key to the root of the real-time-dashboard folder.
In your IDE, edit the real-time-dashboard/.env file to include your Google Cloud project as well as the location of your key file:
CUBEJS_DB_BQ_PROJECT_ID=example-google-project
CUBEJS_DB_BQ_KEY_FILE=./examples.json
CUBEJS_DB_TYPE=bigquery
CUBEJS_API_SECRET=SECRET
Cube.js uses a data schema to generate SQL code. You will be working with the BigQuery Hacker News public data set. Create a file called Stories.js in the real-time-dashboard/schema folder with the following code:
cube(`Stories`, {
    sql: `
      SELECT *
      FROM bigquery-public-data.hacker_news.full
      WHERE type = "story" AND STARTS_WITH(UPPER(url), "HTTP")
    `,

    measures: {
      count: {
        type: `count`,
      },
    },

    dimensions: {
      protocol: {
        sql: `UPPER(REGEXP_EXTRACT(${CUBE}.url, r"^([a-zA-Z]+):"))`,
        type: `string`,
      },

      time: {
        sql: `timestamp`,
        type: `time`,
      },
    },
  });
Now run a real-time dashboard locally to test and validate that it’s working as expected. Run the
npm run devcommand in the real-time-dashboard folder.In your browser, go to http://localhost:4000, which should launch Cube.js Playground, as shown in Figure 4-9.
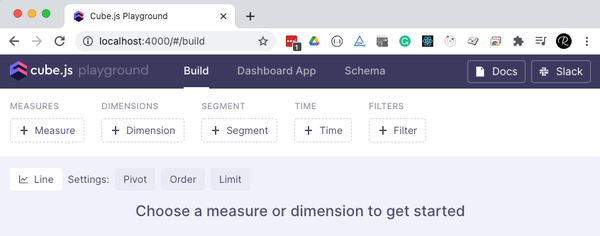
Figure 4-9. Cube.js running locally
To test that it’s connecting to BigQuery, click Measure and choose Stories Count, as shown in Figure 4-10.
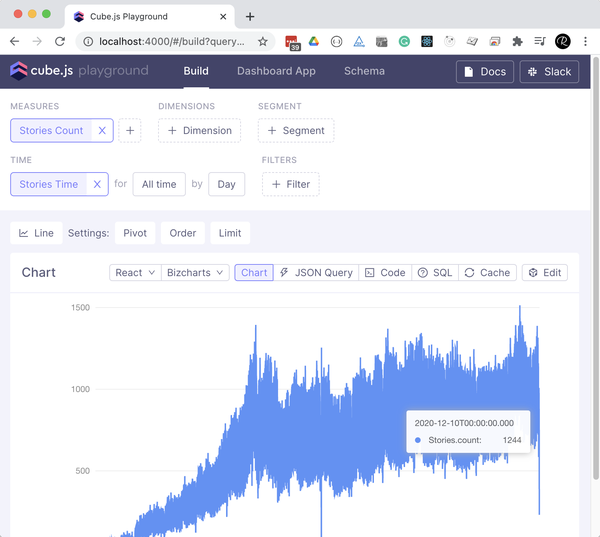
Figure 4-10. Cube.js connection to BigQuery
This service will become an API running on App Engine. The user dashboard will connect to the Cube.js API to fetch the required data and visualize it for the user.
To build the dashboard, click the Dashboard App in the Cube.js Playground.
Once it’s installed, locate the folder in your IDE; it will be under real-time-dashboard/dashboard-app.
In your IDE, edit the src/pages/DashboardPage.js to replace the following line:
const DashboardItems = []
with:
const DashboardItems = [
  {
    id: 0,
    name: "Orders Status by Customers City",
    vizState: {
      query: {
        "measures": [
          "Stories.count"
        ],
        "timeDimensions": [],
        "order": {
          "Stories.count": "desc"
        },
        "dimensions": [
          "Stories.protocol"
        ]
      },
      chartType: "pie",
    }
  },
  {
    id: 1,
    name: "Orders Status by Customers City",
    vizState: {
      query:   {
        "measures": [
          "Stories.count"
        ],
        "timeDimensions": [
          {
            "dimension": "Stories.time",
            "granularity": "year"
          }
        ],
        "order": {},
        "dimensions": []
      },
      chartType: "line",
    }
  },
];
In your IDE, edit src/components/ChartRenderer.js to include the following:
 const ChartRenderer = ({
-   vizState
+   vizState, cubejsApi
-   const renderProps = useCubeQuery(query);
+   const renderProps = useCubeQuery(query, { subscribe: true, cubejsApi });
Note
Remove the lines in CharRenderer.js that are noted with a subtraction symbol (-) and add the lines noted with the addition symbol (+).
To learn more about Cube.js and React, please visit the online reference.
Create an app.yaml file in real-time-dashboard/dashboard-app with the following code:
runtime: nodejs14
handlers:
- url: /(.*\..+)$
  static_files: build/\1
  upload: build/(.*\..+)$
- url: /.*
  static_files: build/index.html
  upload: build/index.html
This configuration lets App Engine serve the optimized React.js build. When making changes, you will always need to run an npm run build before deploying your new version to App Engine.
Run the following commands to deploy the Dashboard to App Engine:
npm run build
    gcloud app deploy
After this has been successfully deployed, run the
gcloud app browsecommand to view the application in your browser.Copy the URL of your deployed dashboard app and edit the real-time-dashboard/dashboard-app/App.js file to replace the
const API_URLvariable with yours. It should look like this:const API_URL = "https://ruicosta-blog.uc.r.appspot.com";
Go ahead and redeploy:
npm run build
    gcloud app deploy
At this point, the Dashboard is ready to connect to the Cube.js API that you just updated in the App.js file. Now it’s time to deploy the API to App Engine.
Create a Dockerfile in the real-time-dashboard folder with the following code:
FROM cubejs/cube:latest

COPY . .
Create an app.yaml file in the real-time-dashboard folder with the following code:
runtime: custom
env: flex
service: api
Since Cube.js uses WebSockets and App Engine Standard does not support WebSockets, we need to use a custom runtime, so you will use Flexible for the API.
Update the content of the cube.js file with the following, located in the root of the real-time-dashboard folder:
module.exports = {
    processSubscriptionsInterval: 1,
    orchestratorOptions: {
      queryCacheOptions: {
        refreshKeyRenewalThreshold: 1,
      }
    },
  };
Update the content of the .env file with the following, located in the root of the real-time-dashboard folder, to include
CUBEJS_WEB_SOCKETS=true.Create a new file, called dispatch.yaml, in the root of the real-time-dashboard folder:
  - url: "*/cubejs-api*"
    service: api
The dispatch.yaml file allows you to override routing rules and allows your Dashboard application to access the API via the main URL of the Dashboard so as not to cause issues with CORS.
You are now ready to deploy the API and have users access data via the Dashboard. In the root of the real-time-dashboard, run the
gcloud app deploycommand to deploy the API.Once this has completed, deploy the dispatch rules by running
gcloud app deploy dispatch.yaml.If you now access the URL of the Dashboard, you should be able to see what’s shown in Figure 4-11.
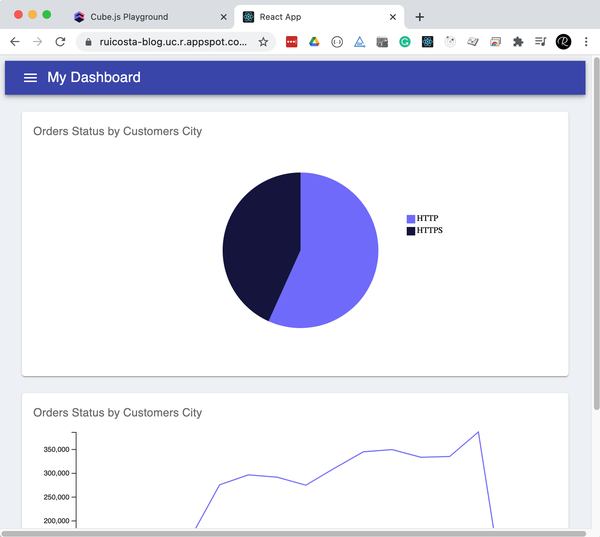
Figure 4-11. Cube.js running on App Engine
Don’t forget to secure your application by enabling IAP.
Discussion
In this recipe, you deployed the Cube.js API, a user Dashboard running on the React.js Framework, to App Engine and created routes with dispatch rules to build an interactive real-time dashboard for users.
There are many moving parts in this recipe, but the key takeaways are:
4.7 Debugging an Instance
Solution
With App Engine Flexible, enable the debug mode. While debugging is enabled, you can access the VM to view the log files of your custom runtime.
To enable debug mode, run the gcloud
app --project PROJECT_IDcommand.It will prompt you with the instances available to enable debugging. Choose one.
In the Google Cloud Console, choose App Engine > Instances.
You should notice in the instance you chose that Debug mode (Figure 4-12) is now enabled.

Figure 4-12. App Engine Debug mode enabled
Click the SSH button to connect to the instance.
At this point, you are connected to the instance host, which has several containers running in it.
Note
In addition to your container running on App Engine Flexible, you will also have three additional containers:
Fluentd Logging agent
Memcache proxy agent
NGINX proxy
The output of the
sudo docker pscommand lists each container; locate the row that contains your project ID and note the NAME of this container.To view the logs, run the
sudo docker logs [CONTAINER-NAME]command.This allows you to view the logs from your application for debugging purposes.
You can also connect to the instance by running
sudo docker exec -it CONTAINER_NAME /bin/bash.When completed, don’t forget to disable debugging by running the
gcloud app --project PROJECT_ID instances disable-debugcommand.
4.8 Using CI/CD
Solution
Use GitLab CI/CD, a tool that allows you to apply continuous integration (CI), continuous delivery (CD), and continuous deployment (also CD) to your application.
Create a new GitLab project and clone the new repository to your local machine.
Create the Hello World application from Recipe 4.1, but do not deploy it to App Engine.
In the root of the directory, create a GitLab CI/CD file named .gitlab-ci.yml with the following contents:
    image: google/cloud-sdk:slim
deploy:
    stage: deploy
    environment: Production
    only:
        -  master
    script:
        - gcloud auth activate-service-account --key-file $GOOGLE_SERVICE_ACCOUNT_FILE
        - gcloud app deploy app.yaml --quiet --project $GOOGLE_PROJECT_ID --version 1
In the Google Cloud Console, go to Identity > Service Accounts.
Click Create Service Account.
Enter name and description and then click Create.
Select the Editor role and click Continue.
Select the service account you just created and, in Options, click Create A Key In JSON Format. Download the key to your local workstation.
In the GitLab console within your project, go to Settings > CI/CD.
Expand the Variables section.
Create a new variable.
Change the type of variable to File. The key will be named GOOGLE_SERVICE_ACCOUNT_FILE, and the value will be the content of the file that has been previously downloaded.
Create another variable, named GOOGLE_PROJECT_ID, and the value will be the ID of the Google Cloud project.
Commit your code and deploy your application to App Engine. In addition, commit your changes to your GitLab repository.
In the GitLab console, open the GitLab CI/CD page. You will notice your pipeline running.
If you click the pipeline, you will see the deployment steps; note Job Succeeded.
Discussion
The continuous methodologies of software development are based on automating the tests and deployments of your source code to minimize the chance of errors. GitLab CI/CD provides a set of tools, including the continuous deployment methodology used in this recipe. Now, instead of deploying your application manually, it can be deployed automatically to Google Cloud App Engine.
Get Google Cloud Cookbook now with the O’Reilly learning platform.
O’Reilly members experience books, live events, courses curated by job role, and more from O’Reilly and nearly 200 top publishers.

