The LED blinking sketch is the first program that you should run to test whether your Arduino board is working and is configured correctly. It is also usually the very first programming exercise someone does when learning to program a microcontroller. A light-emitting diode (LED) is a small electronic component that's a bit like a light bulb, but is more efficient and requires lower voltages to operate.
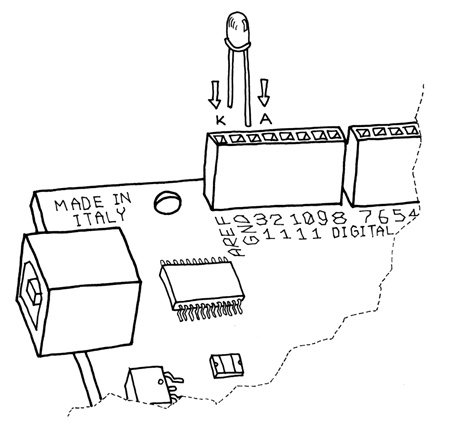
Your Arduino board comes with an LED preinstalled. It's marked "L". You can also add your own LED—connect it as shown in Figure 4-2.
K indicates the cathode (negative), or shorter lead; A indicates the anode (positive), or longer lead.
Once the LED is connected, you need to tell Arduino what to do. This is done through code, that is, a list of instructions that we give the microcontroller to make it do what we want.
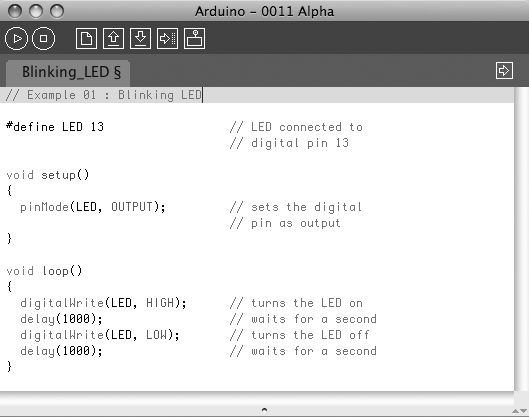
On your computer, go open the folder where you copied the Arduino IDE. Double-click the Arduino icon to start it. Select File > New and you'll be asked to choose a sketch folder name: this is where your Arduino sketch will be stored. Name it Blinking_LED and click OK. Then, type the following text (Example 4-1) into the Arduino sketch editor (the main window of the Arduino IDE). You can also download it from www.makezine.com/getstartedarduino. It should appear as shown in Figure 4-3.
Example 4-1. Blinking LED
#define LED 13   // LED connected to
                 // digital pin 13

void setup()
{
  pinMode(LED, OUTPUT);     // sets the digital
                            // pin as output
}

void loop()
{
  digitalWrite(LED, HIGH);     // turns the LED on
  delay(1000);                 // waits for a second
  digitalWrite(LED, LOW);      // turns the LED off
  delay(1000);                 // waits for a second
}Now that the code is in your IDE, you need to verify that it is correct. Press the "Verify" button (Figure 4-3 shows its location); if everything is correct, you'll see the message "Done compiling" appear at the bottom of the Arduino IDE. This message means that the Arduino IDE has translated your sketch into an executable program that can be run by the board, a bit like an .exe file in Windows or an .app file on a Mac.
At this point, you can upload it into the board: press the Upload to I/O Board button (see Figure 4-3). This will reset the board, forcing it to stop what it's doing and listen for instructions coming from the USB port. The Arduino IDE sends the current sketch to the board, which will store it in its memory and eventually run it.
You will see a few messages appear in the black area at the bottom of the window, and just above that area, you'll see the message "Done uploading" appear to let you know the process has completed correctly. There are two LEDs, marked RX and TX, on the board; these flash every time a byte is sent or received by the board. During the upload process, they keep flickering.
If you don't see the LEDs flicker, or if you get an error message instead of "Done uploading", then there is a communication problem between your computer and Arduino. Make sure you've selected the right serial port (see Chapter 3) in the Tools > Serial Port menu. Also, check the Tools > Board menu to confirm that the correct model of Arduino is selected there.
If you are still having problems, check Chapter 7, Troubleshooting.
Once the code is in your Arduino board, it will stay there until you put another sketch on it. The sketch will survive if the board is reset or turned off, a bit like the data on your computer's hard drive.
Assuming that the sketch has been uploaded correctly, you will see the LED "L" turn on for a second and then turn off for a second. If you installed a separate LED as shown back in Figure 4-2, that LED will blink, too. What you have just written and ran is a "computer program", or sketch, as Arduino programs are called. Arduino, as I've mentioned before, is a small computer, and it can be programmed to do what you want. This is done using a programming language to type a series of instructions in the Arduino IDE, which turns it into an executable for your Arduino board.
I'll next show you how to understand the sketch. First of all, the Arduino executes the code from top to bottom, so the first line at the top is the first one read; then it moves down, a bit like how the playhead of a video player like QuickTime Player or Windows Media Player moves from left to right showing where in the movie you are.
Get Getting Started with Arduino now with the O’Reilly learning platform.
O’Reilly members experience books, live events, courses curated by job role, and more from O’Reilly and nearly 200 top publishers.


