Chapter 4. REST APIs
With the data schema defined, it’s time to get into the details of exposing that data. You’ll build an application program interface (API) with multiple endpoints that perform various operations, like getting all of the orders or submitting new ones. This is one area of the backend that will get very into the details.
In order to create an API that can be maintained by different developers as the team changes, you need standard conventions for the team. Standard conventions are usually outlined in a document that defines the way the team agrees to approach code implementation from everything to naming conventions to the error codes and messages used in responses.
This set of conventions will make it easier to check for deviations in pull request (PR) reviews for any code changes. Your PRs are changes you submit for other developers to review before they get merged with the central code and deployed. Since there might be multiple PRs for a piece of functionality, this rule enforcement is important to maintain code consistency across code bases.
This chapter will go over how to address this convention while actually building an API and cover these areas:
-
Working through data formatting with the frontend and other consuming services
-
Writing an example of code conventions
-
Writing the code for the interface, service, and controller for the API
-
How to track errors with logs and custom error handlers
-
Ensuring validation is in place
These are some of the concerns that will come up as you build out your API and the different endpoints. You’ll run into a lot of different approaches to API development and architecture decisions and all of them are valid. Like with everything else, it depends on the needs of your project and team preferences.
For this API, we’re going to follow these conventions:
-
It will send and receive data in JSON format
-
Endpoint logic shouldn’t reference other endpoints to avoid race conditions
-
Use endpoint naming to reflect relationships of data and functionality (ex. /orders/{orderId}/products)
-
Return standard error codes and custom messages
-
Version the endpoints to gracefully handle deprecation
-
Handle pagination, filtering, and sorting on the backend
-
All endpoints receiving data should have validation
-
Endpoint documentation should be updated with all changes
Making sure the frontend and backend agree
There is always a partnership between the frontend displaying data and the backend processing it. When the frontend has to make multiple calls to fetch data, it can cause the view to render slower for a user and it might prevent them from doing much on the page. When the backend sends more data in responses, it can lead to unnecessary information being gathered and sent which makes the response take longer. This is a trade-off you have to balance.
Typically any type of pagination, filtering, sorting, and calculations should happen on the backend. This is because you can handle the data more efficiently on the backend compared to loading all of the data on the frontend and making them do these operations. It’s very rare you’ll ever want to load all of the data for an app in the frontend.
If these requests come from the frontend team, it’s common for the backend to honor it. This might also be a case for introducing a microservice into the architecture. If there’s a specific endpoint that is called way more than the others, it’s worth researching if it makes sense to separate it out and what approach you would take. That can possibly help both the frontend and backend performance.
One area that you might have to push back on is how endpoints send data to the frontend. They could request that data gets sent back on the same endpoint to help with performance and reduce the number of calls made. If it crosses data boundaries, then you need to double-check if the data should be combined. Data boundaries are how we keep a separation of concerns between different functionality. Here’s an example of keeping a boundary between any products and orders calls.
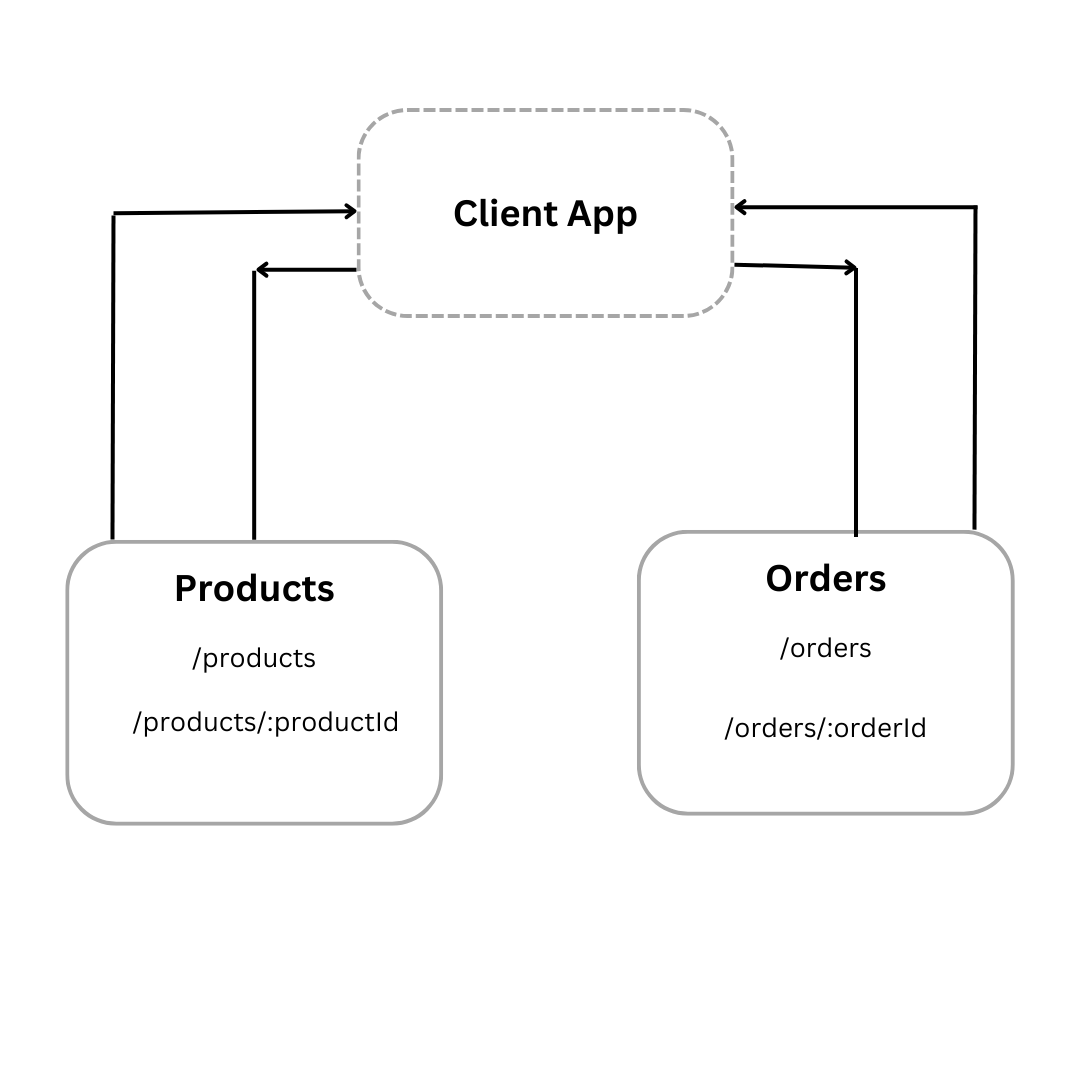
Figure 4-1. Example of data boundaries and how they don’t cross
Remember, the frontend can filter the data out in the view, but anyone can check the developer tools in the browser to check the network response. It’s always the responsibility of the backend to enforce security when it comes to data handling. The frontend can make some security decisions, but users can bypass the UI and use the endpoints directly. We’ll address some security concerns in chapter 8, but this is one of the reasons you want to enforce data boundaries.
Now that the frontend and backend understand the expectations of each other, let’s work on the conventions doc for the backend.
Creating a document for conventions
You can tighten up your code conventions even more with a doc that you share with the team and that you use to help new devs onboard with the team’s code style. These will evolve over time as you encounter new scenarios. It serves as a source of truth for the team when a new endpoint or even a new API needs to be created. That way everyone knows how to build the code so that consistency is maintained everywhere.
There are also tools available like Husky, ESLint and Prettier that can help you automatically enforce the conventions with every PR. Sometimes nitpicks like spacing, tabs, quotation marks, and tests can get tedious to manually check for. Using these types of tools makes it so devs have to meet the conventions before a commit can even be made. Now every PR will have these minute checks which makes reviews faster and code more consistent.
You can find an example of of some conventions here: https://github.com/Wolox/tech-guides/blob/master/backend/backend-standard-and-best-practices.md Docs like this can be starting points for your in-hourse conventions that you extend to match team preferences. For example, your conventions doc might contain an additional section to the one linked above.
Example 4-1. Excerpt from SampleCorp’s API team’s code conventions doc
—-
For pagination, responses should return this structure:
{
 "page": [
    {
      "id": 4,
      "first_name": "My first name",
      "last_name": "My last name",
      "email": "myemail@server.com"
    },
    {
      "id": 5,
      "first_name": "My first name",
      "last_name": "My last name",
      "email": "myemail@server.com"
    },
    {
      "id": 6,
      "first_name": "My first name",
      "last_name": "My last name",
      "email": "myemail@server.com"
    }
 ],
 "count": 3,
 "limit": 3,
 "offset": 0,
 "total_pages": 4,
 "total_count": 12,
 "previous_page": 1,
 "current_page": 2,
 "next_page": 3,
}
For error handling, responses should return this structure:
{
  "errors": [
    { "statusCode": "111", "message": "age must be an int" },
    { "statusCode": "112", "message": "email is mandatory" }
  ]
}
—-
This is another way you can get feedback from others and make the convention doc the best it can be for everyone.
Note
There are some things you’ll set in your conventions that will be annoying to stick to sometimes, especially in a time crunch. That’s why it’s important to implement a few features and see how things go in practice before you really enforce them through linting and other scripts.
Once they’re in a good place though, don’t deviate from them unless there’s a significant change to the direction of the project. The consistency throughout your code bases is what will make this project easier to maintain over the long-term.
Making the API and first endpoint
As discussed in chapter 2, Nest.js is the framework you’ll build with. You won’t go through writing all of the code tutorial-style here. I’ll address underlying reasons for why functionality is implemented a certain way. This is the type of thinking that spreads to any framework. I will leave it up to you to look through the Nest.js docs to understand the syntax of the code.
There are so many things to consider when you start coding on the backend. The secret is to just pick an area and focus on it first. You’ll come back through and address security, performance, and testing concerns. For now though, you need to get some endpoints working so the frontend can start work connecting the UI to the API. You’ll start by writing the basic CRUD operations you know the app will need. In this project, you’ll need CRUD endpoints for:
-
Managing products
-
Managing orders
-
Administrative functions
The first two sets of endpoints are based on what you already know about the app. The last set of endpoints will come from other discussions with Product. There will be actions the Support team will need access to that no user should ever be able to touch. You’ll learn how to handle these different user permission levels and access control in chapter 8. Remember, these endpoints will likely change. The main thing is that you have to start building somewhere.
You can delete some of the boilerplate files, specifically app.controller.spec.ts, app.controller.ts, and app.service.ts. Also go ahead and update app.module.ts to remove the references to those files. This is to keep things as clean as possible as you start to make changes and add new code.
Working on the orders endpoints
You can start by working on the functionality around orders. In the src directory, make a new subfolder called orders and add the files to handle the types for this endpoint, the tests, the service, and the controller.
The orders.controller.ts file is where you define all of the endpoints for this specific feature. So anytime you need to fetch orders or make changes to them, the frontend will only reference the endpoints here. This is a great place to do your initial validation on data received in requests. Here’s an example of an endpoint:
// orders.controller.ts…@Get()public async orders(): Promise<Array<Order>> {try {const orders = await this.ordersService.orders({});return orders;} catch (err) {if (err) {throw new HttpException('Not found', HttpStatus.NOT_FOUND);}throw new HttpException('Generic', HttpStatus.BAD_GATEWAY);}}
Here you can find some custom error handling and it sends a message and status code like you defined in the conventions. The controller shouldn’t contain any business logic because that will be handled in your service. Controllers are just there to handle requests and responses. This makes the code more testable and it keeps the code separated based on what it should do.
Controllers will also do some of that validation I’ve mentioned. Let’s take a look at an update endpoint:
// orders.controller.ts…@Patch(':id')public async update(@Param('id', ParseIntPipe) id: number,@Body() order: UpdateOrderDto,): Promise<Order> {try {return await this.ordersService.updateOrder({where: { id },data: order,});} catch (err) {if (err) {throw new HttpException('Not found', HttpStatus.NOT_FOUND);}throw new HttpException('Generic', HttpStatus.BAD_GATEWAY);}}
Note how the try-catch statement is used for both of the endpoints. This is a clean way of making sure your errors are handled. The code in the try block is always run first. If any errors happen in this block, the catch block will be triggered. Then you can focus on how to handle the errors that are caught. This is something that can get overlooked when devs are in a hurry and it’s a prime candidate to include in your code conventions.
The validation here is happening through the UpdateOrderDto. Here’s what it looks like in orders.interface.ts.
// orders.interface.tsexport class UpdateOrderDto {@IsNotEmpty()name: string;@IsNumber()total: number;}
The validation is handled with the class-validator package, so if the name is empty or the total isn’t a number, an error will be thrown to the frontend telling it the body data was in the wrong format. Sending proper validation messages to the frontend will help the devs know what to do and give users helpful information.
Working on the orders service
The last file is orders.service.ts. This is where the business logic for the orders functionality is handled. Any calculations, sorting, filtering, or other data manipulation is likely happening in this file. Here’s an example of a method to update an order:
// orders.service.ts…public async updateOrder(params: {where: Prisma.OrderWhereUniqueInput;data: Prisma.OrderUpdateInput;}): Promise<Order> {const { data, where } = params;this.logger.log(`Updated existing order ${data.name}`);try {const updatedOrder = await this.prisma.order.update({data: {...data,updatedAt: new Date(),},where,});this.logger.log(`Updated for existing order ${updatedOrder.id} successful`);return updatedOrder;} catch (err) {this.logger.log(`Updated for existing order ${data.name} failed`);throw new HttpException(err.message, HttpStatus.CONFLICT);}}
Now you’re adding even more backend best practices and following the conventions because you have error handling and logging happening here. There will also be errors that come from the service level, which is why you have the try-catch statement to bubble those errors back up to the controller.
You should also add logging like this in your controllers. One thing you’ll find is that logs are invaluable when you’re trying to debug the backend. Make your logs as descriptive as you need to in order to track values across your database and other endpoints or third-party services.
Regardless of the framework you decide to use on the backend, you’ve seen the core things you need to implement: validation on inputs, logging for the crucial parts of the flow, and error handling for issues that may arise. As long as you remember these things and you keep the code conventions in mind, your team is on the way to a strongly built codebase.
It’s time to look at some of the other parts of the backend that will ensure the endpoints and services work as expected.
Establishing a working database connection
Many projects have a folder called utils or helpers or something like this. You’ll need to create one of those to hold the service you’re going to use to instantiate PrismaClient and connect to the database. In the src folder, make a new folder called utils. In this folder, make a file called prisma.service.ts and put the following code from the Nest.js documentation in there: https://docs.nestjs.com/recipes/prisma#use-prisma-client-in-your-nest js-services. You don’t have to worry about writing everything from scratch most of the time if you spend a few minutes reading and looking through docs. That’s a thing you’ll find senior devs doing all the time.
Don’t be afraid to add more things to this utils folder! When you see some small function that is repeated in numerous parts of the app, like data formatters, move them here so they are easy for other devs to find and use.
If you haven’t stopped to make a Git commit, this is a good time to do so. Now you have the backend in a state where other backend devs can come in and add more functionality or configurations. One of the hardest tasks is to set something up that others can improve. That’s what you’re doing right now.
As you build on this application through out the book, you’ll start to add calls to third-party services, handle data from different sources, and work on security concerns. All of these will involve endpoints and other service methods that you’ll add on as you move through the tasks on your sprint.
It’s important to get some practice in, so try to add error handling, logging, and validation to the remaining endpoints in the orders controller. Of course, you can always check out the GitHub repo too.
Conclusion
We covered a lot in this chapter and we will dive even deeper! The main takeaways from this chapter are how to make an agreement with the frontend, setting up strict conventions for your API as soon as possible, making some initial endpoints to get the frontend moving, error handling, validation, and logging. Now that you have a few endpoints up, you can start building on top of them.
Get Full-Stack JavaScript Strategies now with the O’Reilly learning platform.
O’Reilly members experience books, live events, courses curated by job role, and more from O’Reilly and nearly 200 top publishers.

