418 eClient 101 Customization and Integration
7. Select the ClientTaskMinimum entry in the Privilege groups field.
The privilege group ClientTaskMinimum is selected for demonstration
purposes. When you configure your production system, you need to select
privilege groups based on your business requirements.
8. Check the Select all box at the top of Privileges field. This makes all entries in
the privilege group appear in the Selected privileges field.
9. Click OK to save the privilege set.
17.5 Importing LDAP users into Content Manager V8.2
This section provides the steps to import LDAP users into the Content Manager
server V8.2 through Content Manager System Administration Client on the
Windows platform. Before continuing the rest of this section, make sure that IBM
Directory Server V5.1 service is running in the Windows Control Panel.
1. Launch a Content Manager System Administration Client by selecting Start
-> Programs -> IBM Content Manager for Multiplatforms V8.2 -> System
Administration Client.
2. In the Navigation pane on the left, select Authentication -> Users.
3. Right-click Users and select New. The New User window is displayed.
4. Click LDAP in the Define Users tab to import a user.
5. Click Show All on the Import users from LDAP window. If you have defined
many users in LDAP server, you should enter search criteria and click Find,
instead.
6. A warning message is displayed: “Max results retrieved limited to 5000.
Continue retrieving?” Click Yes.
7. You should have at least two users (wasadmin
and john) on the user list. See
Figure 17-13 on page 419.

Chapter 17. Single sign-on 419
Figure 17-13 Import LDAP users
8. Highlight user wasadmin on the user list.
9. Click OK to import the user. Notice that the user information and password
options have been grayed out on the New User window. The information for
the LDAP server is used.
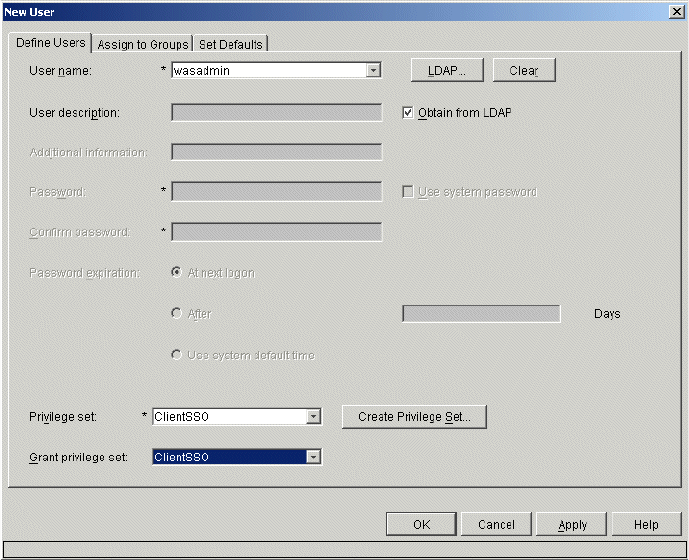
10.Set the values for the fields in Table 17-12. See Figure 17-14 on page 420.
Table 17-12 Creating new Content Manager user
Field Value
Privilege set ClientSSO
Grant privilege set ClientSSO
420 eClient 101 Customization and Integration
Figure 17-14 Creating new Content Manager user
11.Click OK to save the new user definition wasadmin.
12.Repeat the above steps to import an LDAP user named john and other LDAP
users. LDAP user john must be imported because it will be used in a later
section.
13.This should be the end of the single sign-on configuration in the Content
Manager. However, due to a problem in the Version 8.2 product at the time of
writing, you have to do one more step:
a. Open a DB2 command window by selecting Start -> Programs -> IBM
DB2 -> Command Line Tools -> Command Window.
b. Enter the following DB2 SQL statement to connect to the Library Server:
db2 connect to icmnlsdb user icmadmin using password
c. Enter the following DB2 SQL statement
db2 update ICMSTUSERS set PASSWORD=’XYZ’ where PASSWORD is NULL
where ‘XYZ’ is arbitrary. This statement populates the PASSWORD
column in the table ICMSTUSERS in the Library Server database.
Get eClient 101 Customization and Integration now with the O’Reilly learning platform.
O’Reilly members experience books, live events, courses curated by job role, and more from O’Reilly and nearly 200 top publishers.

