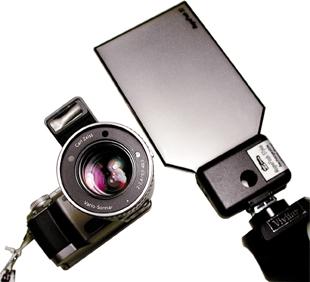
Just because your digital point and shoot has a built-in flash, that doesn’t mean you’re stuck with using it exclusively.
“When two people in an organization always agree, one of them is unnecessary.” You might expect to find that quote cross-stitched on a sign in the Complaint Department. But it hung prominently behind my father’s desk as the editor and publisher of a weekly trade publication.
Dad’s lesson is universally applicable, I’ve found over the years; a different perspective often provides an improvement—in life and in flash photography. I used this lesson to some effect on Mom, with more success on my siblings, and with mixed results on various employers. One place it has never failed me, though, is flash photography.
The big problem with most flash photography is that it uses the flash on the camera. That flash takes the same angle on the subject as the camera’s lens, so it throws harsh shadows, creates red eye, and generally makes The Night of the Living Dead look like the end result from Extreme Makeover. As if that isn’t enough, it also eats camera battery power alive.
Flash really needs to take a different point of view than your lens. An external flash can make the single biggest improvement to the quality of your flash images. And you don’t need a hot shoe or sync socket to use an external flash. Nor do you need a personal trainer to heft the gear around. All you need is a flash on your camera, although hot shoes and sync sockets are also nice to have.
In fact, there are many ways to put an external flash system together. Let’s look at two variations: a simple wireless system you can use with any digicam and a professional bounce flash system.
If your digicam has only the flash it was born with, your external flash should be a slave flash : a flash that fires when it gets its cue (through infrared energy) from your digicam’s flash.
The digicam flash becomes a trigger now. It goes off and tells the external flash that it is now time to fire. To ensure that this works properly, use Fill Flash or Manual Flash mode and mask your digicam flash with a piece of exposed slide film so it won’t illuminate the scene. The slide film acts as an infrared filter, triggering the external slave flash.
The good news with this rig is that you now have an independent flash, triggered by the camera, that you can position anywhere you want. The bad news is that you’ve disabled your camera’s dedicated-flash exposure system. The way dedicated flash works is that the camera initiates the sequence by firing the flash. As the light is reflected off the subject back to the camera, a sensor measures the reflected light. When the amount of light matches the camera’s auto-exposure setting, the camera stops the flash.
I know this sounds truly amazing, but it works. And it all happens in a fraction of a second. The challenge is that when you add an external unit without maintaining this communication system between camera and flash, the camera can no longer control the duration of the external flash. It is either on or off. So, you’ll need to experiment a bit with this setup to get good exposures. I recommend you actually take notes, marking down the distance of the flash from your subject and all of your camera settings, so you can repeat your successes.
If your camera has a Manual Exposure mode, set the shutter speed to 1/30 of a second and set the f-stop to match the flash’s power (according to its documentation). You can fiddle with the shutter speed to capture as much of the background light as you want. A faster shutter speed (say, 1/60 or 1/125 of a second) records less background in low-light conditions. Then, aim the slave at your subject and fire away.
You can use an old flash from your 35mm gear as a slave if you add an IR trigger, such as the US$20 Wein Peanut slave (http://www.weinproducts.com/batteryfree.htm). Or, you can buy a slave with a built-in IR trigger, such as the Zenon MagneFlash flat panel (http://www.imaging-resource.com/ACCS/ZMF/ZMF.HTM), shown in Figure 4-4, or SR Inc.’s Digi-Slave (http://www.srelectronics.com).
If your digicam always fires a preflash (like most Olympus models do), make sure your slave features a delayed trigger. Otherwise, your slave will fire during the preflash, before the shutter opens. Zenon makes delayed-shutter versions of the MagneFlash, and the Digi-Slave line can be configured to fire on the first or second flash from your digicam.
With any digicam, you can enjoy the advantage of an external flash. When you bring your own light to the party, you’ll never see red eye, your shadows will be more natural, and your camera batteries will last longer. You might even enjoy making the shadows fall where they do no harm and perhaps flatter the subject with a softer bounce light that covers a wide area.
As the sign in my father’s office suggested, a different angle on things improves the picture.
—Mike Pasini
Get Digital Photography Hacks now with the O’Reilly learning platform.
O’Reilly members experience books, live events, courses curated by job role, and more from O’Reilly and nearly 200 top publishers.


