
Chapter 3. Installation and configuration 89
1)Add, 2)Remove ##, 3)Modify Hub ##, 4)UserAccess ##, 5)Cancel,
6)Save/exit: 6
... creating config file
"/opt/IBM/ITM/config/waco_ms_REMOTE_WACO.config"
... creating file "/opt/IBM/ITM/tables/REMOTE_WACO/glb_site.txt."
... updating "/opt/IBM/ITM/config/kbbenv"
... verifying Hot Standby.
TEMS configuration completed...
After the configuration is finished, a configuration file is generated in the
install_dir/config directory using the format
<host_name>_ms_<tems_name>.config.
3.2.3 Installing the Tivoli Enterprise Portal Server
This section describes the steps for installing and configuring Tivoli Enterprise
Portal Server on Windows, AIX, or Linux servers.
Installing the portal server on Windows server
The installation procedure for a portal server on Windows includes steps for
configuring the connection between the portal server and the following
components:
The hub monitoring server
The portal server database
The Tivoli Data Warehouse database
Complete the following steps to install the Tivoli Enterprise Portal Server and
portal client on a Windows computer:
1. Launch the installation wizard by double-clicking the setup.exe file in the
\WINDOWS subdirectory of the installation media.
2. Click Next in the Welcome window.
3. In the Install Prerequisites window, read the information about the required
levels of IBM Global Security Toolkit (GSKit) and IBM Java.
4. Click Next. The prerequisite software is installed if necessary.
5. Read and accept the software license agreement by clicking Accept.
Note: Tivoli Enterprise Portal Server requires a database to store information;
please refer to 2.2.5, “Supported databases for Tivoli Enterprise Portal Server
and Tivoli Data Warehouse” on page 37.
90 Deployment Guide Series: IBM Tivoli Monitoring V6.2
6. If you do not have an RDBMS (IBM DB2 or Microsoft SQL Server) installed on
this computer, a message regarding potentially missing required software is
displayed. Stop the installation, install the RDBMS, and begin the installation
again.
7. Specify the directory where you want to install the portal server software and
accompanying files. The default location is C:\IBM\ITM. Click Next.
8. Type an encryption key to use. This key should be the same as what was
used during the installation of the hub monitoring server to which this portal
server will connect. Click Next and then OK to confirm the encryption key.
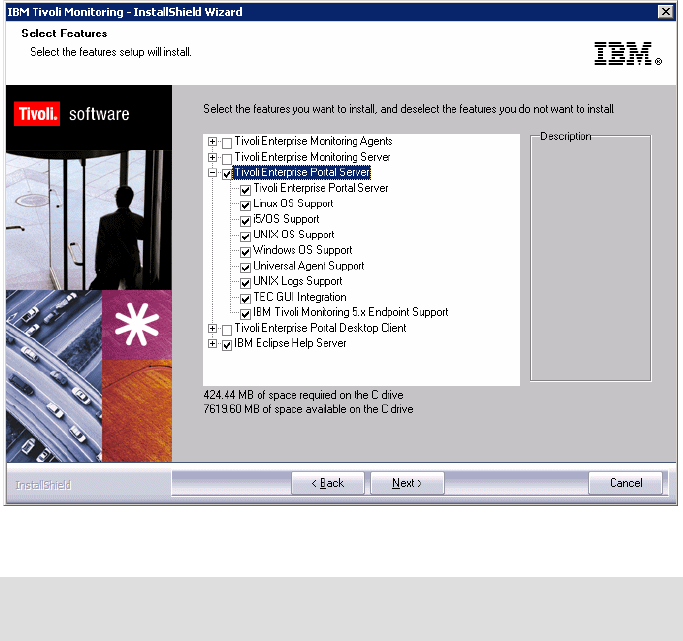
9. In the Select Features window (Figure 3-16), select Tivoli Enterprise Portal
Server from the list of components to install. Remember to leave the
components under Tivoli Enterprise Portal Server selected; the support check
boxes in the subtree are for installing application support files.
Figure 3-16 Selecting features to install
Note: The IBM Eclipse Help Server is automatically selected when you
select the portal server.
Chapter 3. Installation and configuration 91
10.
Optionally select the following additional components to install:
a. If you want to view events on the IBM Tivoli Enterprise Console event
server through the Tivoli Enterprise Portal, expand Tivoli Enterprise
Portal Server and ensure that TEC GUI Integration is selected.
b. If you want to install a portal desktop client on this computer, select Tivoli
Enterprise Portal Desktop Client. When you select the Tivoli Enterprise
Portal Desktop Client check box, all of the check boxes in the attached
subtree are automatically selected. These check boxes are for installing
application support files for base monitoring agents to the portal desktop
client. Leave these check boxes selected as you did for the portal server in
Step 9 on page 90.
11.Click Next.
12.If no IBM Tivoli Monitoring V6.2 component has been previously installed on
this computer, a window is displayed for you to select a program folder for the
Windows Start menu. Select a program folder and click Next. The default
program folder name is IBM Tivoli Monitoring.
13.Review the installation summary details. The summary identifies what you are
installing and where you chose to install it. Click Next to start the installation.
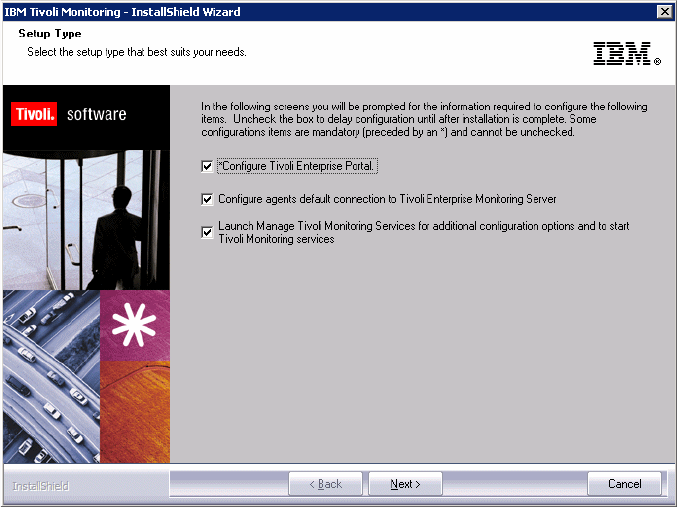
After installation is complete, a configuration window (called the Setup Type
window) is displayed.
92 Deployment Guide Series: IBM Tivoli Monitoring V6.2
14.Clear the check boxes for any components that have already been installed
and configured (at the current release level) on this computer (Figure 3-17),
unless you want to modify the configuration.
Figure 3-17 Selecting components to configure
15.Type the host name of the computer where you are installing the portal server
(Figure 3-18 on page 93). (The host name of this computer is displayed by
default.) Click Next.
Get Deployment Guide Series: IBM Tivoli Monitoring V6.2 now with the O’Reilly learning platform.
O’Reilly members experience books, live events, courses curated by job role, and more from O’Reilly and nearly 200 top publishers.

