Chapter 4. Containers
Kubernetes is a container orchestrator that uses a container runtime to instantiate containers inside of Pods. Many Kubernetes clusters with version 1.24 or later use the container runtime containerd.
Container runtime used on a Kubernetes node
You can fetch information about the container runtime used on any node of a Kubernetes cluster. Simply look at the output of the CONTAINER-RUNTIME column produced by running the command kubectl get nodes -o wide. Check the Kubernetes documentation to learn more about configuring a container runtime for a
cluster.
For the exam, you are expected to understand the practical aspects of defining, building, and publishing container images, which this chapter covers. We’ll also touch on running a container image inside of a container. For all of those operations, we’ll use Docker Engine as the example container runtime though similar functionality is provided by other implementations.
The discussion on containers in this book only scratches the surface. There’s a lot more information on this topic if you want to fully immerse yourself. I can recommend the book Docker: Up & Running (O’Reilly) by Sean P. Kane and Karl Matthias for a detailed explanation of Docker.
Container Terminology
A container packages an application into a single unit of software including its runtime environment and configuration. This unit of software usually includes the operating system, the application’s source code or the binary, its dependencies, and other needed system tools. The declared goal of a container is to decouple the runtime environment from the application to avoid the “but it works on my machine” problem.
The container runtime engine is the software component that can run containers on a host operating system. Examples include Docker Engine or containerd. A container orchestrator uses a container runtime engine to instantiate a container while adding sophisticated features like scalability and networking across the workload. Kubernetes is an example of container orchestrators. Other tools like Nomad are capable of scheduling various types of workload including containers.
The process of bundling an application into a container is called containerization. Containerization works based on instructions defined in a container file. The Docker community calls this a Dockerfile. The Dockerfile explicitly spells out what needs to happen when the software is built. The result of the operation is a container image.
The container image is usually published to a container registry for consumption by other stakeholders. Docker Hub is the primary registry for container images available for public use. Other public registries like GCR and Quay are available. Figure 4-1 illustrates the concepts in the context of containerizing an application.

Figure 4-1. Containerization process
To summarize, the Dockerfile is a blueprint of how the software should be packaged, the image is the artifact produced by the process, and the container is a running instance of the image serving the application. We’ll look at a more concrete example next.
Containerizing a Java-Based Application
Let’s assume we want to containerize a web application written in Java. The application doesn’t write core functionality from scratch but uses the Spring Boot framework as an external library. In addition, we want to control the runtime behavior with the help of environment variables. For example, you may want to provide URLs and credentials to connect to other services like a database. We’ll talk through the process step by step and execute the relevant Docker commands from the terminal. If you want to follow along, you can download a sample application from the project generator Spring Initializr.
Writing a Dockerfile
Before we can create the image, we have to write a Dockerfile. The Dockerfile can reside in any directory and is a plain-text file. The instructions that follow use the Azul JRE distribution of Java 21 as the base image. A base image contains the operating system and the necessary tooling, in this case Java.
Moreover, we include the binary file, an executable Java archive (JAR), into the directory /app of the image. Finally, we define the Java command that executes the program and expose the port 8080 to make the application accessible when run in a container. Example 4-1 outlines a sample Dockerfile.
Example 4-1. Dockerfile for building a Java application
FROMazul/zulu-openjdk:21-jreWORKDIR/appCOPYtarget/java-hello-world-0.0.1.jarjava-hello-world.jarENTRYPOINT["java","-jar","/app/java-hello-world.jar"]EXPOSE8080

Defines the base image.

Sets the working directory of a container. Any
RUN,CMD,ADD,COPY, orENTRYPOINTinstruction will be executed in the specified working directory.
Copies the JAR containing the compiled application code into the working directory.

Sets the default command that executes when a container starts from an image.

Documents the network port(s) the container should listen on.
While writing Dockerfile looks straightforward to beginners, optimizing the container image for a small footprint and security aspects isn’t. You can find a more detailed list of best practices for writing Dockerfiles in the Docker documentation.
Building the Container Image
With the Dockerfile in place, we can create the image. The following command provides the name of the image and the tag. The last argument points to the context directory. A context directory contains the Dockerfile as well as any directories and files to be included in the image. Here, the context directory is the current directory we reside in referenced by “ . ”:
$ docker build -t java-hello-world:1.1.0 .
[+] Building 2.0s (9/9) FINISHED
 => [internal] load .dockerignore
 => => transferring context: 2B
 => [internal] load build definition from Dockerfile
 => => transferring dockerfile: 284B
 => [internal] load metadata for docker.io/azul/zulu-openjdk:21-jre
 => [auth] azul/zulu-openjdk:pull token for registry-1.docker.io
 => [1/3] FROM docker.io/azul/zulu-openjdk:21-jre@sha256:d1e675cac0e5...
 => => resolve docker.io/azul/zulu-openjdk:21-jre@sha256:d1e675cac0e5...
 => => sha256:d1e675cac0e5ce9604283df2a6600d3b46328d32d83927320757ca7...
 => => sha256:67aa3090031eac26c946908c33959721730e42f9195f4f70409e4ce...
 => => sha256:ba408da684370e4d8448bec68b36fadf15c3819b282729df3bc8494...
 => [internal] load build context
 => => transferring context: 19.71MB
 => [2/3] WORKDIR /app
 => [3/3] COPY target/java-hello-world-0.0.1.jar java-hello-world.jar
 => exporting to image
 => => exporting layers
 => => writing image sha256:4b676060678b63de137536da24a889fc9d2d5fe0c...
 => => naming to docker.io/library/java-hello-world:1.1.0

What's Next?
  View a summary of image vulnerabilities and recommendations → ...
Listing Container Images
As indicated by the terminal output, the image has been created. You might have noticed that the base image has been downloaded as part of the process. The generated image can be found in your local Docker Engine cache by running the following command:
$ docker images
REPOSITORY         TAG       IMAGE ID       CREATED          SIZE
java-hello-world   1.1.0     4b676060678b   49 seconds ago   342MB
Running the Container
It’s time to run the application in a container. The run command points to an image and executes its logic in a container:
$ docker run -d -p 8080:8080 java-hello-world:1.1.0
b0ee04accf078ea7c73cfe3be0f9d1ac6a099ac4e0e903773bc6bf6258acbb66
We told the command to forward the port 8080 accessible on localhost to the container port 8080 using the -p CLI option. The -d CLI option runs the container in the background, which means it will detach from the container and return to the terminal prompt. This means we should now be able to resolve the application’s
endpoint from the local machine. As the following command shows, a simple curl to the root context path renders the message “Hello World!”:
$ curl localhost:8080
Hello World!
Listing Containers
Any running containers can be listed to display their runtime properties. The following command renders the container started earlier. The output includes the container ID for later reference. Add the flag -a to render terminated containers as well:
$ docker container ls
CONTAINER ID   IMAGE                    COMMAND                  ...
b0ee04accf07   java-hello-world:1.1.0   "java -jar /app/java…"   ...
Interacting with the Container
Once the container has been started, you can interact with it. All you need is the container ID. Use the logs command to inspect log messages produced by the application. Inspecting logs can be helpful for troubleshooting. The following command renders the log messages produced by Spring Boot upon container startup:
$ docker logs b0ee04accf07
...
2023-06-19 21:06:27.757  INFO 1 --- [nio-8080-exec-1] \
o.a.c.c.C.[Tomcat].[localhost].[/]       : Initializing \
Spring DispatcherServlet 'dispatcherServlet'
2023-06-19 21:06:27.757  INFO 1 --- [nio-8080-exec-1] \
o.s.web.servlet.DispatcherServlet        : Initializing \
Servlet 'dispatcherServlet'
2023-06-19 21:06:27.764  INFO 1 --- [nio-8080-exec-1] \
o.s.web.servlet.DispatcherServlet        : Completed \
initialization in 7 ms
You can dig deeper into the internals of running containers if the container image is packaged with a command-line shell. For example, you may want to inspect files consumed or produced by the application. Use the exec command to run a command in the container. The flag -it allows for iterating with the container until you are ready to exit out of it. The following command opens an iterative bash shell to the running container:
$ docker exec -it b0ee04accf07 bash
root@b0ee04accf07:/app# pwd
/app
root@b0ee04accf07:/app# exit
exit
To leave the interactive bash shell, run the exit command. You’ll return to the terminal prompt on your host machine.
Publishing the Container Image
To publish an image to a registry, you’ll have to do some prework. Most registries require you to provide a prefix that signifies the username or hostname as part of the container image name, which you can achieve with the tag command.
For example, Docker Hub requires you to provide the username. My username is bmuschko and therefore I have to retag my image before pushing it:
$ docker tag java-hello-world:1.1.0 bmuschko/java-hello-world:1.1.0
The tag command does not create a copy of the container image. It simply adds another identifier pointing to the existing container image, as shown in the following output. The image ID and size of the container image is the same for both entries:
$ docker images
REPOSITORY                  TAG       IMAGE ID       CREATED         SIZE
bmuschko/java-hello-world   1.1.0     4b676060678b   6 minutes ago   342MB
java-hello-world            1.1.0     4b676060678b   6 minutes ago   342MB
If the registry is protected, you’ll also have to provide the credentials. For Docker Hub, we are logging in with username:
$ docker login --username=bmuschko
Password: *****
Login Succeeded
Finally, you can push the image to the registry using the push command:
$ docker push bmuschko/java-hello-world:1.1.0
The push refers to repository [docker.io/bmuschko/java-hello-world]
a7b86a39983a: Pushed
df1b2befe5f0: Pushed
e4db97f0e9ef: Mounted from azul/zulu-openjdk
8e87ff28f1b5: Mounted from azul/zulu-openjdk
1.1.0: digest: sha256:6a5069bd9396a7eded10bf8e24ab251df434c121f8f4293c2d3ef...
You can discover the published container image through the Docker Hub web page, as shown in Figure 4-2. The “Tags” tab lists all available tags for the image including their details and quick reference to the docker command for pulling the image.
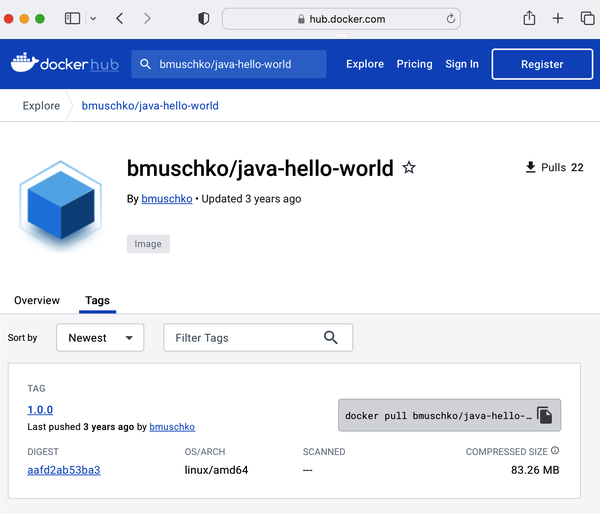
Figure 4-2. Discovering container images on Docker Hub
Anyone with access to the registry can now consume the container image using the pull command.
Saving and Loading a Container Image
Instead of publishing a container image to a container registry, you may want to save it to a file. Files can be easily stored and backed up on a shared drive and don’t require a container registry. The save command saves one or many images to a tar archive. The resulting archive file contains all parent layers, and all tags + versions. The following command saves the container image to the file java-hello-world.tar:
$ docker save -o java-hello-world.tar java-hello-world:1.1.0
To load a container image from a tar archive, use the load command. The command restores both images and tags. The following command loads the container image from the file java-hello-world.tar:
$ docker load --input java-hello-world.tar
Loaded image: java-hello-world:1.1.0
The image is now available in the cache, as shown by running the images command:
$ docker images
REPOSITORY         TAG       IMAGE ID       CREATED         SIZE
java-hello-world   1.1.0     4b676060678b   7 minutes ago   342MB
Going Further
Thus far you have experienced the most common developer workflows: containerizing an application and pushing the image to a registry. There’s far more to learn about building and running containers, but that is outside the scope of this book, and we won’t dive any deeper here. If you’d like to learn more, a good starting point is the Docker documentation.
Summary
Application developers use containerization to bundle the application code into a container image so that it can be deployed to Kubernetes clusters as a single unit of runnable software. The containerization process defines, builds, runs, and publishes a container image using a container runtime engine. In this chapter, we used Docker Engine to demonstrate the process for a Java-based application; however, the steps involved would look similar for applications written in a different programming language.
Exam Essentials
- Gain practical experience with the containerization process
-
Pods run container images inside of a container. You need to understand how to define, build, run, and publish a container image apart from Kubernetes. Practice the use of the container runtime engine’s command-line tool to fulfill the workflow.
- Compare the functionality of different container runtime engines
-
You should get familiar with Docker Engine specifically for understanding the containerization process. At the time of writing, Docker Engine is still the most widely used container runtime engine. Branch out by playing around with other container runtime engines like containerd or Podman.
- Familiarize yourself with other workflows
-
As an application developer, you will deal with defining, building, and modifying container images daily. Container runtime engine support other, less-known features and workflows. It can’t hurt to read through the container runtime engine’s documentation to gain broader exposure.
Sample Exercises
Solutions to these exercises are available in Appendix A.
-
Navigate to the directory app-a/ch04/containerized-java-app of the checked-out GitHub repository bmuschko/ckad-study-guide. Inspect the Dockerfile.
Build the container image from the Dockerfile with the tag
nodejs-hello-world:1.0.0.Run a container with the container image. Make the application available on port 80.
Execute a
curlorwgetcommand against the application’s endpoint.Retrieve the container logs.
-
Modify the Dockerfile from the previous exercise. Change the base image to the tag
20.4-alpineand the working directory to/node.Build the container image from the Dockerfile with the tag
nodejs-hello-world:1.1.0.Ensure that container image has been created by listing it.
-
Pull the container image
alpine:3.18.2available on Docker Hub.Save the container image to the file alpine-3.18.2.tar.
Delete the container image. Verify the container image is not listable anymore.
Reinstate the container image from the file alpine-3.18.2.tar.
Verify that the container image can be listed.
Get Certified Kubernetes Application Developer (CKAD) Study Guide, 2nd Edition now with the O’Reilly learning platform.
O’Reilly members experience books, live events, courses curated by job role, and more from O’Reilly and nearly 200 top publishers.

