Chapter 4. Getting Started with Microsoft Azure Functions
In this chapter, we show you how to start creating serverless applications using Azure Functions, write basic functions using the Python programming language, and use Azure Blob to store and retrieve files and data.
Azure Functions
To begin working with Azure Functions, first you must understand the terminology that Azure uses for these services:
- Functions
-
We call various functions in response to different events and return a result. Our functions are stateless in general but can interact with databases and other resources. With Azure Functions in the Consumption plan (pay-per-execution pricing model), functions by default should take no more than five minutes to execute. You can extend this to 10 minutes by changing the timeout property.
- Function Apps
-
Several functions are grouped into Apps, which share a domain name for URI and other configurations. The Function App is the unit of scale. When the Function App is scaled out, additional resources are allocated to run multiple instances of the Azure Functions host. Conversely, as compute demand is reduced, the scale controller removes function host instances. The number of instances is eventually scaled down to zero when no functions are running within a Function App.
- Functions Project
-
This usually refers to the local folder in which all source code is stored for a particular Function App.
- Resource group
-
A collection of resources that share the same life cycle, permissions, and policies, so it is easier to assign directly to one or several Function Apps.
- Triggers and bindings
-
Triggers define how a function is invoked. A common trigger is an HTTP/S call for a REST API interaction, but you can invoke functions in several different ways. For example, a function can be invoked automatically when a file is created in the storage area or when data changes in a database. You can optionally add input and output bindings to the configuration of a function, describing data from related services that should be available for the function to process.
Let’s now create a Function App via the Azure Portal. We’ll show you how to install all the prerequisites for local development and create a Functions Project on your local computer, add a function to it that is triggered by an HTTP request event, launch it locally to test the function, and deploy it to the Function App to test it again online. We’ll also look at how to use Visual Studio Code to create new Function Projects and to create, run, and debug new functions.
Creating a Function App by Using Azure Portal
The first thing you need to do is create an Azure account.
Note
Please remember that this URL and other URLs in this book may change in the future.
On the Azure Portal dashboard (see Figure 4-1), in the panel on the left side, click “Create a resource.” Then, in the list of resources that opens, select Function Apps.
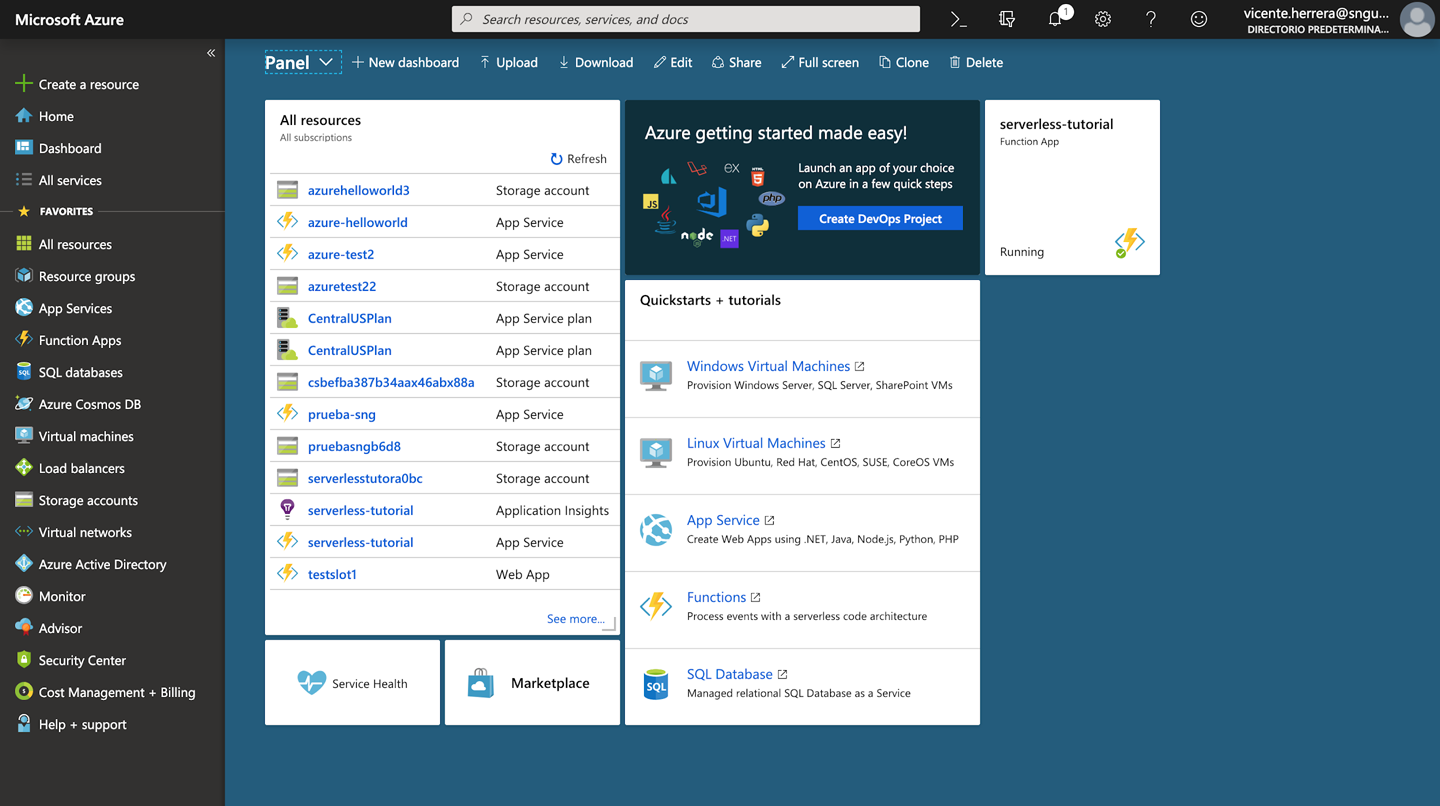
Figure 4-1. The Azure Portal dashboard
You’ll be presented with several options that you can customize:
- App name
-
This name will also be used for the URL of the resources you create in the Function App.
- Subscription
-
The payment account that will be used.
- Resource group
-
A name to group several Azure services that you want to manage together. Select “Create new.”
Note
Python Functions-as-a-Service (FaaS) is in a preview stage as of this writing. This means that we can use it and it is well documented, but some features might not be optimized or fully available. Microsoft rarely leaves new services in a preview state for long; this is a way to give users an advance look at the technology.
Now you need to choose some specific options (see Figure 4-2):
- OS
-
Choose Linux.
- Publish
-
Select Code.
- Runtime Stack
-
Set this to Python.
- Storage
-
Where code will be stored in Azure. Select “Create new.”
- Application Insights
-
Activate this to collect monitoring data and receive recommendations about usage and optimization of your Function App.
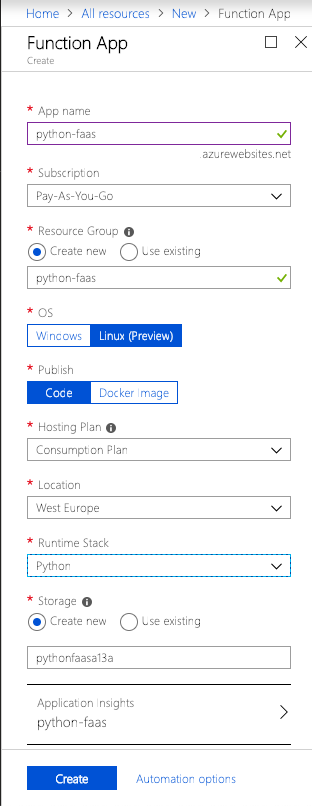
Figure 4-2. Setting options for a Function App
Click Create. It takes several minutes for the creation process to finish, and a notification will inform you when the process is done. When you see it, your Function App is ready! You can click the notification message, which is a quick link that will appear on the dashboard, as shown in Figure 4-3; or, in the menu on the left, select “All resources” and then search for your Function App to start working on it.
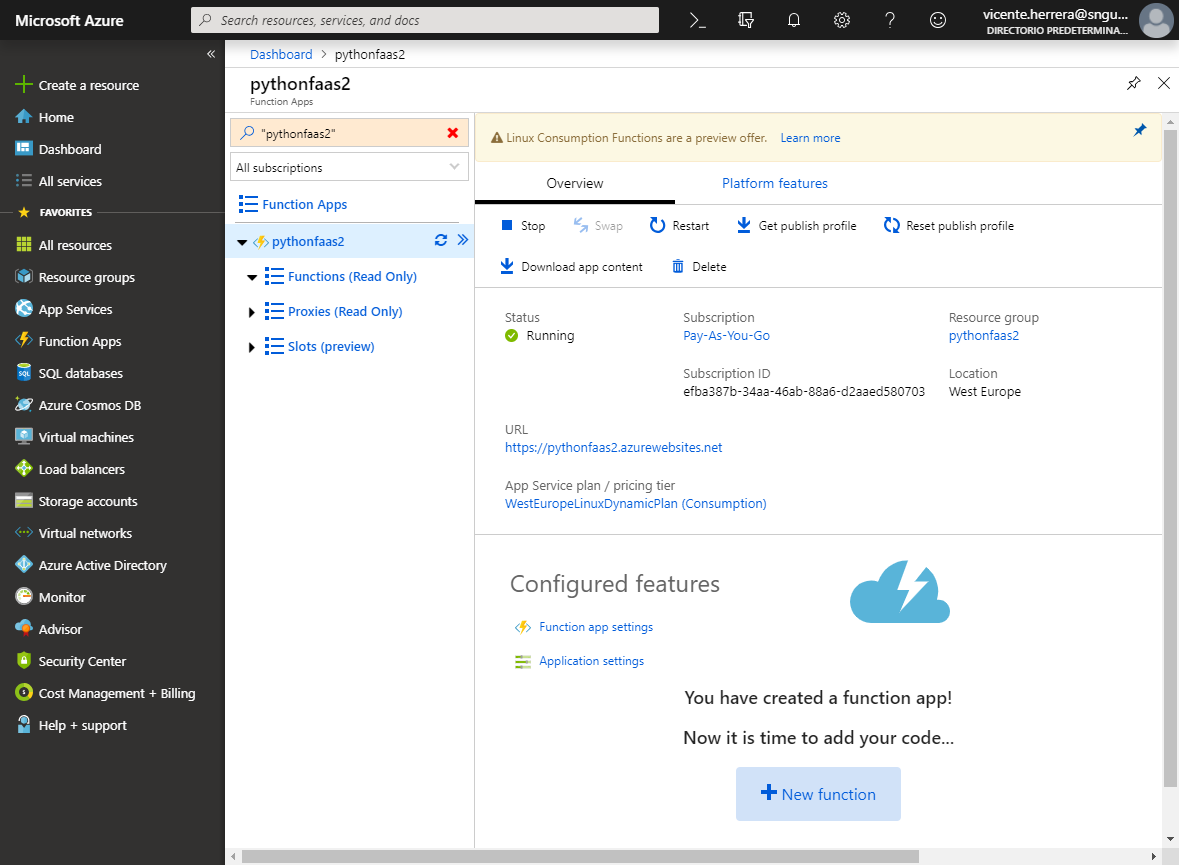
Figure 4-3. The Azure dashboard showing the notification that your Function App is ready
On the Function App web page, you can start, stop, or restart the app and change many options; for example, you can define a custom domain, change the authentication/authorization settings and the CORS security definition, and configure monitoring and metrics.
At the bottom of the page, click “New function.” You’ll be asked if you want to program it using “VS Code” or “Any editor + Core Tools,” as illustrated in Figure 4-4. Whichever you choose, you’ll be presented with a brief tutorial on how to use those tools to program functions, but we’ll also give you a more detailed explanation later in this chapter.
Note
If you had selected a different programming language—for example, JavaScript—you would have a third option that allowed you to program new functions within the Portal using a basic online code editor. Using the Portal editor is a good exercise if you want to test simple things within your functions, but you eventually will need a local development environment for full-fledged function creation.
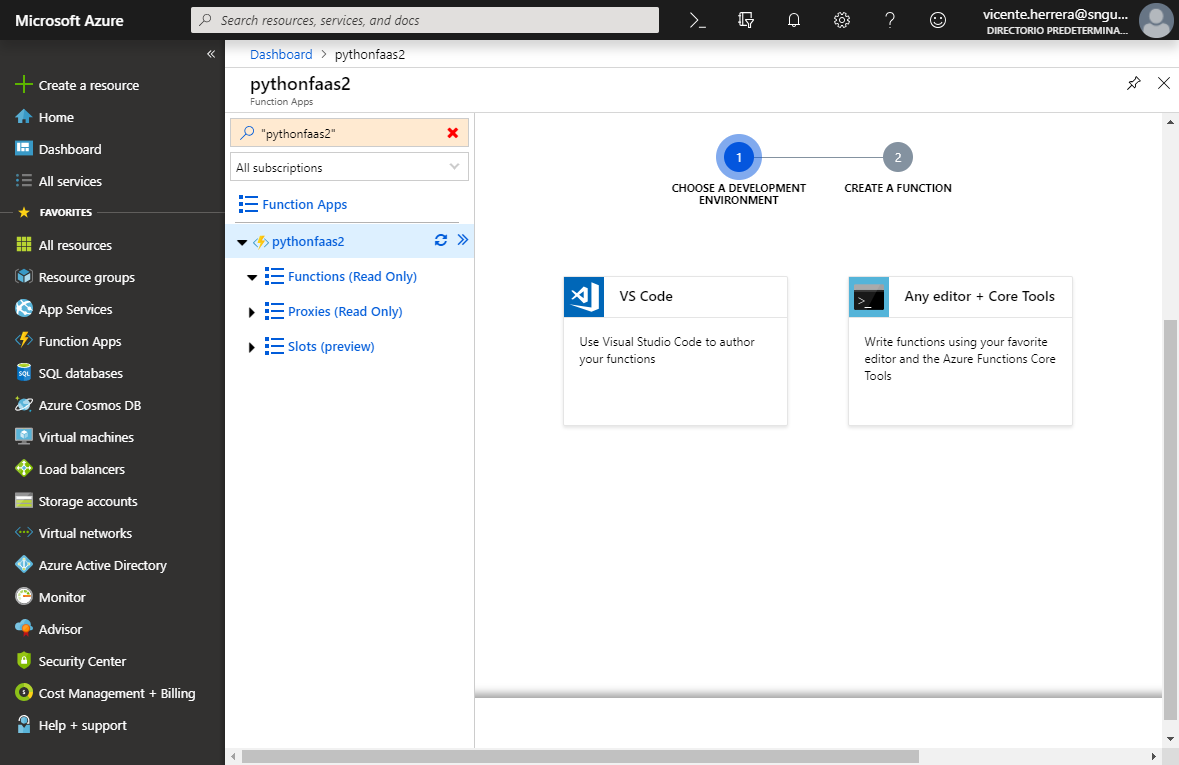
Figure 4-4. Choosing a development environment
Local Development Environment
Now you need to prepare your local environment to code functions. First, you need to install all the prerequisites. All software referenced in the subsections that follow is open source and available for any operating system.
.NET Core v2.x
Azure Functions run on the .NET runtime in Azure or on your computer. You must install it even if you’re not going to use a .NET language.
.NET Core is the new implementation of the .NET platform as an open source project under the .NET Foundation. It is compatible with the latest version of .NET Framework that was available only on Windows, but in the future the framework will be discontinued and all further development will rely on .NET Core.
.NET Core differs on .NET Framework in that it has a modular architecture in which you can install and upgrade individual components using NuGet, whereas .NET Framework requires a full update of the framework to fix things or deploy new features. That makes development in .NET Core more agile.
You can download .NET Core v2.x from the Microsoft website.
Package manager
To install Azure Functions Core Tools later, you will need a package manager to handle the installation and future updates:
-
For Linux, you can use the existing package manager of your distribution.
-
For macOS, use Homebrew.
-
For Windows, one of the alternatives is Chocolatey.
You also can use Node.js to install Core Tools on Windows.
Node.js
Node.js is not essential for programming in Python, but it is necessary to program functions in JavaScript or to install Azure Core Tools on Windows without using Chocolatey.
When using it with Functions, you might encounter an error informing you to use the latest version, like 10.6, when you already have a stable one like 11.x. To prevent that, we recommend that you install the Node Version Manager tool (nvm).
Then, use it to switch to Node.js version 10.6.0 by using the following command:
nvm install 10.6.0
You might need to reinstall globally installed Node Package Manager (npm) packages after the switch. You can check whether the correct version is running by using this command:
node -v
Azure Functions Core Tools 2
Azure Functions Core Tools is a command-line tool that you can use to create new Functions Projects, add code for new Functions to them, execute them on your local machine, deploy them online, and much more.
We will use version 2.x, which enables the usage of Python. After all the prerequisites are satisfied, it’s easy to install.
On Linux Ubuntu 18.04, use these commands:
wget -q https://packages.microsoft.com/config/ubuntu/18.04/
    packages-microsoft-prod.deb
sudo dpkg -i packages-microsoft-prod.deb
sudo apt-get update
sudo apt-get install azure-functions-core-tools
For other Linux distributions, use these instructions.
You can also install it on macOS, using Homebrew:
brew tap azure/functions
brew install azure-functions-core-tools
on Windows, using Chocolatey on an administration command line:
choco install azure-functions-core-tools
or using npm:
npm i -g azure-functions-core-tools --unsafe-perm true
Python 3.6 on Linux Ubuntu 18
Python 3.6 is already installed in Linux Ubuntu 18, but there are a couple of things you still need to take into consideration. First, instead of calling python from the command line, you should use python3. And you need to install the virtual environment tool for Python by using the following command:
apt-get install python3-env
Python 3.6 on Windows
You need the Python SDK to use it as a programming language. As of this writing, Azure Functions requires Python to be version 3.6, specifically. If you are new to Python, you should know that Python 2.x and Python 3.x usually coexist on many machines, as many packages support 2.x but might not be totally compatible with 3.x.
As just mentioned, Azure Functions requires Python 3.6, but the latest version of Python is 3.7, so installing the latest version is not suggested. If you’ve accidentally upgraded, just download the 3.6 installer. Remember on installation to select the option to “Add Python 3.6 to PATH,” as shown in Figure 4-5.
By default, the installation directory will be:
c:\users\<username>\AppData\Local\Programs\Python\Python36
But you can change it to something shorter for all users, like this, by selecting “Customize installation”:
C:\python\python36
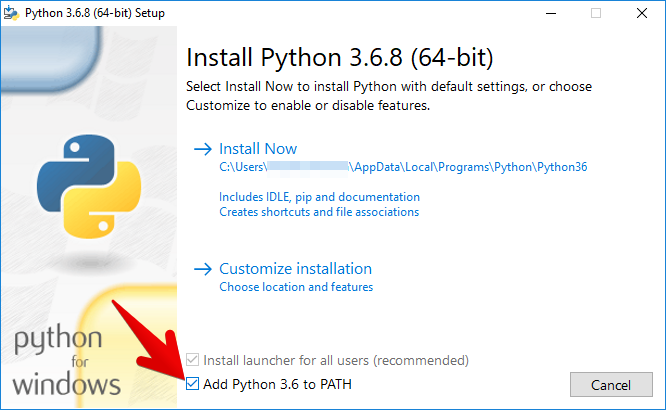
Figure 4-5. Installing Python 3.6
Python 3.6 on macOS
Python 2.x is already installed on macOS, and the operating system uses it for some things, so you don’t want to tamper with that version. You can identify which version of Python is running by using the following at the command line:
python -V
Homebrew always installs the latest version of a program by default, but you can instruct it to use an older one by specifying the hash of its repository URL. Here’s how to do that for Python 3.6.7:
brew unlink python
brew install https://raw.githubusercontent.com/Homebrew/homebrew-core/
    f2a764ef944b1080be64bd88dca9a1d80130c558/Formula/python.rb
You might encounter an error linking to the /user/local/Frameworks folder. If this happens, you must create that directory (and reinstall it again):
sudo mkdir /usr/local/Frameworks
sudo chown $(whoami):admin /usr/local/Frameworks
When you have several versions of Python installed with Homebrew, you can see a list of them using the following:
brew info python
You can switch to a different version with:
brew switch python 3.6.7
Take into consideration that packages installed using the pip tool for Python might need to be reinstalled when switching versions.
An alternative for this that might or might not work for you is to use the pyenv tool to manage Python versions, which you can install as follows:
xcode-select --install
brew update
brew install pyenv
Then you can install and change Python versions by using these commands:
pyenv install 3.6.7
pyenv global 3.6.7
If you get a “zlib not available” error on macOS Mojave, specify the header libraries by using this command:
sudo xcode-select -s /Library/Developer/CommandLineTools
Or, specify the actual location:
CFLAGS="-I$(xcrun --show-sdk-path)/usr/include" pyenv install -v 3.6.7
Or, if you installed zlib with Homebrew, set CPPFLAGS by doing the following:
CPPFLAGS="-I$(brew --prefix zlib)/include" pyenv install -v 3.6.7
You might experience some slight differences on Linux systems.
Note
Git is the most popular version control system, and it might already be installed on your computer. It is not mandatory to use it, but any time you create a Functions Project, Core Tools will also initialize a new Git repository in it.
Creating a Functions Project Using Core Tools
To create a new Functions Project, you should use a Python virtual environment. This is a hidden folder in which Python stores copies of all dependencies (including the Python executable version) alongside necessary Python packages. This means that any time you execute the project, on any machine, it will run under exactly the right conditions and with the right dependencies already available.
The commands that follow create a directory, change into it, create a Python virtual environment, activate it, get out of the directory, and use the Core Tools func command-line tool to initialize the Functions Project. The order is important because func requires the Python virtual environment to be created and active before creating the Functions Project.
On macOS and Linux, using a Bash shell, the commands are as follows:
mkdir myproject
cd myproject
python -m venv .env
source ./.env/bin/activate
cd ..
func init myproject
You can find different activate scripts in the .env/bin directory for different shells, like fish.
Creating the project on Windows with cmd.exe is similar:
mkdir myproject
cd myproject
python -m venv .env
.\.env\bin\activate.bat
cd ..
func init myproject
You’ll be asked what runtime you want to use; choose Python. After that, several files will be generated in your directory.
You should also enter that directory and install or update pip (to install other packages), ptvsd (to debug Python files), and pylint (a linter to check for code mistakes). You might already have those installed in your global Python, but it might be necessary to install them again in your recently activated Python virtual environment:
cd myproject
python -m pip install --upgrade pip
python -m pip install --upgrade ptvsd
python -m pip install --upgrade pylint
Creating new functions using Core Tools
You have activated a Python virtual environment and have an empty Functions Project. Let’s add a new function using Core Tools:
func new
You’ll be asked to select a template from a list. The choices include general triggers:
-
An HTTP trigger to trigger the execution of your code by using an HTTP request
-
An Azure Blob Storage trigger to process storage blobs when they are added to containers
-
An Azure Cosmos DB trigger to process Cosmos DB documents when they are added or updated in collections in a NoSQL database
and event- and queue-related triggers:
-
An Azure Event Grid trigger to respond to events delivered to a subscription in Azure Event Grid
-
An Azure Event Hub trigger to respond to events delivered to an Azure Event Hub
-
An Azure Queue Storage trigger to respond to messages as they arrive in an Azure Storage queue
-
An Azure Service Bus Queue trigger to connect to other Azure or on-premises service message queues
-
An Azure Service Bus Topic trigger to connect to other Azure services or on-premises services by subscribing to topics
-
A Timer trigger to execute a function on a predefined schedule
If you don’t understand much of the previous list, don’t worry. The most important item is the HTTP trigger; the rest you can learn about later when you use the related Azure services.
Choose “HTTP trigger.” This means that your new function will activate when the app receives an HTTP call (like the one a browser makes when it requests a web page from a server). This is what is used in a REST API, whereas other kinds of clients connect to our API endpoints using HTTP requests.
We will need to provide a name for the function—in this case we will call it, very simply, HttpTrigger—and a new directory will be created in the project with that name. Inside of it, there will be three files:
- function.json
-
Configuration file for our function
- Sample.dat
-
Sample data to test the function
- __init__.py
-
The main file with the code that our function runs
Let’s take a look at each of these, starting with the most important one (the one that has the code for the function), __init__.py:
importloggingimportazure.functionsasfuncdefmain(req:func.HttpRequest)->func.HttpResponse:logging.info('Python HTTP trigger function processed a request.')name=req.params.get('name')ifnotname:try:req_body=req.get_json()exceptValueError:passelse:name=req_body.get('name')ifname:returnfunc.HttpResponse(f"Hello {name}!")else:returnfunc.HttpResponse("Please pass a name in the query string or in the request body",status_code=400)
In this case, Core Tools generated an example function called main based on an example template for an HTTP request function. It takes a parameter, req, that is of type func.HttpRequest and returns a parameter also of type func.HttpResponse.
In the req.params object you will find all of the HTTP parameters passed in the URL, and you should expect a name parameter to be present, which you can read from req.params.name. You can use this to build a greeting message.
Let’s take a closer look at this function. It’s very simple. When you visit the URL that triggers the execution of the function, either you’ll see a message indicating that a name should be provided or, if you passed the name using a URL parameter, a friendly “Hello <name>” will be shown. Now let’s look in more detail at the execution of this function.
What will be returned to the user will be in the form of an HttpResponse, which has a body of text and, optionally, a status code (if not supplied, the status 200 OK will be used). These codes are standard for many kinds of HTTP status responses and are meant to make it easy to detect an error when it happens, no matter what the text message is, or an unchanged resource that can be cached. They’re also important because codes of the 4xx (request can’t be fulfilled) and 5xx (errors) type are not billed by Azure. Any time you test for an error or a resource not found, you should return one of those codes.
Starting the Function App locally using Core Tools
To test your function, you need to start the Function App locally using Core Tools via this command:
func host start
Core Tools starts a local instance of the Azure Functions runtime, with all functions waiting for events to arrive and, at the end of the log, information about how they can be triggered:
Now listening on: http://0.0.0.0:7071
Application started. Press Ctrl+C to shut down.
Http Functions:
        HttpTrigger: [GET,POST] http://localhost:7071/api/HttpTrigger
[13/01/2019 22:20:09] Host lock lease acquired by instance ID
    '00000000000000000000000005E6E4E8'.
This says the Function App is running, it’s listening at the URL http://localhost:7071/api/HttpTrigger, and it’s listening to the verbs GET and POST. If you try to visit that URL, a message that you already have seen in your code appears in the browser:
Please pass a name in the query string or in the request body
You must pass a name parameter, which you can do by using a URL like this:
http://localhost:7071/api/HttpTrigger?name=Vicente
Here’s what you get:
Hello Vicente!
So, the function waits for an HTTP request event, like the one a browser makes when visiting a web page, then runs with the parameters provided, and then returns some output. This means that you can use your browser for testing.
Function settings files
Let’s take a look at the rest of the files inside the function folder. Sample.dat is very small and not so important; it has only an example parameter set to automate testing the function:
{"name":"Azure"}
Azure generates this test automatically based on your code.
But function.json is very important, having several configuration parameters:
{"scriptFile":"__init__.py","bindings":[{"authLevel":"anonymous","type":"httpTrigger","direction":"in","name":"req","methods":["get","post"]},{"type":"http","direction":"out","name":"$return"}]}
The methods section is an array of the different HTTP verbs this function accepts, so you can program several different functions that process the same URL depending on the method used for the query. Because the directory name is the default URL for the function, to do so you need to add a parameter to function.json to explicitly change that URL, using the route key.
If you were to create a function that instead of receiving a name value as a parameter read it from the URL, the function.json file would be as follows:
{"scriptFile":"__init__.py","bindings":[{"authLevel":"anonymous","type":"httpTrigger","direction":"in","name":"req","route":"hello/{name}","methods":["get"]},{"type":"http","direction":"out","name":"$return"}]}
If you then changed your function’s code so that instead of using this:
name = req.params.get('name')
it used this:
name = req.route_params.get('name')
you could execute the function just by using a URL of the form:
http://localhost:7071/api/hello/vicente
Local settings and production settings
Another file that you will find in the root directory of your project is local.settings.json. This file stores settings that should be taken into consideration in your application only if it is executed from your local environment, not when deployed to Azure. You usually define here connection strings to databases and other key–value pairs of “secrets.” All those values will be accessible from your code in the process.env variable.
Here are the contents of local.settings.json:
{"IsEncrypted":false,"Values":{"FUNCTIONS_WORKER_RUNTIME":"python","AzureWebJobsStorage":""}}
This file is ignored by default in the Git repository, so you can store sensitive data in it without worrying if the repository is read later. When deploying your Functions Project to Azure, you should visit your Function App dashboard and set the values for the settings used, but using the data that they should have for the production environment. Click the “Application settings” link and then scroll to the section also named “Application settings” to set their production values, as demonstrated in Figure 4-6.
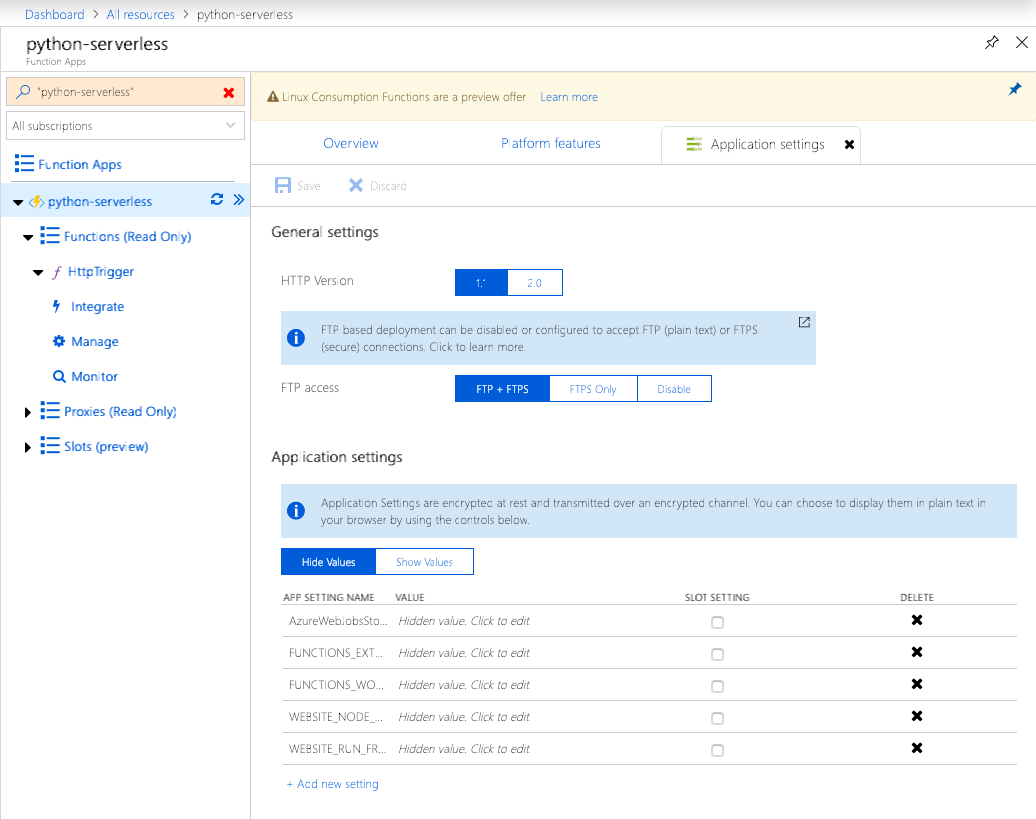
Figure 4-6. Adjusting settings in the Function App dashboard
Deployment using Core Tools
When you want to deploy your Functions Project code to your already created Function App on the Azure Portal, you can use the command line. If you have your virtual environment active, from the project’s root directory, just type the following:
func azure functionapp publish <app_name> --build-native-deps
The first time you run it, it should ask you to ensure you have the Azure CLI installed and to log in to Azure Portal to proceed. From that moment on, it will reuse your credentials and you won’t be asked again. Then, a Docker image will be provisioned to compile the Python project and dependencies to native Linux binaries for execution on the Azure platform, and everything will be packed and uploaded to your Function App. At the end, a list of your functions with a URL for each one will be provided, as shown here:
Getting site publishing info...
pip download -r C:\Users\vicen\code\pytest\requirements.txt
  --dest C:\Users\vicen\AppData\Local\Temp\azureworkerm0zb5f03
pip download --no-deps --only-binary :all: --platform manylinux1_x86_64
  --python-version 36 --implementation cp --abi cp36m
  --dest C:\Users\vicen\AppData\Local\Temp\azureworkerqdfgfduv
  azure_functions==1.0.0b3 pip download --no-deps --only-binary
  :all: --platform manylinux1_x86_64 --python-version 36 --implementation cp
  --abi cp36m --dest C:\Users\vicen\AppData\Local\Temp\azureworkerqdfgfduv
  azure_functions_worker==1.0.0b3
pip download --no-deps --only-binary :all: --platform manylinux1_x86_64
  --python-version 36 --implementation cp --abi cp36m
  --dest C:\Users\vicen\AppData\Local\Temp\azureworkerqdfgfduv grpcio==1.14.2
pip download --no-deps --only-binary :all: --platform manylinux1_x86_64
  --python-version 36 --implementation cp --abi cp36m
  --dest C:\Users\vicen\AppData\Local\Temp\azureworkerqdfgfduv grpcio_tools==1.14.2
pip download --no-deps --only-binary :all: --platform manylinux1_x86_64
  --python-version 36 --implementation cp --abi cp36m
  --dest C:\Users\vicen\AppData\Local\Temp\azureworkerqdfgfduv protobuf==3.7.0
pip download --no-deps --only-binary :all: --platform manylinux1_x86_64
  --python-version 36 --implementation cp --abi cp36m
  --dest C:\Users\vicen\AppData\Local\Temp\azureworkerqdfgfduv setuptools==40.8.0
pip download --no-deps --only-binary :all: --platform manylinux1_x86_64
  --python-version 36 --implementation cp --abi cp36m
  --dest C:\Users\vicen\AppData\Local\Temp\azureworkerqdfgfduv six==1.12.0

Preparing archive...
Uploading 55.71 MB [###############################################]
Upload completed successfully.
Deployment completed successfully.
Syncing triggers...
Functions in python-serverless:
	HttpTrigger - [httpTrigger]
    	Invoke url: https://python-serverless.azurewebsites.net/api/
    	httptrigger?code=B7HJdw62THNLL9lVWWm6jaf3GSrzGRHRafvYBUTgBrqp234J3bkzZA-=
The URL that triggers your function is presented here as the following:
https://python-serverless.azurewebsites.net/api/
    httptrigger?code=B7HJdw62THNLL9lVWWm6jaf3GSrzGRHRafvYBUTgBrqp234J3bkzZA-=
That includes the Function App master key (which changes upon every execution) after code=, but if the access level of your function is anonymous, you are not required to send it in your call. Instead you can just use this:
https://python-serverless.azurewebsites.net/api/httptrigger
Note
We explain more about access levels in Chapter 7.
So, visiting that last URL with a browser, you should see again the same message for the missing parameter:
Please pass a name in the query string or in the request body
And when you add the name parameter to it:
https://python-serverless.azurewebsites.net/api/httptrigger?name=Vicente
you will see again:
Hello Vicente!
Congratulations! You have created your first Function App using the Azure Portal, created a Functions Project on your local computer, added a function to it that is triggered by an HTTP request event, and deployed it to the Function App. And it all works!
Using Visual Studio Code
To edit the code of our functions, we use Microsoft’s open source code editor available for all operating systems, Visual Studio Code. Visual Studio Code is well regarded by many programmers, especially in the JavaScript community. You will see that it has several specific extensions to help with Azure Functions. Before we get underway, though, we need to set it up to program Python Functions Projects.
Because Python support in Functions is still recent and in preview, some of the options for that programming language in Visual Studio Code are not available to use, like deployment (you should continue to use the command-line tool func). But we are confident that they will be added very soon, given that new versions of all these components are released frequently.
Here’s the web page from which you can download and install Visual Studio Code.
To get started, in the vertical menu bar on the left (see Figure 4-7), click the icon for extensions (![]() ) and then search for these extensions:
) and then search for these extensions:
- Azure Tools extension collection
-
This is a collection of several extensions for working with Azure services like Functions, Cosmos DB, App Service, and Storage.
- Python extension for Visual Studio Code
-
This allows you to debug Python code in a Functions Project.
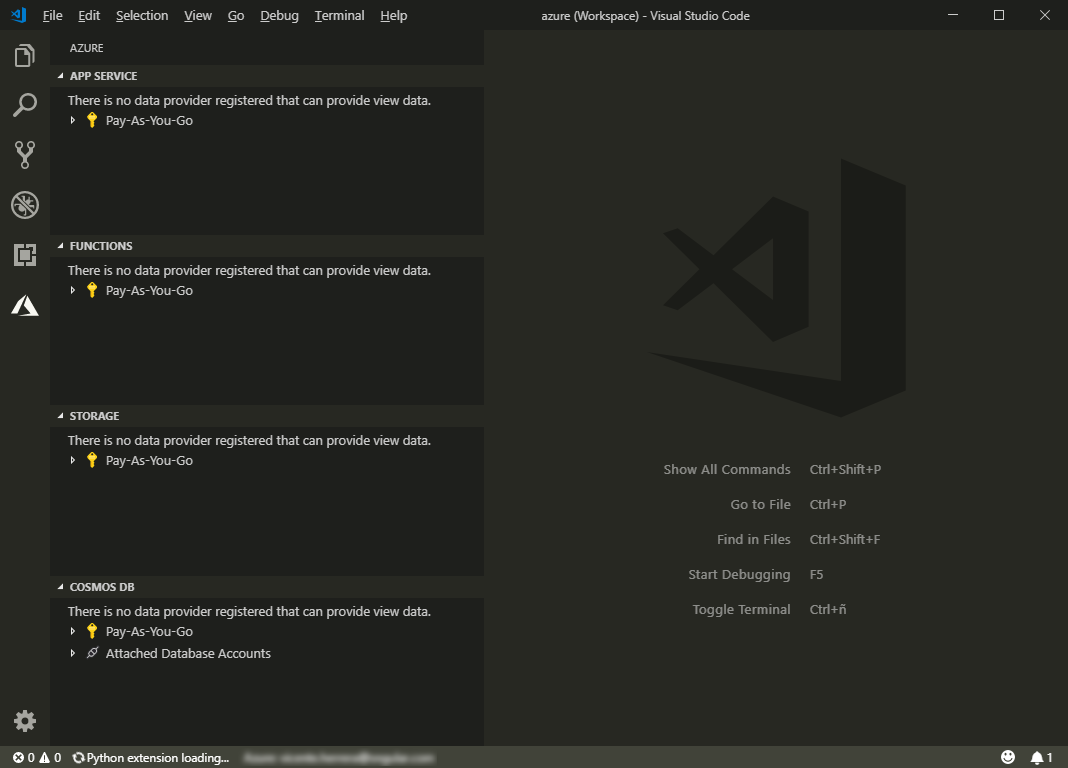
Figure 4-7. Getting started with Visual Studio Code
Again, in the menu bar on the left, click the Azure icon (![]() ) to change to the Azure view, and then click “Sign in to Azure.” A browser session opens in which you can authenticate on the Azure Portal and link the Azure extensions to use your Azure account, as shown in Figure 4-8.
) to change to the Azure view, and then click “Sign in to Azure.” A browser session opens in which you can authenticate on the Azure Portal and link the Azure extensions to use your Azure account, as shown in Figure 4-8.
Figure 4-8. Authenticating on the Azure Portal
To create a project more quickly and easily than using the command-line Core tools, hover your pointer over the Functions group and click the “Create new project” icon (![]() ). You can also create a new function from within a project by using the “New function” icon (
). You can also create a new function from within a project by using the “New function” icon (![]() ) and deploy a Functions Project to an already created Function App on Azure by using the deploy button (
) and deploy a Functions Project to an already created Function App on Azure by using the deploy button (![]() ).
).
By right-clicking the subscription name, you can do the following:
-
Open a browser to the Azure Portal.
-
Create a Function App in Azure without opening the Portal. This currently works only for the Windows runtime. To select a Linux runtime to be able to program in Python, you will need to create it in the Azure Portal, as described.
When you click on the subscription name, a list of all your Function Apps hosted in Azure shows. Right-click any of them and you have several options:
-
Open the app in the Portal.
-
Start, stop, or restart the app.
-
Delete the Function App.
-
Deploy the Function App (still doesn’t work for Python Functions Projects).
-
Configure the deployment source.
-
Start or stop streaming online logs for the app.
To access the debug window, click the debugger icon (![]() ). There, you can click the small play icon (the right-facing green triangle shown in Figure 4-9) to start debugging your app (or press the F5 key without having to switch to the debug sidebar first).
). There, you can click the small play icon (the right-facing green triangle shown in Figure 4-9) to start debugging your app (or press the F5 key without having to switch to the debug sidebar first).

Figure 4-9. The Debug window
You can add your existing Functions Project to the workspace, and it will be recognized by Visual Studio Code, as depicted in Figure 4-10. This allows you to add some helpful configuration.
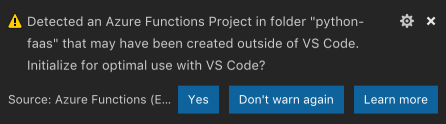
Figure 4-10. Functions Project detection
Switch from custom shells to Bash in Visual Studio Code
The Visual Studio Code “debug run” command for Function Apps is written for Bash on non-Windows operating systems; it is not compatible with other shells like fish. If the default shell on your system is not Bash, you should change to whichever shell Visual Studio Code should use. To do that, go to the settings, search for “shell,” and then change it by clicking Terminal → Integrated → Shell:
From: /usr/local/bin/fish (or whatever value you have different from /bin/bash)
To: /bin/bash
Debugging Python by Using Visual Studio Code
Let’s see how debugging works in Visual Studio Code. Add your Functions Project to the workspace, open your function’s __init__.py file, and then double-click to the left of line 9 in the code. A red dot appears, indicating that you just added a breakpoint. Press F5 to run your code, and watch the execution log in the integrated terminal. If you are asked which Python to use, as illustrated in Figure 4-11, choose the one residing in your .env folder.
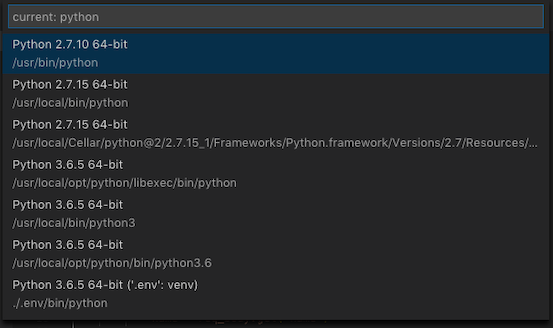
Figure 4-11. Selecting a Python version (choose the one that’s in your .env folder)
Now, if you visit the URL http://localhost:7071/api/HttpTrigger?name=Vicente with your browser or trigger the endpoint with any sort of API client, Visual Studio Code will gain focus, appearing in front of other windows on your system; execution of the Function App will stop at the first line with a breakpoint in your code, and that file will be shown in the editor.
You might run into some problems, though. Let’s run through and try to solve them.
Problem: Configured debug type ‘python’ is not supported
When you start debugging, you might encounter the error message depicted in Figure 4-12.
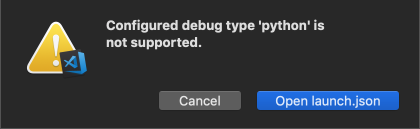
Figure 4-12. Error message: debug type not supported
To solve this problem, simply install the Python extension for Visual Studio Code.
Problem: Forbidden execution of scripts (Windows)
When you start debugging in Windows, you might encounter the problem depicted in Figure 4-13.
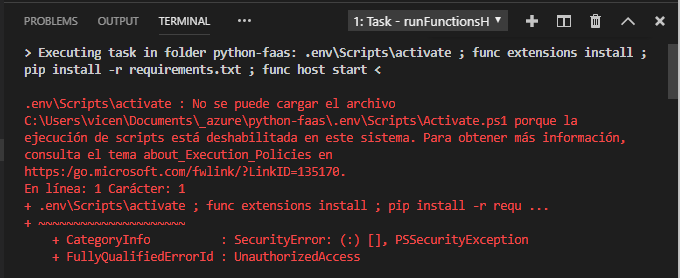
Figure 4-13. Debugging in Windows
To solve this problem, you need to activate execution of scripts. Start PowerShell as an administrator and then run the following command:
Set-ExecutionPolicy Unrestricted
Problem: Failed to attach, no module named ptvsd
When you try to start the debugger on any operating system, a message like that shown in Figure 4-14 might appear.
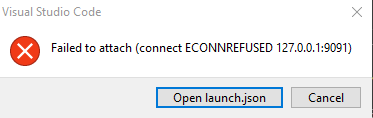
Figure 4-14. Error message when starting the debugger
Also, in the Visual Studio Code terminal window, the log will show a message similar to that shown in Figure 4-15.

Figure 4-15. Error in the Visual Studio Code terminal window
To solve this problem, first install ptvsd globally, as shown here:
pip install ptvsd
Then activate your virtual environment and also install it locally:
python -m pip install --upgrade ptvsd
Azure Blob Storage
You now know a little about programming functions, but to build a more complex application, you need to interface with data storage systems. With this in mind, Azure offers the Blob service.
A blob, or binary large object, is a piece of unstructured data such as text or binary data. After it is stored, it has a unique HTTP/S system that you can use with private access or open it to share with anyone. All blobs are stored in blob containers that work in a similar way to folders on your computer.
If you are going to write or read data in text files from your functions or feed data to train your machine learning modules, you are going to use blobs. Azure Blob is also the main tool for big data analysis, and you can use it to store static assets for websites, like HTML, CSS, frontend JavaScript, and image files.
Azure Blob is very easy to integrate with your functions, and it has many useful features:
-
Scaling (scale up or down as your needs change, and pay only for what you use)
-
Different tiers for frequently accessed (hot tier), infrequently accessed (cold tier), and rarely accessed (archive storage tier) data
-
Georedundancy, which means that the service runs in several geographical locations as a redundancy in case the primary system fails for any reason
-
Block, page, and append types of blobs, so you can optimize their configuration for the kind of data processing that you will do
You might not know it, but you are already working with blobs. Remember when you created your Function App, and you were asked whether you wanted to create a new object storage or use an existing one? The one that you created is in fact a blob storage. You will often find that data storage and blob are synonymous in the Azure ecosystem.
Creating a Storage Account
Go to the Azure Portal and click All Resources. If you followed the steps in the previous section to create a Function App, you will see several elements there. One of these should be of type “storage account,” accompanied by this icon: ![]() . It contains the source code for the execution of the Function App. With some exceptions, you could reuse it for other purposes. For example, if you want to host static website files, you must create a new storage account and you can’t use it at the same time for the code of a Function App.
. It contains the source code for the execution of the Function App. With some exceptions, you could reuse it for other purposes. For example, if you want to host static website files, you must create a new storage account and you can’t use it at the same time for the code of a Function App.
Let’s create a new account. In the menu on the left, click “Create a resource” and then choose Storage Account.
For a new account, you are asked to enter the following information:
-
Project details:
- Subscription
-
Choose your payment account.
- Resource group
-
Create or reuse a group to manage together related Azure services used for the same project.
-
Instance details:
- Storage account name
-
Choose a valid name; this will be part of the unique URL of the blobs.
- Location
-
Choose the closest to you.
- Performance
-
Choose Standard; Premium will have better performance and provide a service-level agreement (SLA), but it will cost you.
- Account kind
-
Choose StorageV2 for general-purpose uses.
- Replication
-
Choose “Read-access geo-redundant storage (RA-GRS)” to have replication for read access across several locations. This will speed read access to blobs when not close to the original location.
- Access tier
-
Choose Hot to store information that will be accessed frequently.
-
Advanced:
- Security
Secure transfer required: Enabled (to force using HTTPS and SSL).
- Virtual networks
Allow access from: All networks.
Data lake storage Gen2 (Preview) Hierarchical namespace: Disable.
-
Tags:
- Name:Value
-
Choose some key–value pairs if you want your storage accounts so that it is easier to find them when you have lots.
On the “Review + create” tab, click the Create button, and then wait for a notification that the storage account has been created.
Transferring Blobs
You can visit your new storage account in the “All resources” section of the Azure Portal. There, you can see a number of settings at your disposal for the storage account. First, let’s use the Blob service to store files. Click the Blobs link; an empty list of blob containers appears. Click the icon to create a new one. When naming containers, you can use only lowercase letters and dashes, the initial character must be a letter or a number, and you can’t use two dashes in a row. Also, the length of the name must be between 3 and 63 characters. You can also specify public read access for each blob in the new container, or the list of all the containers’ blobs. Let’s keep it private in this case.
Click within your new container; a new empty list of files and folders appears. You can now click Upload to send files to the container, and if you view the Advanced section, you can even put them in a separate folder in the container, as shown in Figure 4-16.
Then, when you click the uploaded file, you see a settings page for that item, and there is also a Download button so that you can get a copy to your current computer.
This is an interesting way of working with files, but it’s not the most practical. Luckily, Microsoft offers a free program called Azure Storage Explorer that is available for Windows, Linux, and macOS and makes viewing and managing blobs more practical.
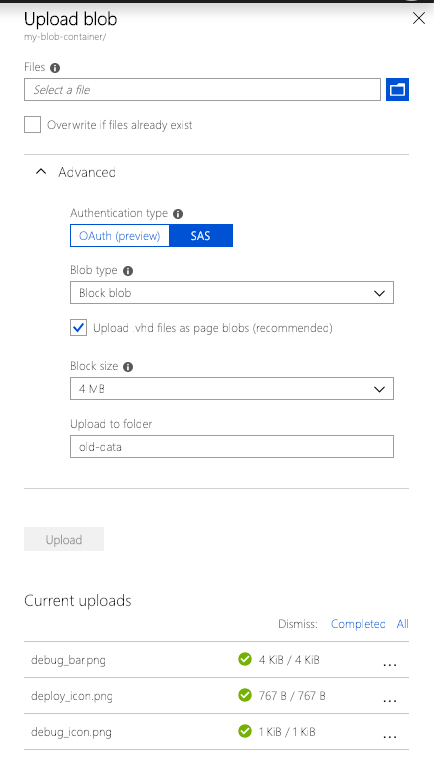
Figure 4-16. Transferring blobs in Azure Portal
After you install Storage Explorer, you can sign in to your Azure account, and it will show you a list of all the resources and activated services that you have created using the Azure Portal (see Figure 4-17). Among them, you will find the Storage Accounts section. If you expand any of the storage accounts, then expand Blob Containers, and then click one of the blob containers, you will see a list of all the files and folders inside. Storage Explorer makes it easy to upload or download files and folders, or to create or delete new blob containers and folders.
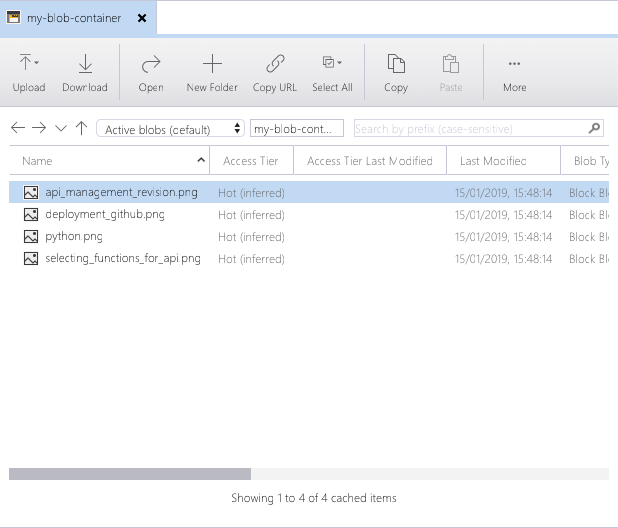
Figure 4-17. Azure Storage Explorer
There are many advanced settings that you can manage using Storage Explorer, but for now you’ve done everything necessary to proceed. You have your storage account with a blob container where you can upload or download files and folders that you can process with your functions.
Summary and Look Ahead
In this chapter, we explored setting up your Azure programming environment and preparing your machine, whether it’s Windows, Linux, or macOS, and how to begin building your serverless systems.
In Chapter 5, we begin implementing machine learning models as we explore Azure’s extensive collection of ready-made tools.
Get Building Intelligent Cloud Applications now with the O’Reilly learning platform.
O’Reilly members experience books, live events, courses curated by job role, and more from O’Reilly and nearly 200 top publishers.

