Chapter 4. Implementing Type Safe AI Services
When working with complex codebases that continuously change by multiple contributors, and interact with external services such as APIs or databases, you will want to follow best practices such as type safety in building your applications.
This chapter focuses on the importance of type safety when building backend services and APIs. You will learn how to implement type safety using Python’s built-in dataclasses and then Pydantic data models, alongside understanding their similarities and differences. In addition, you will explore the use of Pydantic data models with custom validators for protecting against bad user input or incorrect data, and Pydantic Settings for loading and validating environment variables. Finally, you will discover strategies for dealing with schema changes in external systems and managing complexity in evolving codebases to prevent bugs.
By the end of this chapter, you will have a fully typed GenAI service that is less prone to bugs when making changes, bad user inputs and inconsistent model responses.
You can find the start code for this chapter by switching to the ‘ch04-start’ branch to follow along.
Introduction to Type Safety
Type safety is a feature of programming languages that you can use to ensure operations are only performed on compatible data types. By enforcing type constraints, you can be sure operations are performed on suitable data types.
You can enforce type constraints by declaring fully typed variables and functions that explicitly define inputs and outputs. In a complex codebase, you may lose track of variables, their states and constantly changing schemas. When you’ve declared types, you can use static type checkers (like mypy) to detect any inconsistencies and data issues as part of the CI/CD pipelines.
Type-safety helps by raising errors directly in your editor as you change code. As an example, if the API schema of a dependency changes, your code editor will catch it. You will immediately be directed to sources of potential errors without having to run your code. You can avoid sifting through and studying those hard to read and vague runtime error messages. Additionally, you can set up CI/CD pipelines for performing code checks if unforeseen breaking changes affect your system using the type safety system.
Why do people prefer to skip type-safety?
Type safety at first seems like a burden. You have to explicitly type each and every function you write, which can be a hassle and slow you down in the initial phases of development.
Some people skip typing their code for rapid prototyping and to write less boilerplate code. The approach is more flexible, easier to use, and Python is powerful enough to infer simple types. Also, some code patterns (such as functions with multi-type arguments) can be so dynamic that it is easier to avoid implementing strict type-safety when still experimenting. However, it will come to save you hours of development as inevitably your services become complex and continuously change.
The good news is some of these types can be autogenerated using tools such as Prisma when working with databases or client generators when working with external APIs. For external APIs, you can often find official SDKs that have fully typed clients. If not, you can inspect the API to create your own fully typed client. I will cover Prisma and API client generators in more detail later in the book.
When you don’t use types, you open yourself to all sorts of bugs and errors that might occur because other developers unexpectedly update database tables or API schemas that your service interacts with. In other cases, you may update a database table—drop a column for instance—and forget to update the code interacting with that table.
Without types, you may never be made aware of the required changes related to new updates which can be challenging to debug as downstream errors (if not well-handled) may suggest that an entirely different component is broken. As a result, what might have been a quick one-minute debug to resolve can last half a day or even longer.
You can prevent disasters in production with extensive testing which we will cover in future chapters. But it’s much easier to avoid integration and reliability issues if you start using types from the start.
Developing good programming habits
If you haven’t been typing your code in the past, it is never too late to start getting into the habit of typing all your variables, function parameters, and return types.
Using types will make your code more readable, helps you catch bugs early on, and saves you lots of time when you revisit complex codebases to quickly understand how data flows.
Implementing Type Safety
Since Python 3.5, you can now explicitly declare types for your variables, function parameters, and return values. The syntax that allows you to declare these types is type annotation.
Type Annotations
Type annotations don’t affect the runtime behavior of your application. They help catch type errors, particularly in complex larger applications where multiple people are working together. Tools for static type checking, such as Mypy, Pyright, or Pyre, alongside code editors, can validate that the data types stored and returned from functions, match the expected types.
In Python applications, type annotations are used for:
-
Code editor auto-complete support
-
Static type checks using tools like mypy
FastAPI also leverages types hints to:
-
Define handler requirements including path and query parameters, bodies, headers and dependencies, etc.
-
Convert data whenever needed
-
Validate data from incoming requests, databases and external services
-
Auto-update OpenAPI specification that powers the generated documentation page
Example 4-1 shows several examples of type annotation:
Example 4-1. Using type annotation to reduce future bugs as code changes occur
# utils.pyfromtypingimportLiteralfromloguruimportloggerimporttiktokenSupportedModel=Literal["gpt-3.5","gpt-4"]PriceTable=dict[SupportedModel,float]price_table:PriceTable={"gpt-3.5":0.0030,"gpt-4":0.0200}defcount_tokens(text:str|None)->int:ifnotisinstance(text,str|None):raiseValueError("'count_tokens'function only allows strings or None types."f"`text` parameter of type{type(text)}was passed in")iftextisNone:logger.warning("Response is None. Assuming 0 tokens used")return0enc=tiktoken.get_encoding("cl100k_base")returnlen(enc.encode(text))defcalculate_usage_costs(prompt:str,response:str|None,model:SupportedModel,)->tuple[float,float,float]:ifmodelnotinprice_table:# raise at runtime - in case someone ignores type errorsraiseValueError(f"Cost calculation is not supported for{model}model.")price=prices[model]req_costs=price*count_tokens(prompt)/1000res_costs=price*count_tokens(response)/1000total_costs=req_costs+res_costsreturnreq_costs,res_costs,total_costs

Use the
Literalfrom Python’stypingmodule included in its standard library. Declare literals"gpt-3.5"and"gpt-4"and assign toSupportedModeltype alias. ThePriceTableis also a simple type alias that defines a dictionary with keys limited toSupportedModelliterals, and values of typefloat. Typed are normally declared using CamelCase as a best practice to differentiate them from variables. You can now reuse thePriceTabletype alias later.
Declare the pricing table dictionary and assign the PriceTable type to explicitly limit what keys and values are allowed for in the pricing table dictionary.

Type the
count_tokensfunction to accept strings orNonetypes and always return an integer. Implement exception handling in case someone tries to pass in anything other than strings orNonetypes. When definingcount_tokens, code editor and static checkers will raise warnings ifcount_tokensdoesn’t return an integer even if it receives aNoneand raises errors if any other types other than string orNone.
Return
0even if aNonetype is passed to ensure you comply with function typing.
Use Byte-Pair Encoding (BPE) algorithm by OpenAI’s
tiktokenlibrary to tokenize and count tokens for the given text. For tokenization, use thecl100k_baseencoding, which is used for OpenAI’s latest models such asgpt-3.5-turboandgpt-4. Encodings specify how a text is converted into tokens. Different models use different encodings.
Type the
calculate_usage_costsfunction to always take a text prompt and the pre-specified literals formodelparameter. Pass theprice_tablewith the previously declaredPriceTabletype alias. The function should return a tuple of three floats.
Type checkers will raise warnings when an unexpected model literal is passed in, but you should always check for incorrect inputs to functions and raise errors at runtime if an unexpected model parameter is passed in.

Grab the correct price from the pricing table. No need to worry about exception handling, as there is no chance a
KeyErrorcan be raised here if an unsupported model is passed in. If the pricing table is not updated, the function will raise a ValueError early on. Catch theKeyError, issue a warning that pricing table needs updating and then re-raise theKeyErrorso that full details of the issue are still printed to the terminal as you can’t make assumptions about prices.
Use
count_tokensfunction to calculate the LLM request and response costs. If for any reason the LLM doesn’t return a response (returnsNone), thecount_tokenscan handle it and assume zero tokens.
Return a tuple of three floats as per function typing.
In a complex codebase, it can be challenging to guess which data types are being passed around in particular if you make lots of changes everywhere. With typed functions, you can be confident that unexpected parameters aren’t passed to functions that don’t yet support it.
As you can see from Example 4-1, typing your code assists in catching unexpected bugs as you make updates to your code. For instance, if you start using a new LLM model, you can’t yet calculate costs for the new model. To support cost calculation for other LLM models, you first should update the pricing table, related typing and any exception handling logic. Once done, you can be pretty confident that your calculation logic is now extended to work with new model types.
Using Annotated
In Example 4-1, you can use Annotated instead of type aliases in line 3 and 4.
Annotated is a feature of typing module—introduced in Python 3.9—and is similar to type aliases for reusing types,
but allows you to also define metadata for your types.
The metadata doesn’t affect the type checkers but is useful for code documentation, analysis, and runtime inspection.
In Python 3.9, you can use the Annotated like so:
fromtypingimportAnnotated,LiteralSupportedModelType=Annotated[Literal["gpt-3.5","gpt-4"],"Supported models"]PriceTableType=Annotated[dict[SupportedModelType,float],"Supported model pricing table"]
FastAPI framework recommends the use of Annotated instead of type aliases for reusable types,
since it can use the metadata of annotated types
to populate the OpenAPI specifications that powers its API documentation page.
Keep in mind that Annotated feature does require two arguments to work.
The first should be type passed in and the second should be metadata description string.
Typing, while beneficial by itself, doesn’t address all aspects of data handling and structuring. Thankfully, Python’s dataclasses from the standard library help to extend the typing system.
Let’s see how you can leverage dataclasses to improve typing across your application.
Dataclasses
Dataclasses ship with Python 3.7 as part of the standard library. If you need custom data structures, you can use dataclasses to organize, store and transfer data across your application.
They can help with avoiding code smells such as function parameter bloat, where a function is hard to use because it requires more than a handful of parameters. Having a dataclass allows you to organize your data in a custom-defined structure and pass it as a single item to functions that require data from different places.
You can update the Example 4-1 to leverage dataclasses as shown in Example 4-2:
Example 4-2. Using dataclasses to enforce type safety
# utils.pyfromdataclassesimportdataclassfromtypingimportTypedDict,LiteralfromloguruimportloggerSupportedModel=Literal[“gpt-3.5”,“gpt-4”]PriceTable=dict[SupportedModelType,float]prices:PriceTable={“gpt-3.5”:0.0030,“gpt-4”:0.0200}@dataclassclassMessage(TypedDict):prompt:strresponse:str|Nonemodel:SupportedModel@dataclassclassMessageCostReport(TypedDict):req_costs:floatres_costs:floattotal_costs:float# Define count_tokens function as normal...defcalculate_usage_costs(message:Message)->MessageCostReport:ifmessage.modelnotinprices:# raise at runtime - in case someone ignores type errorsraiseValueError(f”Costcalculationisnotsupportedfor{message.model}model.”)price=prices[message.model]req_costs=message.price*count_tokens(message.prompt)/1000res_costs=message.price*count_tokens(message.response)/1000total_costs=req_costs+res_costsreturnMessageCostReport(req_costs=req_costs,res_costs=res_costs,total_costs=total_costs)
Use dataclasses to decorate the
MessageandMessageCostclasses as special classes for holding data.Inherit from
TypedDictto prevent classes from requiring methods as they’re only used for data storage and transfer.Change the signature of the
calculate_usage_costsfunction to use the predefined data classes. This change simplifies the function signature.
You should aim to leverage dataclasses when your code accumulates code smells and becomes difficult to read.
The primary benefit of using dataclasses in Example 4-2 was to group related parameters to simplify the function signature. In other scenarios, you may use dataclasses to:
-
Eliminate code duplication
-
Shrink down code bloat (large classes or functions)
-
Refactor data clumps (variables that are commonly used together)
-
Prevent inadvertent data mutation:
-
Promote data organization
-
Promote encapsulation
-
Enforce data validation
They can also be used to implement many other code enhancements.
Dataclasses are an excellent tool to improve data organization and exchange anywhere in your application. However, they don’t support several features when building API services.
- Automatic data parsing
-
Parsing ISO datetime formatted strings to date times formats on assignment
- Field Validation
-
Performing complex checks on assignment of values to fields. For instance, checking if a prompt is too long.
- Serialization and deserialization
-
Converting between JSON and Pythonic data structures
- Field filtering
-
Removing fields of objects that are unset or contain
Nonevalues - Built-in support for defaults
-
Auto-populating unset fields using predefined defaults
None of the mentioned limitations would force you to move away from using dataclasses.
FastAPI does support dataclasses through Pydantic. Pydantic implements its own version of dataclasses with support for the aforementioned features, enabling you to migrate codebases that heavily use dataclasses.
Let’s take a look at Pydantic next and what makes it great for building GenAI services.
Pydantic Models
Pydantic is the most widely used data validation library with support for custom validators and serializers. Pydantic’s core logic is controlled by type annotations in Python and can emit data in JSON format, allowing for seamless integration with any other tools. In addition, the core data validation logic in Pydantic V2 has been rewritten in Rust to maximize its speed and performance, positioning it as one of the fastest data validation libraries in Python. As a result, Pydantic has heavily influenced FastAPI and 8000 other packages in the Python ecosystem including HuggingFace, Django and LangChain. It is a battle-tested toolkit used by major tech companies with 141 million downloads a month at the time of writing, making it a suitable candidate for adoption in your projects in replacement for dataclasses.
Pydantic provides an extensive toolset for data validation and processing using its own BaseModel implementation.
Pydantic models share many similarities with dataclasses but differ in subtle areas.
When you create Pydantic models,
a set of initialization hooks are called that add data validation,
serialization, and JSON schema generation features to the models that vanilla dataclasses lack.
FastAPI tightly integrates with Pydantic and leverages its rich feature set under the hood for data processing. Type checkers and code editors can also read Pydantic models similar to dataclasses to perform checks and provide auto-completions.
How to use Pydantic
You can install Pydantic into your project using
$pipinstallpydantic
Pydantic at its core implements a BaseModel which is the primary method for defining models.
Models are simply classes that inherit from BaseModel and define fields as annotated attributes using type hints.
Any models can then be used as schemas to validate your data.
With Pydantic models, you can specify the request and response requirements of your service endpoints, validate incoming untrusted data from external sources or pass related data around as a single group (similar to structs in C like languages). You can also go as far as filter your LLM outputs using Pydantic models (and validators, which you will learn more about shortly).
You can create your own Pydantic models as shown in Example 4-3:
Example 4-3. Creating Pydantic models
frompydanticimportBaseModelclassTextModelRequest(BaseModel):model:Literal["tinyllama","gemma2b"]prompt:strtemperature:float=0.0
Define the
TextModelRequestmodel inheriting the PydanticBaseModel.Set defaults for optional fields. For instance, set 0.0 temperature field if a value is not provided on initialization.
Example 4-3 also shows how you can switch your data classes into Pydantic models to leverage its many features.
Compound Pydantic Models
With Pydantic models, you can declare data schemas--that define data structures supported in the operations of your service. Additionally, you can also use inheritance for building compound models as shown in Example 4-4:
schemas:
Example 4-4. Creating Pydantic models
frompydanticimportBaseModelclassModelRequest(BaseModel):prompt:strclassTextModelRequest(ModelRequest):model:Literal["tinyllama","gemma2b"]temperature:float=0.0classImageModelRequest(ModelRequest):model:Literal["tinysd","sd1.5"]output_size:tuple[int,int]num_inference_steps:int=200classModelResponse(BaseModel):request_id:strip:str|Nonecontent:str|bytescreated_at:datetime=datetime.now()classTextModelResponse(ModelResponse):tokens:intclassImageModelResponse(ModelResponse):size:tuple[int,int]url:str
Define the
ModelRequestmodel inheriting the PydanticBaseModel.Define the
TextModelRequestandImageModelRequestmodels by inheritingModelRequest. The optional temperature field by default is set to 0.0.num_inference_stepsfield for theImageModelRequestmodel is optional and set to 200. Both of these models will now require the prompt string field to be provided.Define the
ModelResponse. If the data for theipoptional field is not provided, then use defaults ofNone.contentfield can be both bytes (for image images) or string (for text models).Define the
ImageModelResponseandTextModelResponsemodels by inheriting theModelResponsemodel. ForTextModelResponse, provide count of tokens and withImageModelResponseprovide an image size in pixels alongside the remote URL for downloading the image.
With the models shown in Example 4-4, you have schemas needed to define requirements of your text and image generation endpoints.
Field Constraints and Validators
Aside from support for standard types,
Pydantic also ships with constrained types such as EmailStr, PositiveInt, UUID4, AnyHttpUrl, etc.
that can perform data validation out-of-the-box during model initialization for common data formats.
The full list of Pydantic types is available at https://docs.pydantic.dev/latest/api/types.
Note
Some constrained types such as EmailStr will require dependency packages to be installed to function but
can be extremely useful for validating common data formats such as emails.
To define more custom and complex field constraints on top of Pydantic constrained types,
you can use the Field function from Pydantic with Annotated type
to reduce chances of errors when constraining fields.
Example 4-5
replaces standard type hints in Example 4-4 with constrained types and Field functions
to implement stricter data requirements for your endpoints based on model constraints.
Example 4-5. Using constrained fields
fromdatetimeimportdatetimefromuuidimportuuid4fromtypingimportAnnotated,Literalfrompydanticimport(BaseModel,Field,HttpUrl,IPvAnyAddress,PositiveInt,computed_field)classModelRequest(BaseModel):prompt:Annotated[str,Field(min_length=1,max_length=10000)]classTextModelRequest(ModelRequest):model:Literal["tinyllama","gemma2b"]temperature:Annotated[float,Field(gte=0.0,lte=1.0,default=0.0)]classImageModelRequest(ModelRequest):model:Literal["tinysd","sd1.5"]output_size:tuple[PositiveInt,PositiveInt]num_inference_steps:Annotated[int,PositiveInt]=200classModelResponse(BaseModel):request_id:Annotated[str,Field(default_factory=lambda:uuid4().hex)]# no defaults set for ip field - raises ValidationError if a valid IP address or None is not provided.ip:Annotated[str,IPvAnyAddress]|Nonecontent:Annotated[str|bytes,Field(min_length=0,max_length=10000)]created_at:datetime=datetime.now()classTextModelResponse(ModelResponse):tokens:Annotated[int,Field(gte=0)]classImageModelResponse(ModelResponse):size:tuple[int,int]=tuple[Field(gte=0),Field(gte=0)]url:Annotated[str,HttpUrl]|None=None
Replace
strstandard type withFieldandAnnotatedto bound string length to a range of characters.Constrain the temperature between
0.0and1.0with a default value of0.0.lteandgtekeywords refer to less than equal and greater than equal.Constrain the
output_sizeandnum_inference_stepsfields to positive integers usingPositiveIntconstrained type.Generate a new request UUID by passing a callable to
default_factorythat will be called to generate a new UUID.Constrain the optional
ipfield to any valid IP v4 or v6 address ranges.Noneis also valid entry if the client’s IP can’t be determined. This optional field doesn’t have a default value so if a valid IP orNoneis not provided, Pydantic will raise aValidationError.Constrain the
contentfield to 10,000 characters or bytes.Constraint content of a tuple to positive integers only using two
Fieldfunctions.Constrain the optional
urlfield to any valid http or https URL, where hostname and Top Level Domain (TLD) are required.
With the models defined in Example 4-5, you can now perform validation on incoming or outgoing data to match the data requirements you have.
Custom Field and Model Validators
Another excellent feature of Pydantic for performing data validation checks is custom field validators.
Special methods can be associated with model fields
to execute conditional data checks by employing the @field_validator or @model_validator decorators.
While @field_validator access a value of a single field to perform checks,
the @model_validator decorator allows for checks that involve multiple fields.
Example 4-6 shows how both types of custom validators can be implemented on the ImageModelRequest.
Example 4-6. Implementing custom field and model validators for ImageModelRequest
# schemas.pyfromtypingimportAnnotated,LiteralfromPydanticimportBaseModel,Field,field_validator,model_validatorclassModelRequest(BaseModel):prompt:Annotated[str,Field(min=1,max=4000)]classImageModelRequest(ModelRequest):model:Literal["tinysd","sd1.5"]output_size:tuple[PositiveInt,PositiveInt]num_inference_steps:Annotated[int,PositiveInt]=200@field_validator("output_size")defvalidate_output_size(cls,v:tuple[PositiveInt,PositiveInt])->tuple[PositiveInt,PositiveInt]:ifv[0]/v[1]!=1:raiseValueError(f"Only square images are supported for{cls.__name__}")ifv[0]notin[512,1024]:raiseValueError(f"Invalid output size:{v}- expected 512 or 1024")returnv@model_validator(mode="after")defvalidate_inference_steps(self)->"ImageModelRequest":ifself.model=="tinysd"andself.num_inference_steps>2000:raiseValueError(f"TinySD model cannot have more than 2000 inference steps")returnself
Attach the
validate_output_sizefield validator tooutput_sizefield to check for incorrect values.The
tinysdmodel can only generate square images in certain sizes. Asking for a non-square image size (aspect ratio other than1) should raise aValueError.Attach
validate_inference_stepsvalidator to theImageModelRequestmodel to perform checks on the model field values after the model is initialized (mode="after"). Raise aValueErrorif the user asks for a large number of inference steps fortinysdmodel.
Note
The after validators run after Pydantic’s internal parsing.
It is more common to use after validators as they’re generally more type safe and thus easier to implement.
With custom field validators shown in Example 4-6, you can now be confident that your image generation endpoints will be protected from incorrect configurations provided by users.
Computed Fields
Similar to dataclasses, Pydantic also allows you to implement methods to compute fields derived from other fields.
You can use the computed_field decorator to implement a computed field for calculating count of tokens and cost
as shown in Example 4-7.
Example 4-7. Using computed fields to automatically count the total number of tokens
fromutilsimportcount_tokensclassTextModelResponse(ModelResponse):price:Annotated[float,Field(gte=0,default=0.01)]@computed_field@propertydeftokens(self)->int:returncount_tokens(self.content)@computed_field@propertydefcost(self)->float:returnself.price*self.tokens
Computed fields are useful
for encapsulating any field computation logic inside your Pydantic models to keep code organized.
Bear in mind that computed fields are only accessible when you serialize a Pydantic model
either manually using .model_dump() or via FastAPI when an API handler returns the model as response.
Model Export and Serialization
As Pydantic can emit JSONs for any models, the models you defined in Example 4-5 can also be dumped into (or be loaded from) JSON strings or Python dictionaries while maintaining any compound schemas as shown in Example 4-8.
Example 4-8. Exporting and serializing the TextModelResponse model
>>response=TextModelResponse(content="FastAPI Generative AI Service",ip=None)>>response.model_dump(exclude_none=True){'content':'FastAPI Generative AI Service','cost':0.06,'created_at':datetime.datetime(2024,3,7,20,42,38,729410),'price':0.01,'request_id':'a3f18d85dcb442baa887a505ae8d2cd7','tokens':6}>>response.model_dump_json(exclude_unset=True)'{"ip":null,"content":"FastAPI Generative AI Service","tokens":6,"cost":0.06}'
Exporting Pydantic models to dictionaries or JSON strings
When you create a Pydantic model, you also get access to type hints for the associated fields and can later export your model to Python dictionaries or JSON strings. Pydantic will also allow you to exclude fields based on their values. For instance, you can run model.dict(exclude_none=True) to return a dictionary without any of the fields that’ve been set to None. Other options for excluding fields during export include:
exclude_unset-
Only return the fields that were explicitly set during the model creation.
exclude_defaults-
Only return the optional fields that were set to default values.
exclude_None-
Only return fields that were set to None.
You can mix and match these conditions when exporting your models. These options are extremely useful when working with models that have a large number of fields such as filters. For example, if the client doesn’t specify certain filters as query parameters to your endpoint, you can exclude all unset filtering fields from your request filter model.
You can also use the same field exclusion features when exporting your Pydantic models to JSON strings using model.json_dump(exclude_unset=True).
Parsing environment variables with Pydantic
Alongside the BaseModel, Pydantic also implements a Base class for parsing settings and secrets from files.
This feature is provided in an optional Pydantic package called
pydantic-settings which you can install as a dependency:
$pipinstallpydantic-settings
The settings base class provides optional Pydantic features for loading a settings or config class from environment variables or secret files. Using this feature, the settings values can be set in code or overridden by environment variables.
This is useful in production where you don’t want to expose secrets inside the code or the container environment.
When you create a model inheriting from BaseSettings,
the model initializer will attempt to set values of each field using provided defaults.
If unsuccessful, the initializer will then read the values of any unset fields from the environment variables.
Given a dotenv environment file (.env):
APP_SECRET=asdlkajdlkajdklaslkldjkasldjkasdjaslk
DATABASE_URL=postgres://sa:password@localhost:5432/cms
CORS_WHITELIST=["https://xyz.azurewebsites.net","http://localhost:3000"]
Example 4-9 shows parsing environment variables using BaseSettings in action.
Example 4-9. Using Pydantic BaseSettings to parse environment variables
# settings.pyfromtypingimportAnnotatedfrompydanticimportField,HttpUrl,PostgresDsnfrompydantic_settingsimportBaseSettings,SettingsConfigDictclassAppSettings(BaseSettings):model_config=SettingsConfigDict(env_file=".env",env_file_encoding="utf-8")port:Annotated[int,Field(default=8000)]app_secret:Annotated[str,Field(min_length=32)]pg_dsn:Annotated[PostgresDsn,Field(alias="DATABASE_URL",default="postgres://user:pass@localhost:5432/database"),]cors_whitelist_domains:Annotated[set[HttpUrl],Field(alias="CORS_WHITELIST",default=["http://localhost:3000"]),]settings=AppSettings()(settings.model_dump())""" {'port': 8000 'app_secret': 'asdlkajdlkajdklaslkldjkasldjkasdjaslk', 'pg_dsn': MultiHostUrl('postgres://sa:password@localhost:5432/cms'), 'cors_whitelist_domains': {Url('http://localhost:3000/'), Url('https://xyz.azurewebsites.net/')}, } """
Declare the
AppSettingsinheriting from theBaseSettingsclass from pydantic_settings packageConfigure the
AppSettingsto read environment variables from.envfile at root of a project with theUTF-8encoding. By default, snake_case field names will map to environment variables names that are an uppercase version of those names. For instance,app_secretbecomesAPP_SECRET.Validate that
DATABASE_URLenvironment variable has a valid Postgres connection string format. If not provided, set the default value.Check that CORS_WHITELIST environment variable has a unique list of valid URLs with hostname and TLDs. If not provided, set the default to a set with single value of
http://localhost:3000.We can check the
AppSettingsclass is working by printing a dump of the model.
Note: You can switch environment files when testing using _env_file argument:
test_settings=AppSettings(_env_file="test.env")
Dataclasses or Pydantic models in FastAPI
Example 4-10 shows how dataclasses can be used in FastAPI route handlers. Even though dataclasses don’t support serialization and field validation at runtime, the service still works as FastAPI converts built-in dataclasses to Pydantic dataclasses that include these features.
Example 4-10. Using dataclasses in FastAPI
# schemas.pyfromtypingimportLiteralfromdataclassesimportdataclass@dataclassclassTextModelRequest:model:Literal["tinyLlama","gemma2b"]prompt:strtemperature:float@dataclassclassTextModelResponse:response:strtokens:int# main.pyfromfastapiimportFastAPI,Body,statusfromschemasimportTextModelRequest,TextModelResponsefromutilsimportcount_tokens# load lifespan...app=FastAPI(lifespan=lifespan)@app.post("/generate/text")defserve_text_to_text_controller(body:TextModelRequest=Body(...))->TextModelResponse:ifbody.modelnotin["tinyLlama","gemma2b"]:raiseHTTPException(detail=f"Model{body.model}is not supported",status_code=status.HTTP_400_BAD_REQUEST)output=generate_text(models["text"],body.prompt,body.temperature)tokens=count_tokens(body.prompt)+count_tokens(output)returnTextModelResponse(response=output,tokens=tokens)
Define models for text model request and response schemas
Convert the handler to serve
POSTrequests with a body. Then, declare the request body asTextModelRequestand the response asTextModelResponse. Static code checkers like mypy will read the type annotations and raise warnings if your controller doesn’t return the expected response model.Explicitly check if the service supports the
modelparameter provided in the requestbody. If not, return a bad request HTTP exception response to the client.FastAPI converts vanilla dataclasses to Pydantic dataclasses to serialize/deserialize and validate the request and response data.
In Example 4-10, you have leveraged type annotations by refactoring the text model controller to be resilient to new changes and bad user input. Static type checkers can now help you catch any data-related issues as changes occur. In addition, FastAPI used your type annotations to validate request and responses alongside the auto-generation of OpenAPI documentation page, as shown in Figure 4-1:
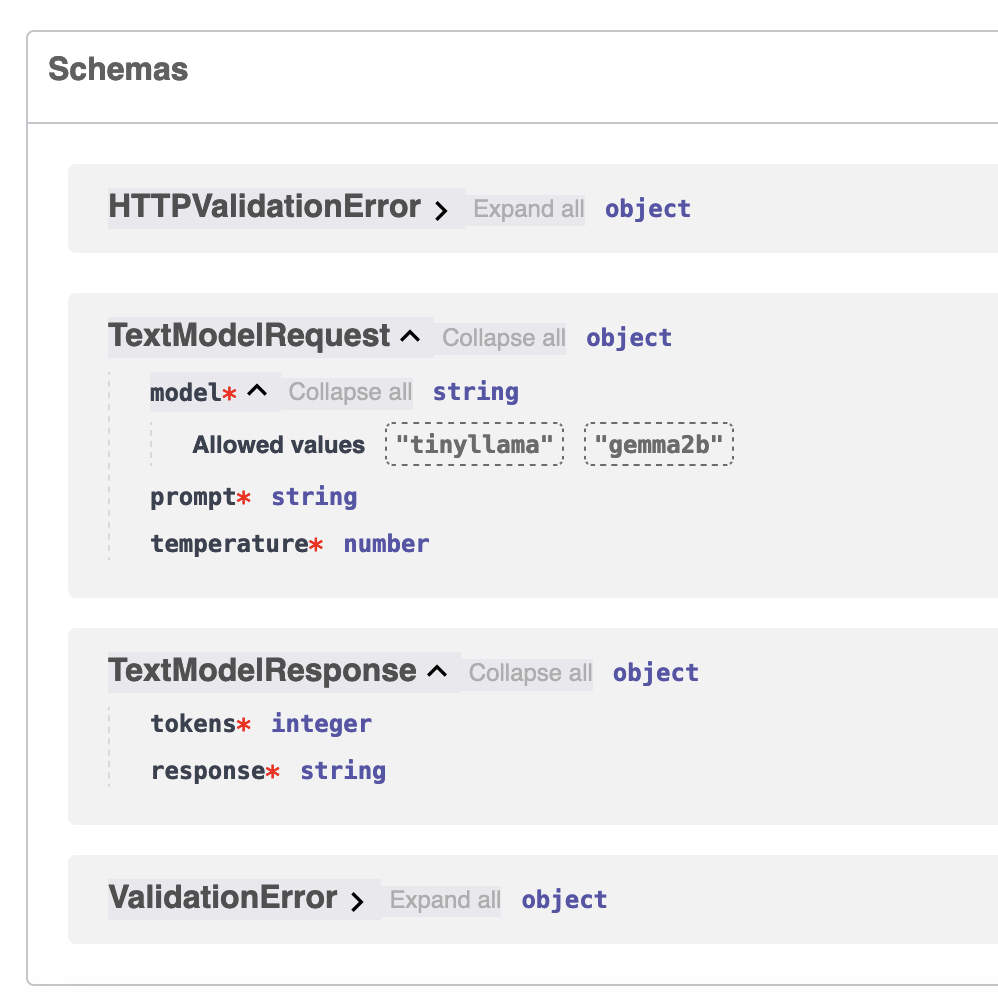
Figure 4-1. Automatic generation of validation schemas using vanilla dataclasses
You now see that FastAPI leverages Pydantic models under the hood for data handling and validation, even if you use vanilla dataclasses. FastAPI converts your vanilla dataclasses to Pydantic flavored dataclasses to use its data validation features. This behavior is intentional because if you have projects with several pre-existing dataclass type annotations, you can still migrate them over without having to rewrite them into Pydantic models for leveraging data validation features. However, if you’re starting a fresh project, it is recommended to use Pydantic models directly in replacement for Python’s built-in dataclasses.
Now let’s see how you can replace dataclasses with Pydantic in your FastAPI application. This is shown in Example 4-11.
Example 4-11. Using Pydantic to model request and response schemas
# main.pyfromfastapiimportFastAPI,Body,statusfromschemasimportTextModelRequest,TextModelResponsefromutilsimportcount_tokens# load lifespan...app=FastAPI(lifespan=lifespan)@app.post("/generate/text")defserve_text_to_text_controller(request:Request,body:TextModelRequest=Body(...))->TextModelResponse:ifbody.modelnotin["tinyLlama","gemma2b"]:raiseHTTPException(detail=f"Model{body.model}is not supported",status_code=status.HTTP_400_BAD_REQUEST)output=generate_text(models["text"],body.prompt,body.temperature)returnTextModelResponse(content=output,ip=request.client.host)
Import Pydantic models for text model request and response schemas
Convert the handler to serve
POSTrequests with a body. Then, declare the request body asTextModelRequestand the response asTextModelResponse. Static code checkers like mypy will read the type annotations and raise warnings if your controller doesn’t return the expected response model.Explicitly check if the service supports the
modelparameter provided in the requestbody. If not, return a bad request HTTP exception response to the client.Return the
TextModelResponsePydantic model as per function typing. Access the client’s IP address using the request object viarequest.client.host. FastAPI will take care of serializing your model using.model_dump()under the hood. As you also implemented the computed fields fortokensandcostproperties, these will also automatically will be included in your API response without any additional work.
Note
As shown in Example 4-10, if you use dataclasses instead of Pydantic models, FastAPI will convert them to Pydantic dataclasses to serialize/deserialize and validate the request and response data. However, you may not be able to leverage advanced features such as field constraints and computed fields with dataclasses.
As you can see in Example 4-11, Pydantic can provide exceptional developer experience by helping in type checks, data validation, serialization, code editor auto-completions and computed attributes.
FastAPI can also use your Pydantic models to autogenerate OpenAPI specification and documentation page so that you can manually test your endpoints seamlessly.
Once you start the server, you should see an updated documentation page with the new Pydantic models and the updated constrained fields Figure 4-2:
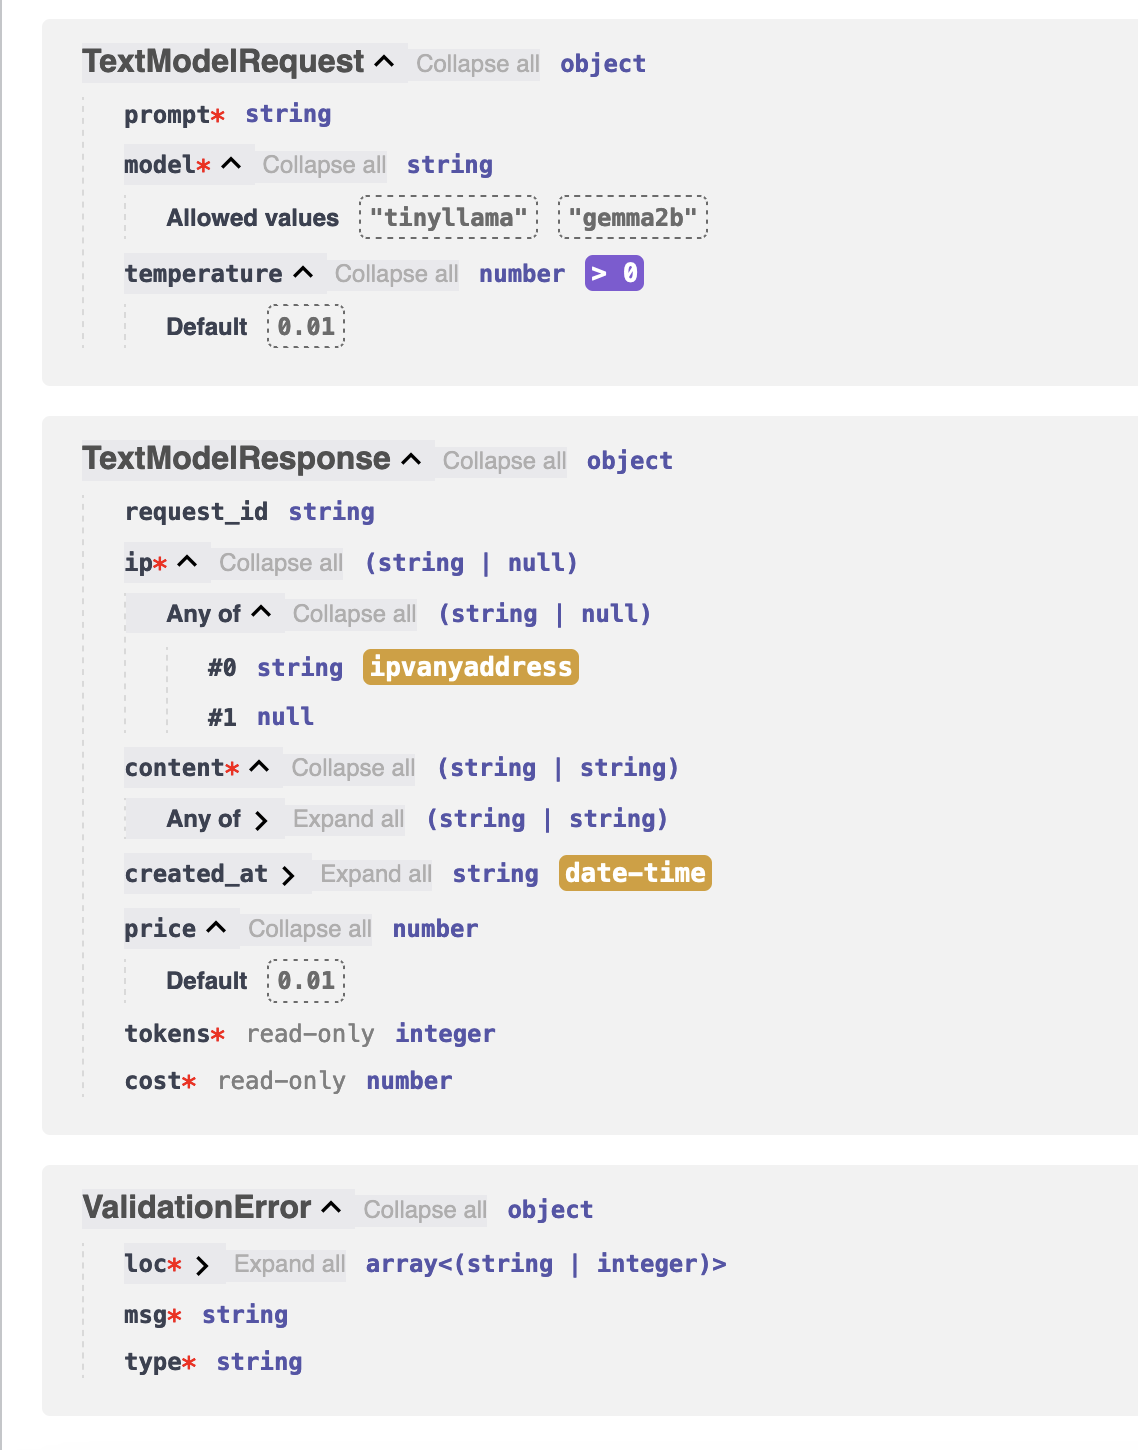
Figure 4-2. Automatic generation of FastAPI docs using Pydantic models
And if you send a request to the /generate/text endpoint,
you should now see the pre-populated fields via the TextModelResponse Pydantic model in Figure 4-3:
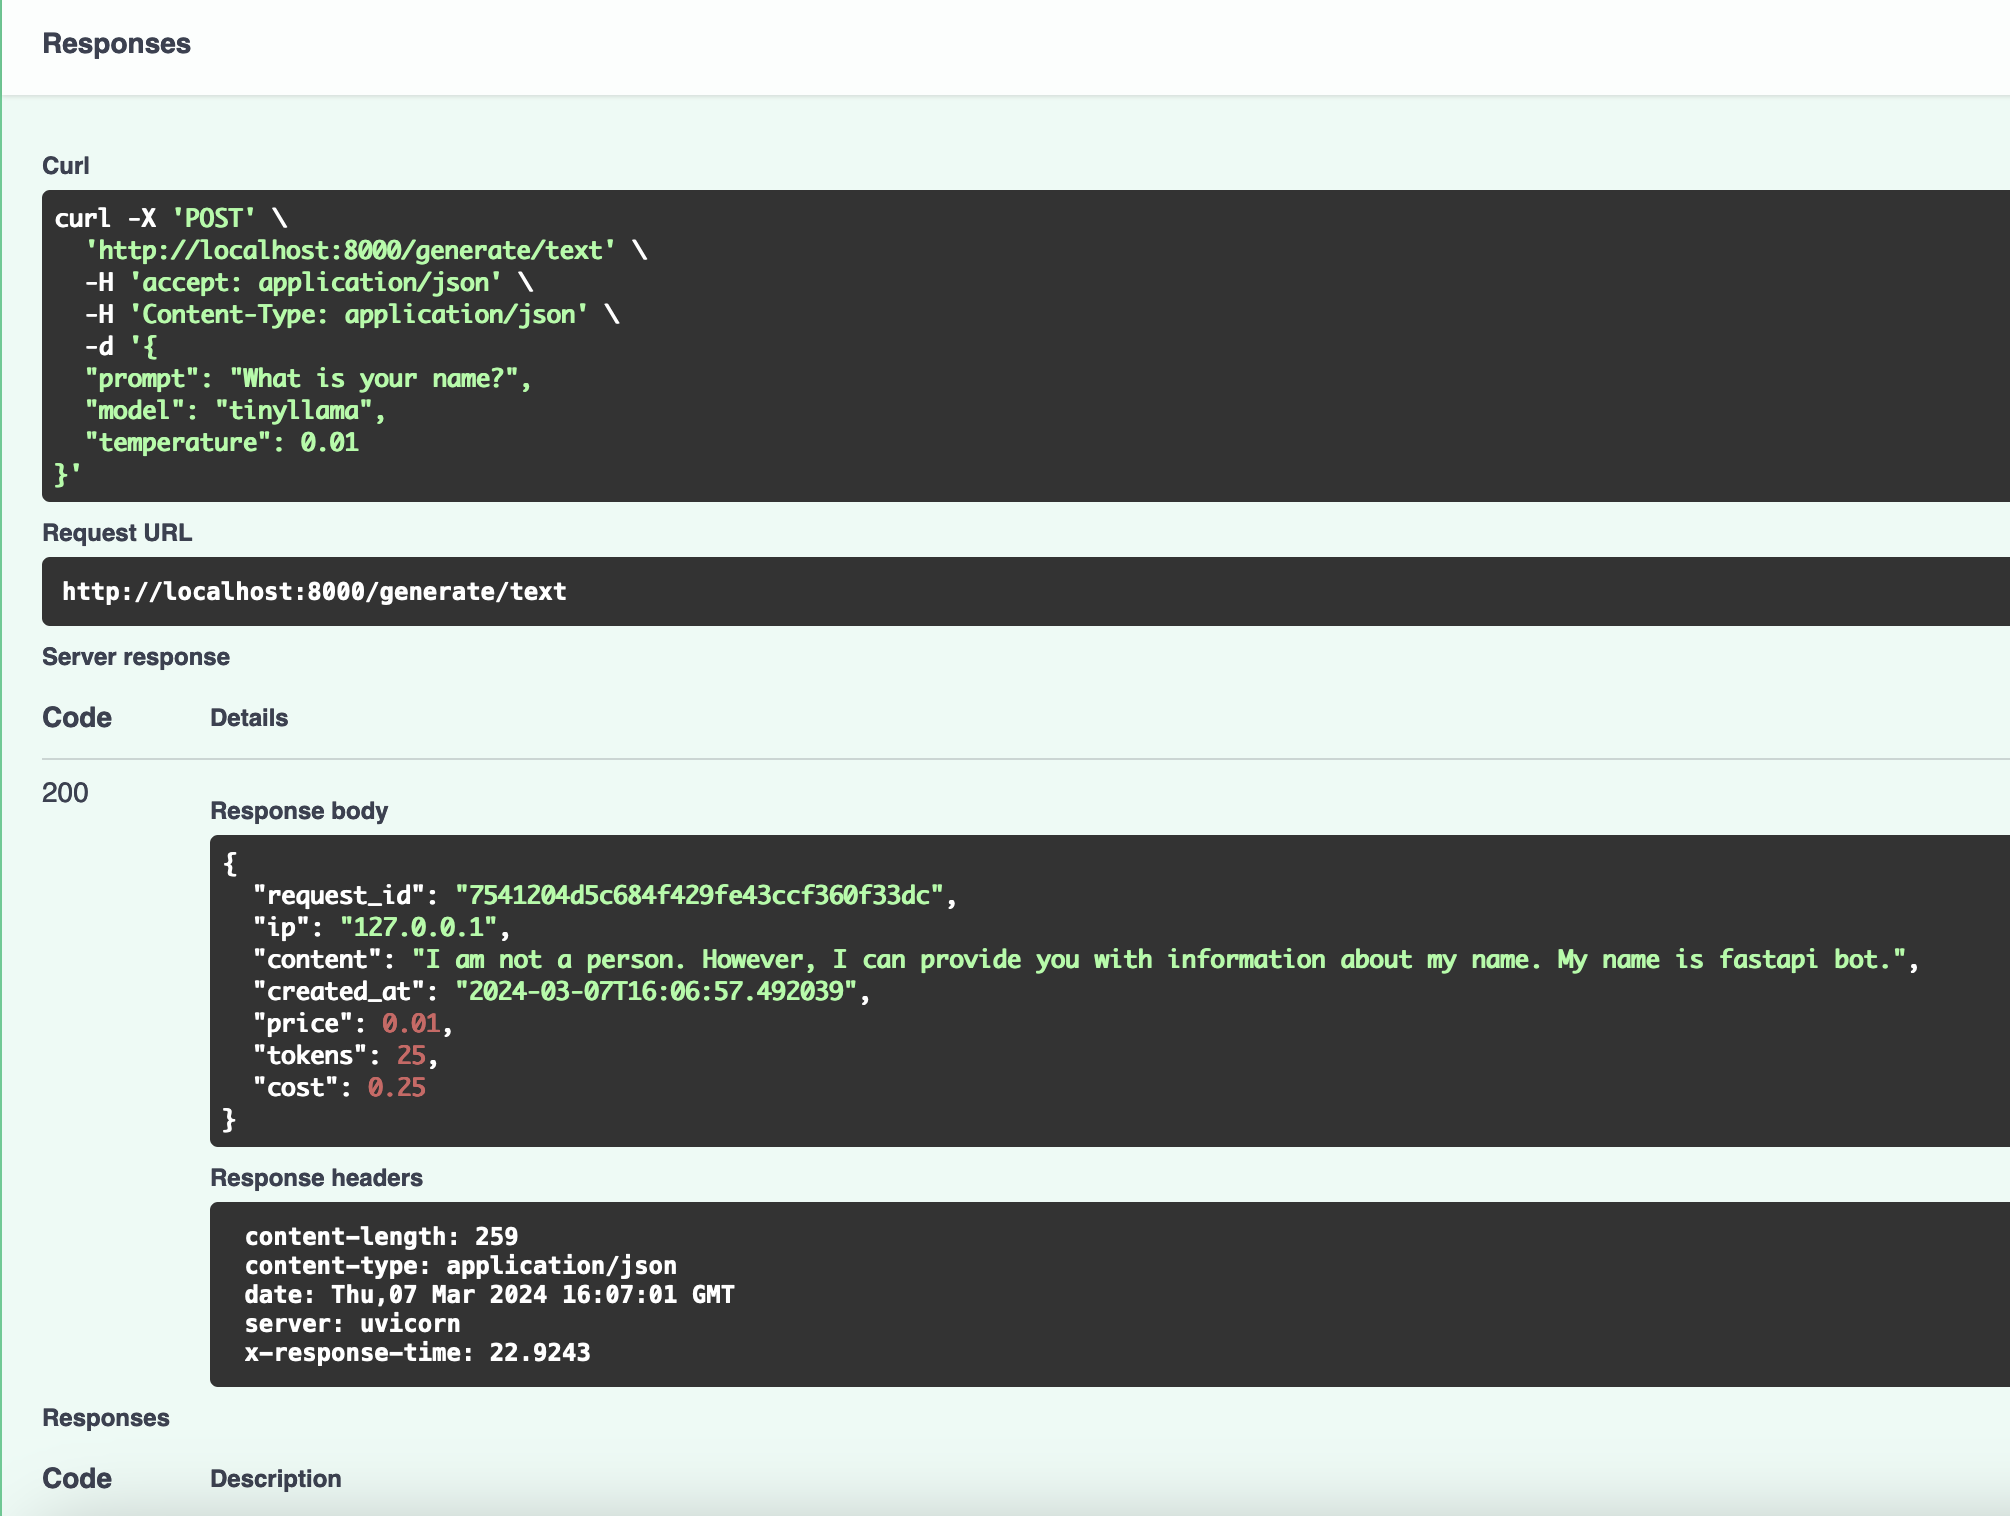
Figure 4-3. Automatic population of the response fields via the TextModelResponse Pydantic model
The Pydantic model features I covered in this chapter, represent just a fraction of the tools at your disposal for constructing GenAI services. You should now feel more confident in leveraging Pydantic to annotate your own services to improve its reliability and your own developer experience.
Summary
In this chapter, you’ve learned the importance of creating fully typed services for GenAI models.
You now understand how to implement type safety with standard and constrained types, use Pydantic models for data validation, and how to implement your own custom data validators across your GenAI service. You’ve also discovered strategies for validating request and response content and managing application settings with Pydantic to prevent bugs and to improve your development experience. Overall, by following along with the practical examples, you learned how to implement a robust, less error-prone GenAI service.
The next chapter covers Asynchronous Programming in AI, teaching you to enhance performance and handle parallel operations. You will learn more about I/O and CPU-bound tasks, limitations of FastAPI’s background tasks, how to address its limits, and understand Celery’s role in distributed processing and task management.
Get Building Generative AI Services with FastAPI now with the O’Reilly learning platform.
O’Reilly members experience books, live events, courses curated by job role, and more from O’Reilly and nearly 200 top publishers.

