
that you want displayed. To do so, list the columns inside the <asp:GridView>
and </asp:GridView> tags, as shown below:
File: AddressBook.aspx (excerpt)
<asp:GridView ID="grid" runat="server"
AutoGenerateColumns="False">
<Columns>
<asp:BoundField DataField="Name" HeaderText="Name" />
<asp:BoundField DataField="City" HeaderText="City" />
<asp:BoundField DataField="MobilePhone"
HeaderText="Mobile Phone" />
</Columns>
</asp:GridView>
Notice that each column that we want to display is created using a BoundField
control inside a set of <Columns> and </Columns> tags. Each BoundField control
has a DataField property, which specifies the name of the column, and a
HeaderText property, which sets the name of the column as you want it displayed
to the user.
Now, save your work and view it in the browser. This time, only the columns
that you specified to be bound are displayed in the GridView. The results should
appear as shown in Figure 11.3.
Note that if you don’t include the HeaderText property for any of the bound
columns, those columns will not have a header.
We’ve now succeeded in displaying only the information we want to display, but
the GridView still looks plain. In the next section, we’ll use styles to customize
the look of our GridView.
Styling the GridView with Templates, Skins, and
CSS
The GridView control offers a number of design-time features that are tightly
integrated with the Visual Web Developer designer. As with the DataList class,
when you click the grid’s smart tag, you get quick access to a number of very
useful features, as Figure 11.4 illustrates.
436
Chapter 11: Managing Content Using Grid View and Details View
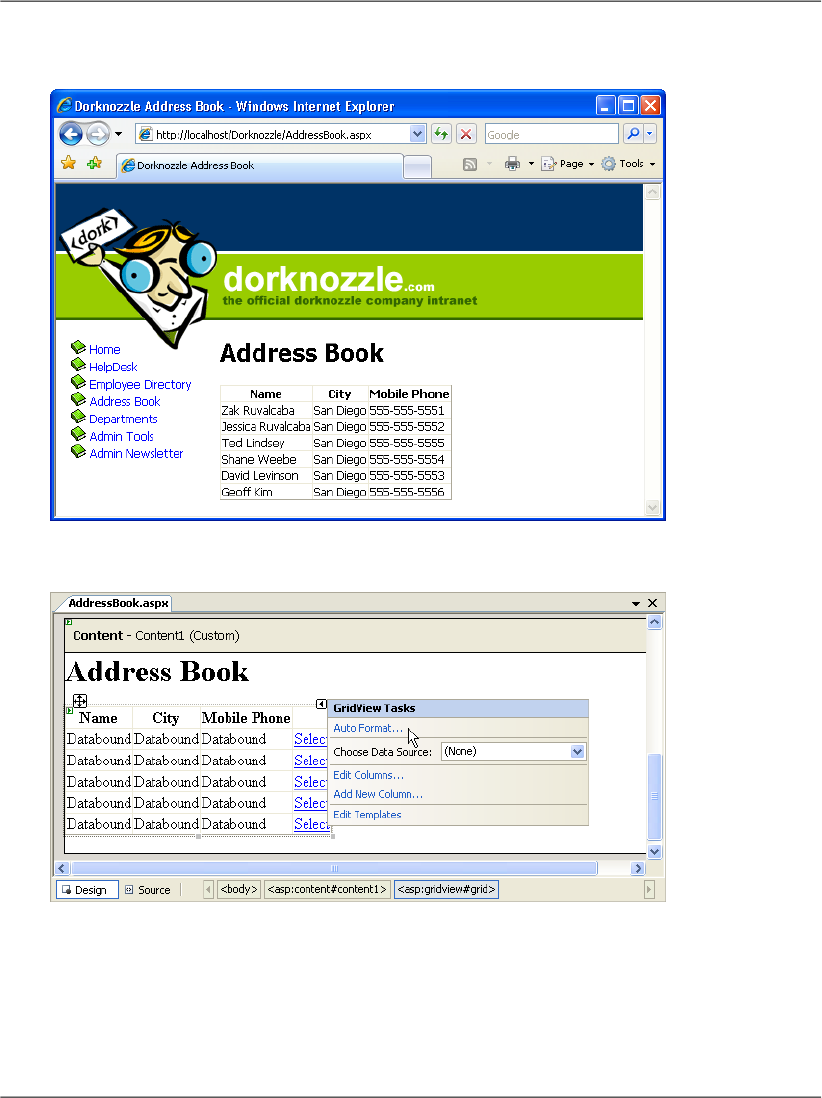
Figure 11.3. Displaying selected columns
Figure 11.4. The smart tag options of GridView
If you click the Auto Format… link from the smart tag menu and choose one
of the predefined styles, Visual Web Developer generates a number of template
styles for you, like this:
437
Styling the GridView with Templates, Skins, and CSS

<asp:GridView ID="grid" runat="server" AutoGenerateColumns="False"
CellPadding="4" ForeColor="#333333" GridLines="None">
<Columns>
<asp:BoundField DataField="Name" HeaderText="Name" />
<asp:BoundField DataField="City" HeaderText="City" />
<asp:BoundField DataField="MobilePhone"
HeaderText="Mobile Phone" />
</Columns>
<FooterStyle BackColor="#5D7B9D" Font-Bold="True"
ForeColor="White" />
<RowStyle BackColor="#F7F6F3" ForeColor="#333333" />
<EditRowStyle BackColor="#999999" />
<SelectedRowStyle BackColor="#E2DED6" Font-Bold="True"
ForeColor="#333333" />
<PagerStyle BackColor="#284775" ForeColor="White"
HorizontalAlign="Center" />
<HeaderStyle BackColor="#5D7B9D" Font-Bold="True"
ForeColor="White" />
<AlternatingRowStyle BackColor="White" ForeColor="#284775" />
</asp:GridView>
However, this time, we prefer not to rely on the predefined templates, but to
define our own styles through CSS. Additionally, we want to add a new skin
definition for the GridView (you learned about skins back in Chapter 5), so that
all the GridView controls throughout our site have a standard appearance.
Open your Dorknozzle.css file from the App_Themes/Blue folder and add these
styles to it:
File: Dorknozzle.css (excerpt)
.GridMain
{
border-right: gainsboro thin solid;
border-top: gainsboro thin solid;
border-left: gainsboro thin solid;
border-bottom: gainsboro thin solid;
background-color: #333333;
width: 400px;
}
.GridRow
{
background-color: #FFFAFA;
}
.GridSelectedRow
{
438
Chapter 11: Managing Content Using Grid View and Details View

background-color: #E6E6FA;
}
.GridHeader
{
background-color: #ADD8E6;
font-weight: bold;
text-align: left;
}
Then modify the skin file SkinFile.skin in App_Themes/Blue by adding this
skin definition:
File: SkinFile.skin (excerpt)
<asp:GridView runat="server" CssClass="GridMain" CellPadding="4"
GridLines="None">
<RowStyle CssClass="GridRow" />
<SelectedRowStyle CssClass="GridSelectedRow" />
<HeaderStyle CssClass="GridHeader" />
</asp:GridView>
Finally, make sure that your GridView declaration in AddressBook.aspx doesn’t
contain any styling details, as shown here:
File: AddressBook.aspx (excerpt)
<asp:GridView ID="grid" runat="server"
AutoGenerateColumns="false">
<Columns>
<asp:BoundField DataField="Name" HeaderText="Name" />
<asp:BoundField DataField="City" HeaderText="City" />
<asp:BoundField DataField="MobilePhone"
HeaderText="Mobile Phone" />
</Columns>
</asp:GridView>
439
Styling the GridView with Templates, Skins, and CSS
Get Build Your Own ASP.NET 2.0 Web Site Using C# & VB, Second Edition now with the O’Reilly learning platform.
O’Reilly members experience books, live events, courses curated by job role, and more from O’Reilly and nearly 200 top publishers.

