REGISTERING YOUR DEVICES
The next step is to register your devices with the iOS Provisioning Portal so that you can later associate them with the provisioning profiles (more on this shortly). As mentioned in the beginning of this appendix, when you connect your device to Organizer for the first time, Organizer will attempt to register your device with the iOS Provisioning Portal automatically. However, if you skipped that step, or you want to register additional devices manually, you need to register them manually.
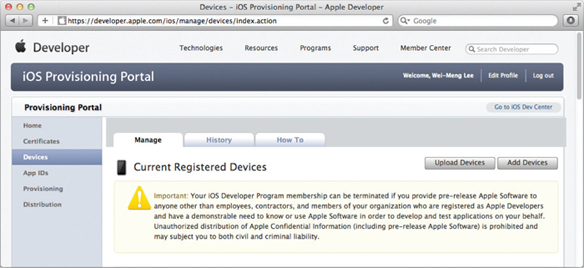
Back on the iOS Provisioning Portal page, click the Devices item displayed on the left side of the page (see Figure A-13). On the right you will see options to both add devices and upload a list of devices to register.

FIGURE A-13
Click the Add Devices button to register one or more devices. Give your device a name and enter its Device ID (see Figure A-14). Recall that you obtained the Device ID (UDID) of your device earlier, in the “Obtaining the UDID of Your Device” section. To register additional devices, click the plus (+) button. Then click Submit.
![]() NOTE For the Standard Program, you can register up to 100 devices for testing. All added devices count toward your 100-device limit, whether you use them or not. In other words, if you register five devices and then lose ...
NOTE For the Standard Program, you can register up to 100 devices for testing. All added devices count toward your 100-device limit, whether you use them or not. In other words, if you register five devices and then lose ...
Get Beginning iOS 5 Application Development now with the O’Reilly learning platform.
O’Reilly members experience books, live events, courses curated by job role, and more from O’Reilly and nearly 200 top publishers.

