Chapter 1. Security
1.0 Introduction
The average cost of a data breach in 2021 reached a new high of USD 4.24 million as reported by the IBM/Ponemon Institute Report. When you choose to run your applications in the cloud, you trust AWS to provide a secure infrastructure that runs cloud services so that you can focus on your own innovation and value-added activities.
But security in the cloud is a shared responsibility between you and AWS. You are responsible for the configuration of things like AWS Identity and Access Management (IAM) policies, Amazon EC2 security groups, and host based firewalls. In other words, the security of the hardware and software platform that make up the AWS cloud is an AWS responsibility. The security of software and configurations that you implement in your AWS account(s) are your responsibility.
As you deploy cloud resources in AWS and apply configuration, it is critical to understand the security settings required to maintain a secure environment. This chapter’s recipes include best practices and use cases focused on security. As security is a part of everything, you will use these recipes in conjunction with other recipes and chapters in this book. For example, you will see usage of AWS Systems Manager Session Manager used throughout the book when connecting to your EC2 instances. These foundational security recipes will give you the tools you need to build secure solutions on AWS.
In addition to the content in this chapter, so many great resources are available for you to dive deeper into security topics on AWS. “The Fundamentals of AWS Cloud Security”, presented at the 2019 AWS security conference re:Inforce, gives a great overview. A more advanced talk, “Encryption: It Was the Best of Controls, It Was the Worst of Controls”, from AWS re:Invent, explores encryption scenarios explained in detail.
Tip
AWS publishes a best practices guide for securing your account, and all AWS account holders should be familiar with the best practices as they continue to evolve.
Warning
We cover important security topics in this chapter. It is not possible to cover every topic as the list of services and configurations (with respect to security on AWS) continues to grow and evolve. AWS keeps its Best Practices for Security, Identity, and Compliance web page up-to-date.
Workstation Configuration
You will need a few things installed to be ready for the recipes in this chapter.
General setup
Follow the “General workstation setup steps for CLI recipes” to validate your configuration and set up the required environment variables. Then, clone the chapter code repository:
git clone https://github.com/AWSCookbook/Security
1.1 Creating and Assuming an IAM Role for Developer Access
Solution
Create a role using an IAM policy that will allow the role to be assumed later. Attach the AWS managed PowerUserAccess IAM policy to the role (see Figure 1-1).
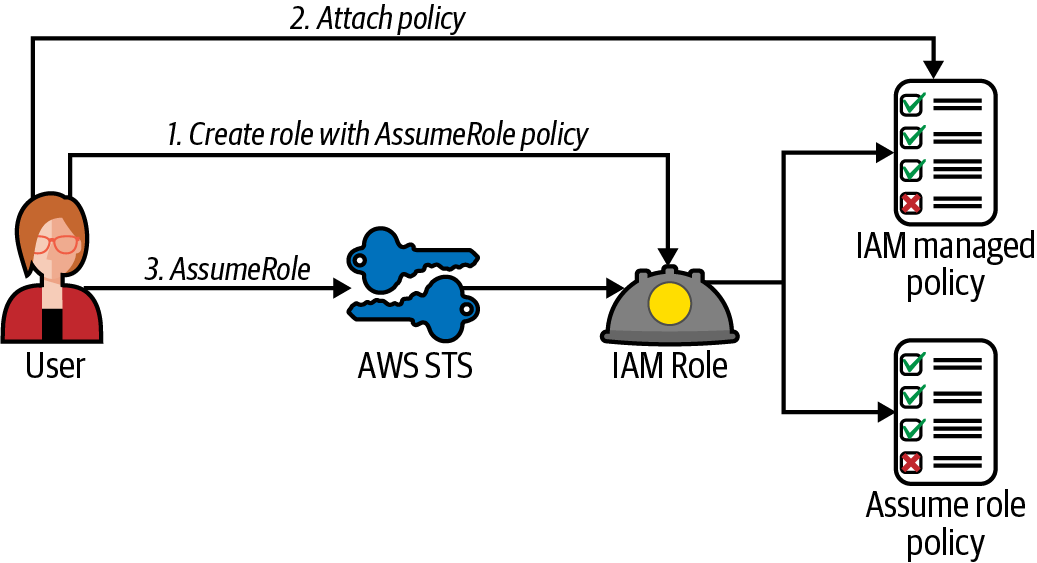
Figure 1-1. Create role, attach policy, and assume role
Steps
-
Create a file named assume-role-policy-template.json with the following content. This will allow an IAM principal to assume the role you will create next (file provided in the repository):
{
  "Version": "2012-10-17",
  "Statement": [
    {
      "Effect": "Allow",
      "Principal": {
        "AWS": "PRINCIPAL_ARN"
      },
      "Action": "sts:AssumeRole"
    }
  ]
}
Tip
If you are using an IAM user, and you delete and re-create the IAM user, this policy will not continue to work because of the way that the IAM service helps mitigate the risk of privilege escalation. For more information, see the Note in the IAM documentation about this.
-
Retrieve the ARN for your user and set it as a variable:
PRINCIPAL_ARN=$(aws sts get-caller-identity --query Arn --output text)
-
Use the
sedcommand to replacePRINCIPAL_ARNin the assume-role-policy-template.json file and generate the assume-role-policy.json file:sed -e "s|PRINCIPAL_ARN|${PRINCIPAL_ARN}|g" \ assume-role-policy-template.json > assume-role-policy.json -
Create a role and specify the assume role policy file:
ROLE_ARN=$(aws iam create-role --role-name AWSCookbook101Role \ --assume-role-policy-document file://assume-role-policy.json \ --output text --query Role.Arn) -
Attach the AWS managed
PowerUserAccesspolicy to the role:aws iam attach-role-policy --role-name AWSCookbook101Role \ --policy-arn arn:aws:iam::aws:policy/PowerUserAccessNote
AWS provides access policies for common job functions for your convenience. These policies may be a good starting point for you to delegate user access to your account for specific job functions; however, it is best to define a least-privilege policy for your own specific requirements for every access need.
Validation checks
aws sts assume-role --role-arn $ROLE_ARN \
     --role-session-name AWSCookbook101
You should see output similar to the following:
{
  "Credentials": {
    "AccessKeyId": "<snip>",
    "SecretAccessKey": "<snip>",
    "SessionToken": "<snip>",
    "Expiration": "2021-09-12T23:34:56+00:00"
  },
  "AssumedRoleUser": {
    "AssumedRoleId": "EXAMPLE:AWSCookbook101",
    "Arn": "arn:aws:sts::11111111111:assumed-role/AWSCookbook101Role/AWSCookbook101"
  }
}
Tip
The AssumeRole API returns a set of temporary credentials for a role session from the AWS Security Token Service (STS) to the caller as long as the permissions in the AssumeRole policy for the role allow. All IAM roles have an AssumeRole policy associated with them. You can use the output of this to configure the credentials for the AWS CLI; set the AccessKey, SecretAccessKey, and SessionToken as environment variables; and also assume the role in the AWS Console using the Switch Role feature. When your applications need to make AWS API calls, the AWS SDK for your programming language of choice handles this for them.
Cleanup
Follow the steps in this recipe’s folder in the chapter code repository.
Discussion
Using administrative access for routine development tasks is not a security best practice. Giving unneeded permissions can result in unauthorized actions being performed. Using the PowerUserAccess AWS managed policy for development purposes is a better alternative to start rather than using AdministratorAccess. Later, you should define your own customer managed policy granting only the specific actions for your needs. For example, if you need to log in often to check the status of your EC2 instances, you can create a read-only policy for this purpose and attach it to a role. Similarly, you can create a role for billing access and use it to access the AWS Billing console only. The more you practice using the principle of least privilege, the more security will become a natural part of what you do.
You used an IAM user in this recipe to perform the steps. If you are using an AWS account that leverages federation for access (e.g., a sandbox or development AWS account at your employer), you should use temporary credentials from the AWS STS rather than an IAM user. This type of access uses time-based tokens that expire after an amount of time, rather than “long-lived” credentials like access keys or passwords. When you performed the AssumeRole in the validation steps, you called the STS service for temporary credentials. To help with frequent AssumeRole operations, the AWS CLI supports named profiles that can automatically assume and refresh your temporary credentials for your role when you specify the role_arn parameter in the named profile.
Tip
You can require multi-factor authentication (MFA) as a condition within the AssumeRole policies you create. This would allow the role to be assumed only by an identity that has been authenticated with MFA. For more information about requiring MFA for AssumeRole, see the support document.
See Recipe 9.4 to create an alert when a root login occurs.
Tip
You can grant cross-account access to your AWS resources. The resource you define in the policy in this recipe would reference the AWS account and principal within that account that you would like to delegate access to. You should always use an ExternalID when enabling cross-account access. For more information, see the official tutorial for cross-account access.
1.2 Generating a Least Privilege IAM Policy Based on Access Patterns
Solution
Use the IAM Access Analyzer in the IAM console to generate an IAM policy based on the CloudTrail activity in your AWS account, as shown in Figure 1-2.
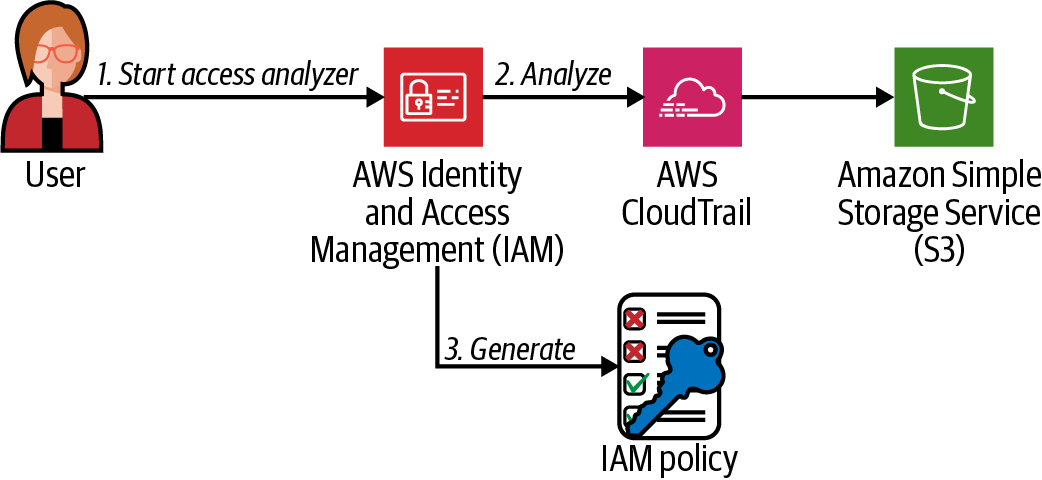
Figure 1-2. IAM Access Analyzer workflow
Prerequisite
-
CloudTrail logging enabled for your account to a configured S3 bucket (see Recipe 9.3)
Steps
-
Navigate to the IAM console and select your IAM role or IAM user that you would like to generate a policy for.
-
On the Permissions tab (the default active tab when viewing your principal), scroll to the bottom, expand the “Generate policy based on CloudTrail events” section, and click the “Generate policy” button.
Tip
For a quick view of the AWS services accessed from your principal, click the Access Advisor tab and view the service list and access time. While the IAM Access Advisor is not as powerful as the Access Analyzer, it can be helpful when auditing or troubleshooting IAM principals in your AWS account.
-
Select the time period of CloudTrail events you would like to evaluate, select your CloudTrail trail, choose your Region (or select “All regions”), and choose “Create and use a new service role.” IAM Access Analyzer will create a role for the service to use for read access to your trail that you selected. Finally, click “Generate policy.” See Figure 1-3 for an example.
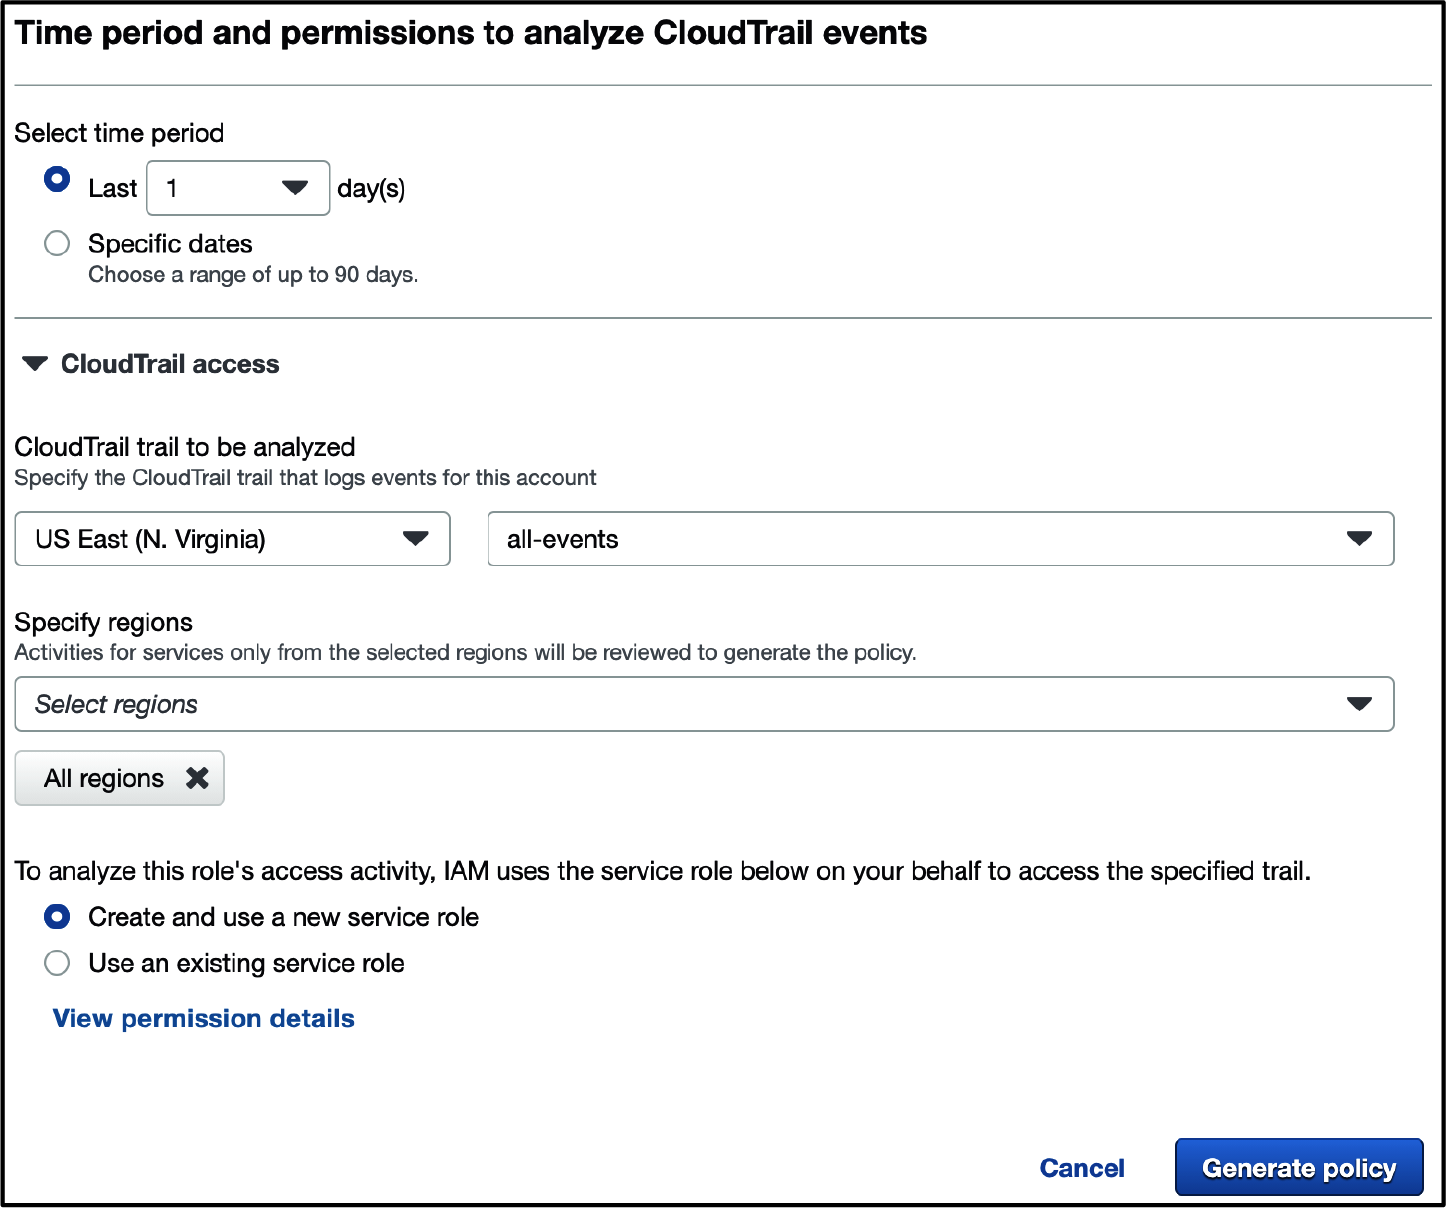
Figure 1-3. Generating a policy in the IAM Access Analyzer configuration
Note
The role creation can take up to 30 seconds. Once the role is created, the policy generation will take an amount of time depending on how much activity is in your CloudTrail trail.
-
Once the analyzer has completed, scroll to the bottom of the permissions tab and click “View generated policy,” as shown in Figure 1-4.

Figure 1-4. Viewing the generated policy
-
Click Next, and you will see a generated policy in JSON format that is based on the activity that your IAM principal has made. You can edit this policy in the interface if you wish to add additional permissions. Click Next again, choose a name, and you can deploy this generated policy as an IAM policy.
You should see a generated IAM policy in the IAM console similar to this:
{
  "Version": "2012-10-17",
  "Statement": [
    {
      "Effect": "Allow",
      "Action": [
        "access-analyzer:ListPolicyGenerations",
        "cloudtrail:DescribeTrails",
        "cloudtrail:LookupEvents",
        "iam:GetAccountPasswordPolicy",
        "iam:GetAccountSummary",
        "iam:GetServiceLastAccessedDetails",
        "iam:ListAccountAliases",
        "iam:ListGroups",
        "iam:ListMFADevices",
        "iam:ListUsers",
        "s3:ListAllMyBuckets",
        "sts:GetCallerIdentity"
      ],
      "Resource": "*"
    }, ...
}
Validation checks
Create a new IAM user or role and attach the newly created IAM policy to it. Perform an action granted by the policy to verify that the policy allows your IAM principal to perform the actions that you need it to.
Discussion
You should always seek to implement least privilege IAM policies when you are scoping them for your users and applications. Oftentimes, you might not know exactly what permissions you may need when you start. With IAM Access Analyzer, you can start by granting your users and applications a larger scope in a development environment, enable CloudTrail logging (Recipe 9.3), and then run IAM Access Analyzer after you have a window of time that provides a good representation of the usual activity (choose this time period in the Access Analyzer configuration as you did in step 3). The generated policy will contain all of the necessary permissions to allow your application or users to work as they did during that time period that you chose to analyze, helping you implement the principle of least privilege.
Note
You should also be aware of the list of services that Access Analyzer supports.
Challenge
Use the IAM Policy Simulator (see Recipe 1.4) on the generated policy to verify that the policy contains the access you need.
1.3 Enforcing IAM User Password Policies in Your AWS Account
Problem
Your security policy requires that you must enforce a password policy for all the users within your AWS account. The password policy sets a 90-day expiration, and passwords must be made up of a minimum of 32 characters including lowercase and uppercase letters, numbers, and symbols.
Solution
Set a password policy for IAM users in your AWS account. Create an IAM group, an IAM user, and add the user to the group to verify that the policy is being enforced (see Figure 1-5).
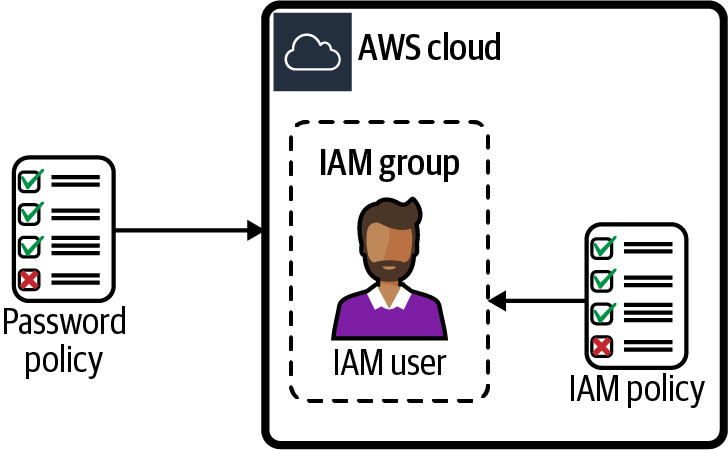
Figure 1-5. Using password policies with IAM users
Note
If your organization has a central user directory, we recommend using identity federation to access your AWS accounts using AWS Single Sign-On (SSO) rather than create individual IAM users and groups. Federation allows you to use an identity provider (IdP) where you already maintain users and groups. AWS publishes a guide that explains federated access configurations available. You can follow Recipe 9.6 to enable AWS SSO for your account even if you do not have an IdP available (AWS SSO provides a directory you can use by default).
Steps
-
Set an IAM password policy using the AWS CLI to require lowercase and uppercase letters, symbols, and numbers. The policy should indicate a minimum length of 32 characters, a maximum password age of 90 days, and password reuse prevented:
aws iam update-account-password-policy \ --minimum-password-length 32 \ --require-symbols \ --require-numbers \ --require-uppercase-characters \ --require-lowercase-characters \ --allow-users-to-change-password \ --max-password-age 90 \ --password-reuse-prevention true -
aws iam create-group --group-name AWSCookbook103Group
You should see output similar to the following:
{ "Group": { "Path": "/", "GroupName": "AWSCookbook103Group", "GroupId": "<snip>", "Arn": "arn:aws:iam::111111111111:group/AWSCookbook103Group", "CreateDate": "2021-11-06T19:26:01+00:00" } } -
Attach the
ReadOnlyAccesspolicy to the group:aws iam attach-group-policy --group-name AWSCookbook103Group \ --policy-arn arn:aws:iam::aws:policy/AWSBillingReadOnlyAccessTip
It is best to attach policies to groups and not directly to users. As the number of users grows, it is easier to use IAM groups to delegate permissions for manageability. This also helps to meet compliance for standards like CIS Level 1.
-
Create an IAM user:
aws iam create-user --user-name awscookbook103user
You should see output similar to the following:
{ "User": { "Path": "/", "UserName": "awscookbook103user", "UserId": "<snip>", "Arn": "arn:aws:iam::111111111111:user/awscookbook103user", "CreateDate": "2021-11-06T21:01:47+00:00" } } -
Use Secrets Manager to generate a password that conforms to your password policy:
RANDOM_STRING=$(aws secretsmanager get-random-password \
--password-length 32 --require-each-included-type \
--output text \
--query RandomPassword)
-
Create a login profile for the user that specifies a password:
aws iam create-login-profile --user-name awscookbook103user \
     --password $RANDOM_STRING
You should see output similar to the following:
{ "LoginProfile": { "UserName": "awscookbook103user", "CreateDate": "2021-11-06T21:11:43+00:00", "PasswordResetRequired": false } } -
Add the user to the group you created for billing view-only access:
aws iam add-user-to-group --group-name AWSCookbook103Group \
     --user-name awscookbook103user
Validation checks
Verify that the password policy you set is now active:
aws iam get-account-password-policy
You should see output similar to:
{
  "PasswordPolicy": {
    "MinimumPasswordLength": 32,
    "RequireSymbols": true,
    "RequireNumbers": true,
    "RequireUppercaseCharacters": true,
    "RequireLowercaseCharacters": true,
    "AllowUsersToChangePassword": true,
    "ExpirePasswords": true,
    "MaxPasswordAge": 90,
    "PasswordReusePrevention": 1
  }
}
Try to create a new user by using the AWS CLI with a password that violates the password policy. AWS will not allow you to create such a user:
aws iam create-user --user-name awscookbook103user2
Use Secrets Manager to generate a password that does not adhere to your password policy:
RANDOM_STRING2=$(aws secretsmanager get-random-password \
--password-length 16 --require-each-included-type \
--output text \
--query RandomPassword)
Create a login profile for the user that specifies the password:
aws iam create-login-profile --user-name awscookbook103user2 \
--password $RANDOM_STRING2
This command should fail and you should see output similar to:
An error occurred (PasswordPolicyViolation) when calling the CreateLoginProfile
operation: Password should have a minimum length of 32
Cleanup
Follow the steps in this recipe’s folder in the chapter code repository.
Discussion
For users logging in with passwords, AWS allows administrators to enforce password policies to their accounts that conform to the security requirements of your organization. This way, administrators can ensure that individual users don’t compromise the security of the organization by choosing weak passwords or by not regularly changing their passwords.
Tip
Multi-factor authentication is encouraged for IAM users. You can use a software-based virtual MFA device or a hardware device for a second factor on IAM users. AWS keeps an updated list of supported devices.
Multi-factor authentication is a great way to add another layer of security on top of existing password-based security. It combines “what you know” and “what you have”; so, in cases where your password might be exposed to a malicious third-party actor, they would still need the additional factor to authenticate.
Challenge
Download the credential report to analyze the IAM users and the password ages in your account.
1.4 Testing IAM Policies with the IAM Policy Simulator
Solution
Attach an IAM policy to an IAM role and simulate actions with the IAM Policy Simulator, as shown in Figure 1-6.
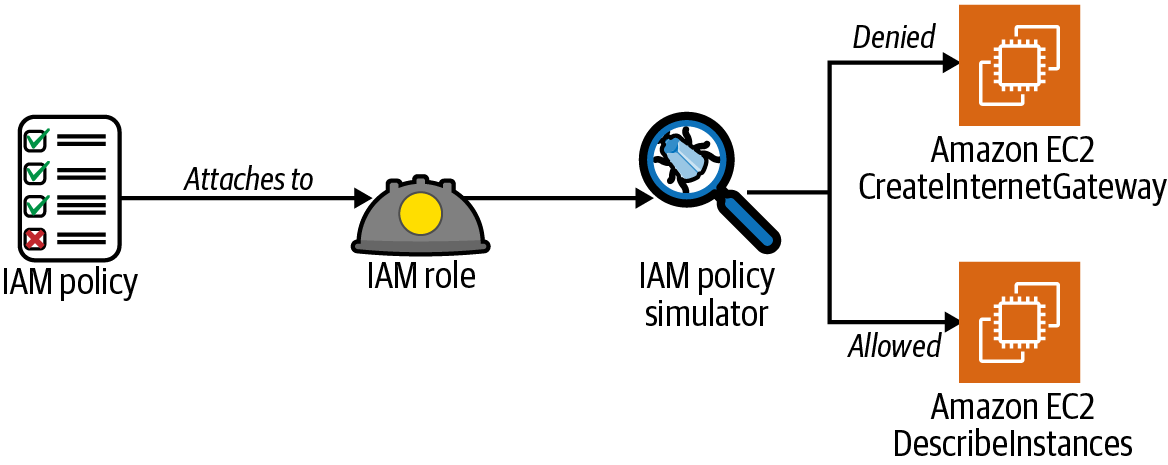
Figure 1-6. Simulating IAM policies attached to an IAM role
Steps
-
Create a file called assume-role-policy.json with the following content (file provided in the repository):
{ "Version": "2012-10-17", "Statement": [ { "Effect": "Allow", "Principal": { "Service": "ec2.amazonaws.com" }, "Action": "sts:AssumeRole" } ] } -
Create an IAM role using the assume-role-policy.json file:
aws iam create-role --assume-role-policy-document \
     file://assume-role-policy.json --role-name AWSCookbook104IamRole
You should see output similar to the following:
{ "Role": { "Path": "/", "RoleName": "AWSCookbook104IamRole", "RoleId": "<<UniqueID>>", "Arn": "arn:aws:iam::111111111111:role/AWSCookbook104IamRole", "CreateDate": "2021-09-22T23:37:44+00:00", "AssumeRolePolicyDocument": { "Version": "2012-10-17", "Statement": [ ... -
Attach the IAM managed policy for
AmazonEC2ReadOnlyAccessto the IAM role:aws iam attach-role-policy --role-name AWSCookbook104IamRole \ --policy-arn arn:aws:iam::aws:policy/AmazonEC2ReadOnlyAccess
Tip
You can find a list of all the actions, resources, and condition keys for EC2 in this AWS article. The IAM global condition context keys are also useful in authoring fine-grained policies.
Validation checks
Simulate the effect of the IAM policy you are using, testing several different types of actions on the EC2 service.
Test the ec2:CreateInternetGateway action:
aws iam simulate-principal-policy \
     --policy-source-arn arn:aws:iam::$AWS_ACCOUNT_ARN:role/AWSCookbook104IamRole \
     --action-names ec2:CreateInternetGateway
You should see output similar to the following (note the EvalDecision):
{
  "EvaluationResults": [
  {
    "EvalActionName": "ec2:CreateInternetGateway",
    "EvalResourceName": "*",
    "EvalDecision": "implicitDeny",
    "MatchedStatements": [],
    "MissingContextValues": []
  }
  ]
}
Note
Since you attached only the AWS managed AmazonEC2ReadOnlyAccess IAM policy to the role in this recipe, you will see an implicit deny for the CreateInternetGateway action. This is expected behavior. AmazonEC2ReadOnlyAccess does not grant any “create” capabilities for the EC2 service.
Test the ec2:DescribeInstances action:
aws iam simulate-principal-policy \
     --policy-source-arn arn:aws:iam::$AWS_ACCOUNT_ARN:role/AWSCookbook104IamRole \
     --action-names ec2:DescribeInstances
You should see output similar to the following:
{
  "EvaluationResults": [
  {
    "EvalActionName": "ec2:DescribeInstances",
    "EvalResourceName": "*",
    "EvalDecision": "allowed",
    "MatchedStatements": [
      {
      "SourcePolicyId": "AmazonEC2ReadOnlyAccess",
      "SourcePolicyType": "IAM Policy",
      "StartPosition": {
        "Line": 3,
        "Column": 17
      },
      "EndPosition": {
        "Line": 8,
        "Column": 6
      }
      }
    ],
    "MissingContextValues": []
  }
  ]
}
Note
The AmazonEC2ReadOnlyAccess policy allows read operations on the EC2 service, so the DescribeInstances operation succeeds when you simulate this action.
Cleanup
Follow the steps in this recipe’s folder in the chapter code repository.
Discussion
IAM policies let you define permissions for managing access in AWS. Policies can be attached to principals that allow you to grant (or deny) permissions to resources, users, groups and services. It is always best to scope your policies to the minimal set of permissions required as a security best practice. The IAM Policy Simulator can be extremely helpful when designing and managing your own IAM policies for least-privileged access.
The IAM Policy Simulator also exposes a web interface you can use to test and troubleshoot IAM policies and understand their net effect with the policy you define. You can test all the policies or a subset of policies that you have attached to users, groups, and roles.
Tip
The IAM Policy Simulator can help you simulate the effect of the following:
-
Identity-based policies
-
IAM permissions boundaries
-
AWS Organizations service control policies (SCPs)
-
Resource-based policies
After you review the Policy Simulator results, you can add additional statements to your policies that either solve your issue (from a troubleshooting standpoint) or attach newly created policies to users, groups, and roles with the confidence that the net effect of the policy was what you intended.
Note
To help you easily build IAM policies from scratch, AWS provides the AWS Policy Generator.
Challenge
Simulate the effect of a permissions boundary on an IAM principal (see Recipe 1.5).
1.5 Delegating IAM Administrative Capabilities Using Permissions Boundaries
Solution
Create a permissions boundary policy, create an IAM role for Lambda developers, create an IAM policy that specifies the boundary policy, and attach the policy to the role you created. Figure 1-7 illustrates the effective permissions of the identity-based policy with the permissions boundary.
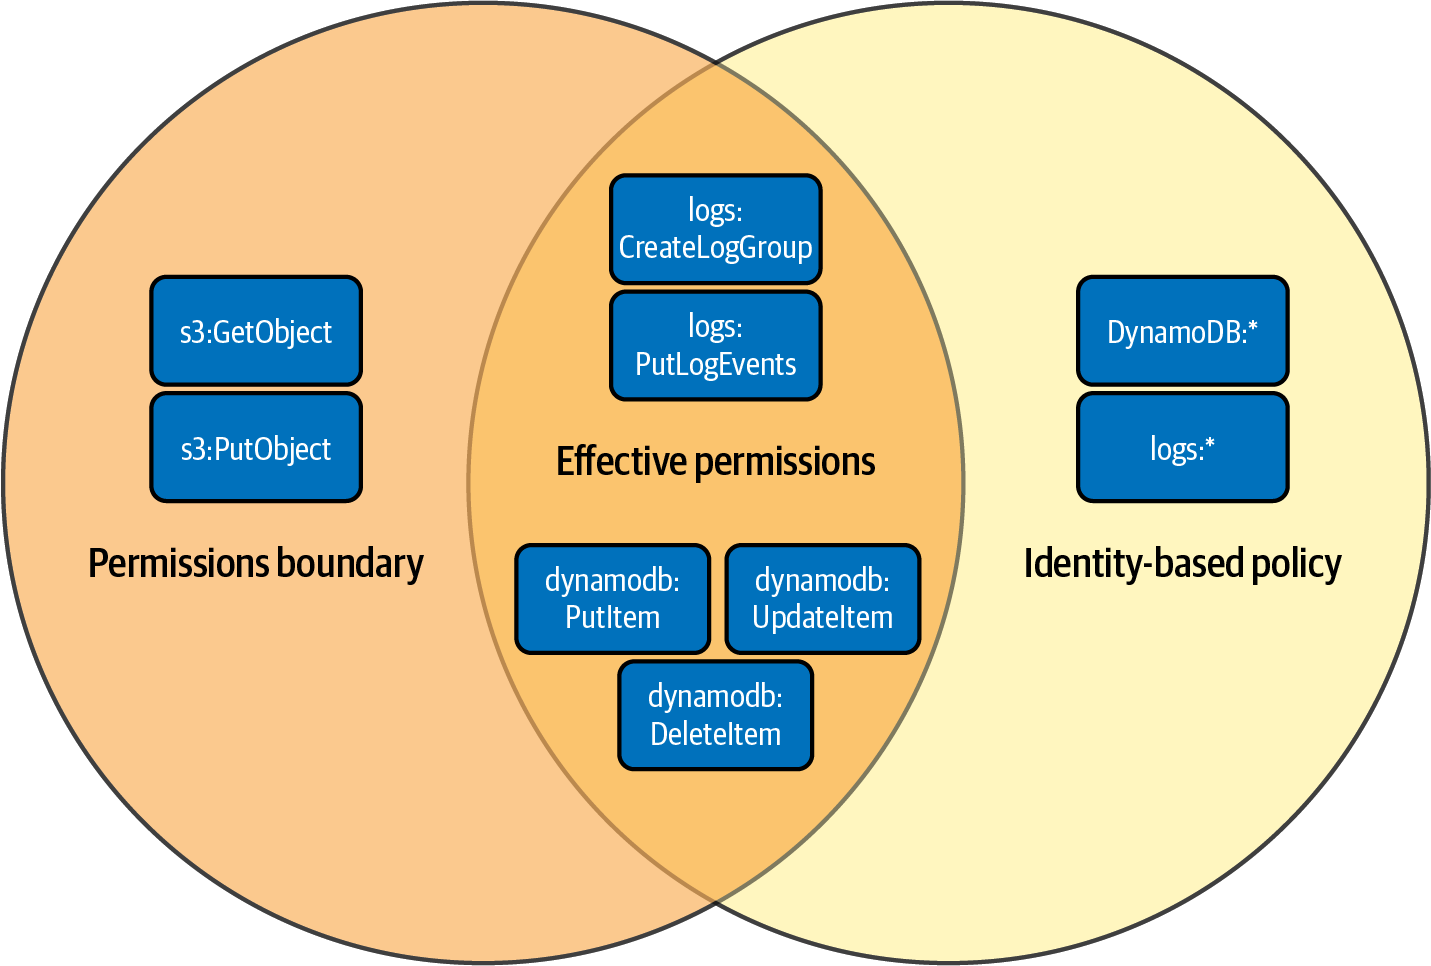
Figure 1-7. Effective permissions of identity-based policy with permissions boundary
Prerequisite
-
An IAM user or federated identity for your AWS account with administrative privileges (follow the AWS guide for creating your first IAM admin user and user group).
Steps
-
Create a file named assume-role-policy-template.json with the following content (file provided in the repository):
{ "Version": "2012-10-17", "Statement": [ { "Effect": "Allow", "Principal": { "AWS": "PRINCIPAL_ARN" }, "Action": "sts:AssumeRole" } ] } -
Retrieve the ARN for your user and set it as a variable:
PRINCIPAL_ARN=$(aws sts get-caller-identity --query Arn --output text)
-
Use the
sedcommand to replacePRINCIPAL_ARNin the assume-role-policy-template.json file that we provided in the repository and generate the assume-role-policy.json file:sed -e "s|PRINCIPAL_ARN|${PRINCIPAL_ARN}|g" \ assume-role-policy-template.json > assume-role-policy.jsonNote
For the purposes of this recipe, you set the allowed IAM principal to your own user (User 1). To test delegated access, you would set the IAM principal to something else.
-
Create a role and specify the assume role policy file:
ROLE_ARN=$(aws iam create-role --role-name AWSCookbook105Role \ --assume-role-policy-document file://assume-role-policy.json \ --output text --query Role.Arn) -
Create a permissions boundary JSON file named boundary-template.json with the following content. This allows specific DynamoDB, S3, and CloudWatch Logs actions (file provided in the repository):
{ "Version": "2012-10-17", "Statement": [ { "Sid": "CreateLogGroup", "Effect": "Allow", "Action": "logs:CreateLogGroup", "Resource": "arn:aws:logs:*:AWS_ACCOUNT_ID:*" }, { "Sid": "CreateLogStreamandEvents", "Effect": "Allow", "Action": [ "logs:CreateLogStream", "logs:PutLogEvents" ], "Resource": "arn:aws:logs:*:AWS_ACCOUNT_ID:*" }, { "Sid": "DynamoDBPermissions", "Effect": "Allow", "Action": [ "dynamodb:PutItem", "dynamodb:UpdateItem", "dynamodb:DeleteItem" ], "Resource": "arn:aws:dynamodb:*:AWS_ACCOUNT_ID:table/AWSCookbook*" }, { "Sid": "S3Permissions", "Effect": "Allow", "Action": [ "s3:GetObject", "s3:PutObject" ], "Resource": "arn:aws:s3:::AWSCookbook*/*" } ] } -
Use the
sedcommand to replaceAWS_ACCOUNT_IDin the boundary-policy-template.json file and generate the boundary-policy.json file:sed -e "s|AWS_ACCOUNT_ID|${AWS_ACCOUNT_ID}|g" \ boundary-policy-template.json > boundary-policy.json -
Create the permissions boundary policy by using the AWS CLI:
aws iam create-policy --policy-name AWSCookbook105PB \
     --policy-document file://boundary-policy.json
You should see output similar to the following:
{ "Policy": { "PolicyName": "AWSCookbook105PB", "PolicyId": "EXAMPLE", "Arn": "arn:aws:iam::111111111111:policy/AWSCookbook105PB", "Path": "/", "DefaultVersionId": "v1", "AttachmentCount": 0, "PermissionsBoundaryUsageCount": 0, "IsAttachable": true, "CreateDate": "2021-09-24T00:36:53+00:00", "UpdateDate": "2021-09-24T00:36:53+00:00" } } -
Create a policy file named policy-template.json for the role (file provided in the repository):
{
  "Version": "2012-10-17",
  "Statement": [
    {
      "Sid": "DenyPBDelete",
      "Effect": "Deny",
      "Action": "iam:DeleteRolePermissionsBoundary",
      "Resource": "*"
    },
    {
      "Sid": "IAMRead",
      "Effect": "Allow",
      "Action": [
        "iam:Get*",
        "iam:List*"
      ],
      "Resource": "*"
    },
    {
       "Sid": "IAMPolicies",
      "Effect": "Allow",
      "Action": [
        "iam:CreatePolicy",
        "iam:DeletePolicy",
        "iam:CreatePolicyVersion",
        "iam:DeletePolicyVersion",
        "iam:SetDefaultPolicyVersion"
      ],
      "Resource": "arn:aws:iam::AWS_ACCOUNT_ID:policy/AWSCookbook*"
    },
    {
      "Sid": "IAMRolesWithBoundary",
      "Effect": "Allow",
      "Action": [
        "iam:CreateRole",
        "iam:DeleteRole",
        "iam:PutRolePolicy",
        "iam:DeleteRolePolicy",
        "iam:AttachRolePolicy",
        "iam:DetachRolePolicy"
      ],
      "Resource": [
        "arn:aws:iam::AWS_ACCOUNT_ID:role/AWSCookbook*"
      ],
      "Condition": {
        "StringEquals": {
          "iam:PermissionsBoundary": "arn:aws:iam::AWS_ACCOUNT_ID:policy/AWSCookbook105PB"
        }
      }
    },
    {
      "Sid": "ServerlessFullAccess",
      "Effect": "Allow",
        "Action": [
        "lambda:*",
        "logs:*",
        "dynamodb:*",
        "s3:*"
      ],
      "Resource": "*"
    },
    {
      "Sid": "PassRole",
      "Effect": "Allow",
      "Action": "iam:PassRole",
      "Resource": "arn:aws:iam::AWS_ACCOUNT_ID:role/AWSCookbook*",
      "Condition": {
        "StringLikeIfExists": {
          "iam:PassedToService": "lambda.amazonaws.com"
        }
      }
    },
    {
      "Sid": "ProtectPB",
      "Effect": "Deny",
      "Action": [
        "iam:CreatePolicyVersion",
        "iam:DeletePolicy",
        "iam:DeletePolicyVersion",
        "iam:SetDefaultPolicyVersion"
      ],
      "Resource": [
        "arn:aws:iam::AWS_ACCOUNT_ID:policy/AWSCookbook105PB",
        "arn:aws:iam::AWS_ACCOUNT_ID:policy/AWSCookbook105Policy"
      ]
    }
  ]
}
"Effect": "Deny",
"Action": [
"iam:CreatePolicyVersion",
"iam:DeletePolicy",
"iam:DeletePolicyVersion",
"iam:SetDefaultPolicyVersion"
],
"Resource": [
"arn:aws:iam::AWS_ACCOUNT_ID:policy/AWSCookbook105PB",
"arn:aws:iam::AWS_ACCOUNT_ID:policy/AWSCookbook105Policy"
]
}
]
}This custom IAM policy has several statements working together, which define certain permissions for the solution to the problem statement:

-
DenyPBDelete: Explicitly deny the ability to delete permissions boundaries from roles. 
-
IAMRead: Allow read-only IAM access to developers to ensure that the IAM console works. 
-
IAMPolicies: Allow the creation of IAM policies but force a naming convention prefixAWSCookbook*. 
-
IAMRolesWithBoundary: Allow the creation and deletion of IAM roles only if they contain the permissions boundary referenced. 
-
ServerlessFullAccess: Allow developers to have full access to the AWS Lambda, Amazon DynamoDB, Amazon CloudWatch logs, and Amazon S3 services. 
-
PassRole: Allow developers to pass IAM roles to Lambda functions. 
-
ProtectPB: Explicitly deny the ability to modify the permissions boundary that bound the roles they create.
-
Use the
sedcommand to replaceAWS_ACCOUNT_IDin the policy-template.json file and generate the policy.json file:sed -e "s|AWS_ACCOUNT_ID|${AWS_ACCOUNT_ID}|g" \ policy-template.json > policy.json -
Create the policy for developer access:
aws iam create-policy --policy-name AWSCookbook105Policy \
     --policy-document file://policy.json
You should see output similar to the following:
{ "Policy": { "PolicyName": "AWSCookbook105Policy", "PolicyId": "EXAMPLE", "Arn": "arn:aws:iam::11111111111:policy/AWSCookbook105Policy", "Path": "/", "DefaultVersionId": "v1", "AttachmentCount": 0, "PermissionsBoundaryUsageCount": 0, "IsAttachable": true, "CreateDate": "2021-09-24T00:37:13+00:00", "UpdateDate": "2021-09-24T00:37:13+00:00" } } -
Attach the policy to the role you created in step 2:
aws iam attach-role-policy --policy-arn \
     arn:aws:iam::$AWS_ACCOUNT_ID:policy/AWSCookbook105Policy \
     --role-name AWSCookbook105Role
Validation checks
Assume the role you created and set the output to local variables for the AWS CLI:
creds=$(aws --output text sts assume-role --role-arn $ROLE_ARN \
     --role-session-name "AWSCookbook105" | \
     grep CREDENTIALS | cut -d " " -f2,4,5)
export AWS_ACCESS_KEY_ID=$(echo $creds | cut -d " " -f2)
export AWS_SECRET_ACCESS_KEY=$(echo $creds | cut -d " " -f4)
export AWS_SESSION_TOKEN=$(echo $creds | cut -d " " -f5)
Try to create an IAM role for a Lambda function, create an assume role policy for the Lambda service (lambda-assume-role-policy.json):
{
  "Version": "2012-10-17",
  "Statement": [
    {
      "Effect": "Allow",
      "Principal": {
        "Service": "lambda.amazonaws.com"
      },
      "Action": "sts:AssumeRole"
    }
  ]
}
Create the role, specifying the permissions boundary, which conforms to the role-naming standard specified in the policy:
TEST_ROLE_1=$(aws iam create-role --role-name AWSCookbook105test1 \
     --assume-role-policy-document \
     file://lambda-assume-role-policy.json \
     --permissions-boundary \
     arn:aws:iam::$AWS_ACCOUNT_ID:policy/AWSCookbook105PB \
     --output text --query Role.Arn)
Attach the managed AmazonDynamoDBFullAccess policy to the role:
aws iam attach-role-policy --role-name AWSCookbook105test1 \
--policy-arn arn:aws:iam::aws:policy/AmazonDynamoDBFullAccess
Attach the managed CloudWatchFullAccess policy to the role:
aws iam attach-role-policy --role-name AWSCookbook105test1 \
--policy-arn arn:aws:iam::aws:policy/CloudWatchFullAccess
Note
Even though you attached AmazonDynamoDBFullAccess and CloudWatchFullAccess to the role, the effective permissions of the role are limited by the statements in the permissions boundary you created in step 3. Furthermore, even though you have s3:GetObject and s3:PutObject defined in the boundary, you have not defined these in the role policy, so the function will not be able to make these calls until you create a policy that allows these actions. When you attach this role to a Lambda function, the Lambda function can perform only the actions allowed in the intersection of the permissions boundary and the role policy (see Figure 1-7).
You can now create a Lambda function specifying this role (AWSCookbook105test1) as the execution role to validate the DynamoDB and CloudWatch Logs permissions granted to the function. You can also test the results with the IAM Policy Simulator.
You used an AssumeRole and set environment variables to override your local terminal AWS profile to perform these validation checks. To ensure that you revert back to your original authenticated session on the command line, perform the perform the cleanup steps provided at the top of the README file in the repository.
Cleanup
Follow the steps in this recipe’s folder in the chapter code repository.
Note
Be sure to delete your environment variables so that you can regain permissions needed for future recipes:
unset AWS_ACCESS_KEY_ID
unset AWS_SECRET_ACCESS_KEY
unset AWS_SESSION_TOKEN
Discussion
In your quest to implement a least privilege access model for users and applications within AWS, you need to enable developers to create IAM roles that their applications can assume when they need to interact with other AWS services. For example, an AWS Lambda function that needs to access an Amazon DynamoDB table would need a role created to be able to perform operations against the table. As your team scales, instead of your team members coming to you every time they need a role created for a specific purpose, you can enable (but control) them with permissions boundaries, without giving up too much IAM access. The iam:PermissionsBoundary condition in the policy that grants the iam:CreateRole ensures that the roles created must always include the permissions boundary attached.
Permissions boundaries act as a guardrail and limit privilege escalation. In other words, they limit the maximum effective permissions of an IAM principal created by a delegated administrator by defining what the roles created can do. As shown in Figure 1-7, they work in conjunction with the permissions policy (IAM policy) that is attached to an IAM principal (IAM user or role). This prevents the need to grant wide access to an administrator role, prevents privilege escalation, and helps you achieve least privilege access by allowing your team members to quickly iterate and create their own least-privileged roles for their applications.
In this recipe, you may have noticed that we used a naming convention of AWSCookbook* on the roles and policies referenced in the permissions boundary policy, which ensures the delegated principals can create roles and policies within this convention. This means that developers can create resources, pass only these roles to services, and also keep a standard naming convention. This is an ideal practice when implementing permissions boundaries. You can develop a naming convention for different teams, applications, and services so that these can all coexist within the same account, yet have different boundaries applied to them based on their requirements, if necessary.
At minimum, you need to keep these four things in mind when building roles that implement permissions boundary guardrails to delegate IAM permissions to nonadministrators:
-
Allow the creation of IAM customer managed policies: your users can create any policy they wish; they do not have an effect until they are attached to an IAM principal.
-
Allow IAM role creation with a condition that a permissions boundary must be attached: force all roles created by your team members to include the permission boundary in the role creation.
-
Allow attachment of policies, but only to roles that have a permissions boundary: do not let users modify existing roles that they may have access to.
-
Allow
iam:PassRoleto AWS services that your users create roles for: your developers may need to create roles for Amazon EC2 and AWS Lambda, so give them the ability to pass only the roles they create to those services you define.
Tip
Permissions boundaries are a powerful, advanced IAM concept that can be challenging to understand. We recommend checking out the talk by Brigid Johnson at AWS re:Inforce 2018 to see some real-world examples of IAM policies, roles, and permissions boundaries explained in a practical way.
1.6 Connecting to EC2 Instances Using AWS SSM Session Manager
Solution
Create an IAM role, attach the AmazonSSMManagedInstanceCore policy, create an EC2 instance profile, attach the IAM role you created to the instance profile, associate the EC2 instance profile to an EC2 instance, and finally, run the aws ssm start-session command to connect to the instance. A logical flow of these steps is shown in Figure 1-8.
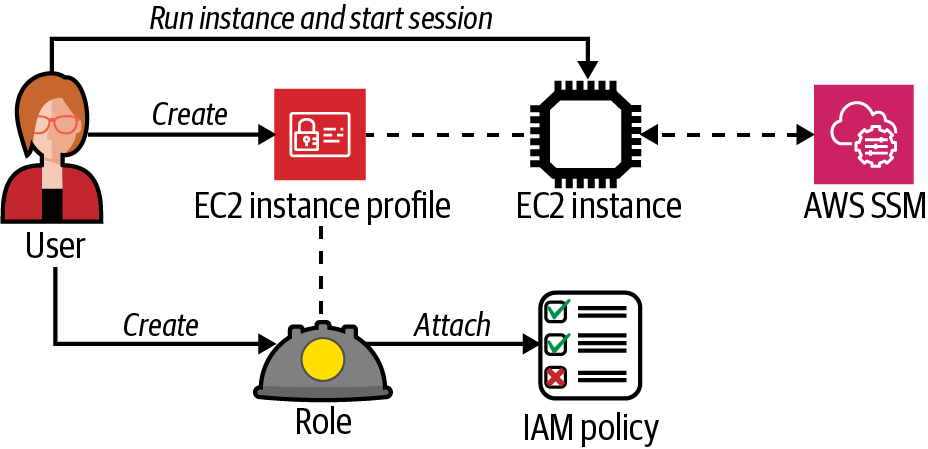
Figure 1-8. Using Session Manager to connect to an EC2 instance
Prerequisites
-
Amazon Virtual Private Cloud (VPC) with isolated or private subnets and associated route tables
-
AWS CLI v2 with the Session Manager plugin installed
Preparation
Follow the steps in this recipe’s folder in the chapter code repository.
Steps
-
Create a file named assume-role-policy.json with the following content (file provided in the repository):
{ "Version": "2012-10-17", "Statement": [ { "Effect": "Allow", "Principal": { "Service": "ec2.amazonaws.com" }, "Action": "sts:AssumeRole" } ] } -
Create an IAM role with the statement in the provided assume-role-policy.json file using this command:
ROLE_ARN=$(aws iam create-role --role-name AWSCookbook106SSMRole \ --assume-role-policy-document file://assume-role-policy.json \ --output text --query Role.Arn) -
Attach the
AmazonSSMManagedInstanceCoremanaged policy to the role so that the role allows access to AWS Systems Manager:aws iam attach-role-policy --role-name AWSCookbook106SSMRole \ --policy-arn arn:aws:iam::aws:policy/AmazonSSMManagedInstanceCore -
Create an instance profile:
aws iam create-instance-profile \
     --instance-profile-name AWSCookbook106InstanceProfile
You should see output similar to the following:
{ "InstanceProfile": { "Path": "/", "InstanceProfileName": "AWSCookbook106InstanceProfile", "InstanceProfileId": "(RandomString", "Arn": "arn:aws:iam::111111111111:instance-profile/AWSCookbook106InstanceProfile", "CreateDate": "2021-11-28T20:26:23+00:00", "Roles": [] } } -
Add the role that you created to the instance profile:
aws iam add-role-to-instance-profile \
     --role-name AWSCookbook106SSMRole \
     --instance-profile-name AWSCookbook106InstanceProfile
Note
The EC2 instance profile contains a role that you create. The instance profile association with an instance allows it to define “who I am,” and the role defines “what I am permitted to do.” Both are required by IAM to allow an EC2 instance to communicate with other AWS services using the IAM service. You can get a list of instance profiles in your account by running the
aws iam list-instance-profilesAWS CLI command. -
Query SSM for the latest Amazon Linux 2 AMI ID available in your Region and save it as an environment variable:
AMI_ID=$(aws ssm get-parameters --names \ /aws/service/ami-amazon-linux-latest/amzn2-ami-hvm-x86_64-gp2 \ --query 'Parameters[0].[Value]' --output text) -
Launch an instance in one of your subnets that references the instance profile you created and also uses a
Nametag that helps you identify the instance in the console:INSTANCE_ID=$(aws ec2 run-instances --image-id $AMI_ID \ --count 1 \ --instance-type t3.nano \ --iam-instance-profile Name=AWSCookbook106InstanceProfile \ --subnet-id $SUBNET_1 \ --security-group-ids $INSTANCE_SG \ --metadata-options \ HttpTokens=required,HttpPutResponseHopLimit=64,HttpEndpoint=enabled \ --tag-specifications \ 'ResourceType=instance,Tags=[{Key=Name,Value=AWSCookbook106}]' \ 'ResourceType=volume,Tags=[{Key=Name,Value=AWSCookbook106}]' \ --query Instances[0].InstanceId \ --output text)Tip
EC2 instance metadata is a feature you can use within your EC2 instance to access information about your EC2 instance over an HTTP endpoint from the instance itself. This is helpful for scripting and automation via user data. You should always use the latest version of instance metadata. In step 7, you did this by specifying the
--metadata-optionsflag and providing theHttpTokens=requiredoption that forces IMDSv2.
Validation checks
Ensure your EC2 instance has registered with SSM. Use the following command to check the status. This command should return the instance ID:
aws ssm describe-instance-information \
     --filters Key=ResourceType,Values=EC2Instance \
     --query "InstanceInformationList[].InstanceId" --output text
Connect to the EC2 instance by using SSM Session Manager:
aws ssm start-session --target $INSTANCE_ID
You should now be connected to your instance and see a bash prompt. From the bash prompt, run a command to validate you are connected to your EC2 instance by querying the metadata service for an IMDSv2 token and using the token to query metadata for the instance profile associated with the instance:
TOKEN=`curl -X PUT "http://169.254.169.254/latest/api/token" -H "X-aws-ec2-metadata-token-ttl-seconds: 21600"`
curl -H "X-aws-ec2-metadata-token: $TOKEN" http://169.254.169.254/latest/meta-data/iam/info
You should see output similar to the following:
{
  "Code" : "Success",
  "LastUpdated" : "2021-09-23T16:03:25Z",
  "InstanceProfileArn" : "arn:aws:iam::111111111111:instance-profile/AWSCookbook106InstanceProfile",
  "InstanceProfileId" : "AIPAZVTINAMEXAMPLE"
}
Exit the Session Manager session:
exit
Cleanup
Follow the steps in this recipe’s folder in the chapter code repository.
Discussion
When you use AWS SSM Session Manager to connect to EC2 instances, you eliminate your dependency on Secure Shell (SSH) over the internet for command-line access to your instances. Once you configure Session Manager for your instances, you can instantly connect to a bash shell session on Linux or a PowerShell session for Windows systems.
Warning
SSM can log all commands and their output during a session. You can set a preference to stop the logging of sensitive data (e.g., passwords) with this command:
stty -echo; read passwd; stty echo;
There is more information in an AWS article about logging session activity.
Session Manager works by communicating with the AWS Systems Manager (SSM) API endpoints within the AWS Region you are using over HTTPS (TCP port 443). The agent on your instance registers with the SSM service at boot time. No inbound security group rules are needed for Session Manager functionality. We recommend configuring VPC Endpoints for Session Manager to avoid the need for internet traffic and the cost of Network Address Translation (NAT) gateways.
Here are some examples of the increased security posture Session Manager provides:
-
No internet-facing TCP ports need to be allowed in security groups associated with instances.
-
You can run instances in private (or isolated) subnets without exposing them directly to the internet and still access them for management duties.
-
There is no need to create, associate, and manage SSH keys with instances.
-
There is no need to manage user accounts and passwords on instances.
-
You can delegate access to manage EC2 instances using IAM roles.
Note
Any tool like SSM that provides such powerful capabilities must be carefully audited. AWS provides information about locking down permissions for the SSM user, and more information about auditing session activity.
1.7 Encrypting EBS Volumes Using KMS Keys
Solution
Create a customer-managed KMS key (CMK), enable yearly rotation of the key, enable EC2 default encryption for EBS volumes in a Region, and specify the KMS key you created (shown in Figure 1-9).

Figure 1-9. Create a customer-managed key, enable rotation, and set default encryption for EC2 using a customer-managed key
Steps
-
Create a customer-managed KMS key and store the key ARN as a local variable:
KMS_KEY_ID=$(aws kms create-key --description "AWSCookbook107Key" \ --output text --query KeyMetadata.KeyId) -
Create a key alias to help you refer to the key in other steps:
aws kms create-alias --alias-name alias/AWSCookbook107Key \ --target-key-id $KMS_KEY_ID -
Enable automated rotation of the symmetric key material every 365 days:
aws kms enable-key-rotation --key-id $KMS_KEY_ID
-
Enable EBS encryption by default for the EC2 service within your current Region:
aws ec2 enable-ebs-encryption-by-default
You should see output similar to the following:
{ "EbsEncryptionByDefault": true } -
Update the default KMS key used for default EBS encryption to your customer-managed key that you created in step 1:
aws ec2 modify-ebs-default-kms-key-id \
     --kms-key-id alias/AWSCookbook107Key
You should see output similar to the following:
{
  "KmsKeyId": "arn:aws:kms:us-east-1:111111111111:key/1111111-aaaa-bbbb-222222222"
}
Validation checks
Use the AWS CLI to retrieve the default EBS encryption status for the EC2 service:
aws ec2 get-ebs-encryption-by-default
You should see output similar to the following:
{
  "EbsEncryptionByDefault": true
}
Retrieve the KMS key ID used for default encryption:
aws ec2 get-ebs-default-kms-key-id
You should see output similar to the following:
{
  "KmsKeyId": "arn:aws:kms:us-east-1:1111111111:key/1111111-aaaa-3333-222222222c64b"
}
Check the automatic rotation status of the key you created:
aws kms get-key-rotation-status --key-id $KMS_KEY_ID
You should see output similar to the following:
{
  "KeyRotationEnabled": true
}
Cleanup
Follow the steps in this recipe’s folder in the chapter code repository.
Discussion
When you are faced with the challenge of ensuring that all of your newly created EBS volumes are encrypted, the ebs-encryption-by-default option comes to the rescue. With this setting enabled, every EC2 instance you launch will by default have its EBS volumes encrypted with the specified KMS key. If you do not specify a KMS key, a default AWS-managed aws/ebs KMS key is created and used. If you need to manage the lifecycle of the key or have a requirement specifying that you or your organization must manage the key, customer-managed keys should be used.
Automatic key rotation on the KMS service simplifies your approach to key rotation and key lifecycle management.
KMS is a flexible service you can use to implement a variety of data encryption strategies. It supports key policies that you can use to control who has access to the key. These key policies layer on top of your existing IAM policy strategy for added security. You can use KMS keys to encrypt many different types of data at rest within your AWS account, for example:
-
Amazon S3
-
Amazon EC2 EBS volumes
-
Amazon RDS databases and clusters
-
Amazon DynamoDB tables
-
Amazon EFS volumes
-
Amazon FSx file shares
-
And many more
Challenge 1
Change the key policy on the KMS key to allow access to only your IAM principal and the EC2 service.
Challenge 2
Create an EBS volume and verify that it is encrypted by using the aws ec2 describe-volumes command.
1.8 Storing, Encrypting, and Accessing Passwords Using Secrets Manager
Solution
Create a password, store the password in Secrets Manager, create an IAM Policy with access to the secret, and grant an EC2 instance profile access to the secret, as shown in Figure 1-10.
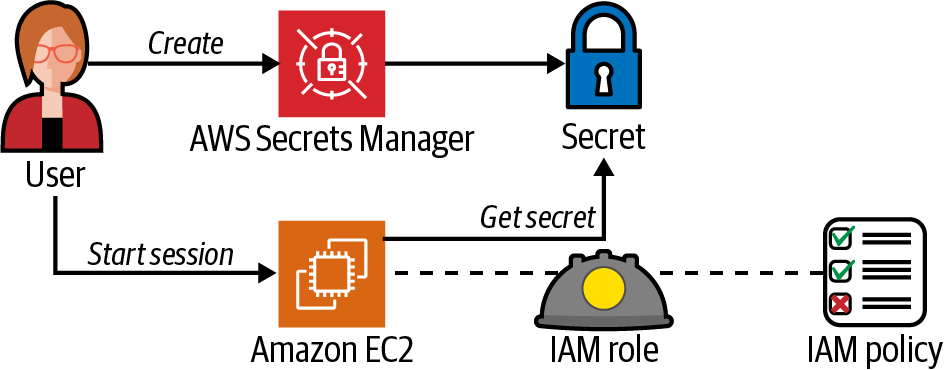
Figure 1-10. Create a secret and retrieve it via the EC2 instance
Prerequisites
-
VPC with isolated subnets and associated route tables.
-
EC2 instance deployed. You will need the ability to connect to this for testing.
Preparation
Follow the steps in this recipe’s folder in the chapter code repository.
Steps
-
Create a secret using the AWS CLI:
RANDOM_STRING=$(aws secretsmanager get-random-password \ --password-length 32 --require-each-included-type \ --output text \ --query RandomPassword) -
Store it as a new secret in Secrets Manager:
SECRET_ARN=$(aws secretsmanager \ create-secret --name AWSCookbook108/Secret1 \ --description "AWSCookbook108 Secret 1" \ --secret-string $RANDOM_STRING \ --output text \ --query ARN) -
Create a file called secret-access-policy-template.json that references the secret you created. (file provided in the repository):
{ "Version": "2012-10-17", "Statement": [ { "Effect": "Allow", "Action": [ "secretsmanager:GetResourcePolicy", "secretsmanager:GetSecretValue", "secretsmanager:DescribeSecret", "secretsmanager:ListSecretVersionIds" ], "Resource": [ "SECRET_ARN" ] }, { "Effect": "Allow", "Action": "secretsmanager:ListSecrets", "Resource": "*" } ] } -
Use the
sedcommand to replaceSECRET_ARNin the secret-access-policy-template.json file and generate the secret-access-policy.json file:sed -e "s|SECRET_ARN|$SECRET_ARN|g" \ secret-access-policy-template.json > secret-access-policy.json -
Create the IAM policy for secret access:
aws iam create-policy --policy-name AWSCookbook108SecretAccess \
     --policy-document file://secret-access-policy.json
You should see output similar to the following:
{ "Policy": { "PolicyName": "AWSCookbook108SecretAccess", "PolicyId": "(Random String)", "Arn": "arn:aws:iam::1111111111:policy/AWSCookbook108SecretAccess", "Path": "/", "DefaultVersionId": "v1", "AttachmentCount": 0, "PermissionsBoundaryUsageCount": 0, "IsAttachable": true, "CreateDate": "2021-11-28T21:25:23+00:00", "UpdateDate": "2021-11-28T21:25:23+00:00" } } -
Grant an EC2 instance ability to access the secret by adding the IAM policy you created to the EC2 instance profile’s currently attached IAM role:
aws iam attach-role-policy --policy-arn \
     arn:aws:iam::$AWS_ACCOUNT_ID:policy/AWSCookbook108SecretAccess \
     --role-name $ROLE_NAME
Validation checks
Connect to the EC2 instance:
aws ssm start-session --target $INSTANCE_ID
Set and export your default region:
export AWS_DEFAULT_REGION=us-east-1
Retrieve the secret from Secrets Manager from the EC2:
aws secretsmanager get-secret-value --secret-id AWSCookbook108/Secret1
You should see output similar to the following:
{
  "Name": "AWSCookbook108/Secret1",
  "VersionId": "<string>",
  "SecretString": "<secret value>",
  "VersionStages": [
    "AWSCURRENT"
  ],
  "CreatedDate": 1638221015.646,
  "ARN": "arn:aws:secretsmanager:us-east-1:111111111111:secret:AWSCookbook108/Secret1-<suffix>"
}</suffix>
Exit the Session Manager session:
exit
Cleanup
Follow the steps in this recipe’s folder in the chapter code repository.
Discussion
Securely creating, storing, and managing the lifecycle of secrets, like API keys and database passwords, is a fundamental component to a strong security posture in the cloud. You can use Secrets Manager to implement a secrets management strategy that supports your security strategy. You can control who has access to what secrets using IAM policies to ensure the secrets you manage are accessible by only the necessary security principals.
Since your EC2 instance uses an instance profile, you do not need to store any hard-coded credentials on the instance in order for it to access the secret. The access is granted via the IAM policy attached to the instance profile. Each time you (or your application) access the secret from the EC2 instance, temporary session credentials are obtained from the STS service to allow the get-secret-value API call to retrieve the secret. The AWS CLI automates this process of token retrieval when an EC2 instance profile is attached to your instance. You can also use the AWS SDK within your applications to achieve this functionality.
Some additional benefits to using Secrets Manager include the following:
-
Encrypting secrets with KMS keys that you create and manage
-
Auditing access to secrets through CloudTrail
-
Automating secret rotation using Lambda
-
Granting access to other users, roles, and services like EC2 and Lambda
-
Replicating secrets to another Region for high availability and disaster recovery purposes
1.9 Blocking Public Access for an S3 Bucket
Solution
Apply the Amazon S3 Block Public Access feature to your bucket, and then check the status with the Access Analyzer (see Figure 1-11).
Tip
AWS provides information on what is considered “public” in an article on S3 storage.
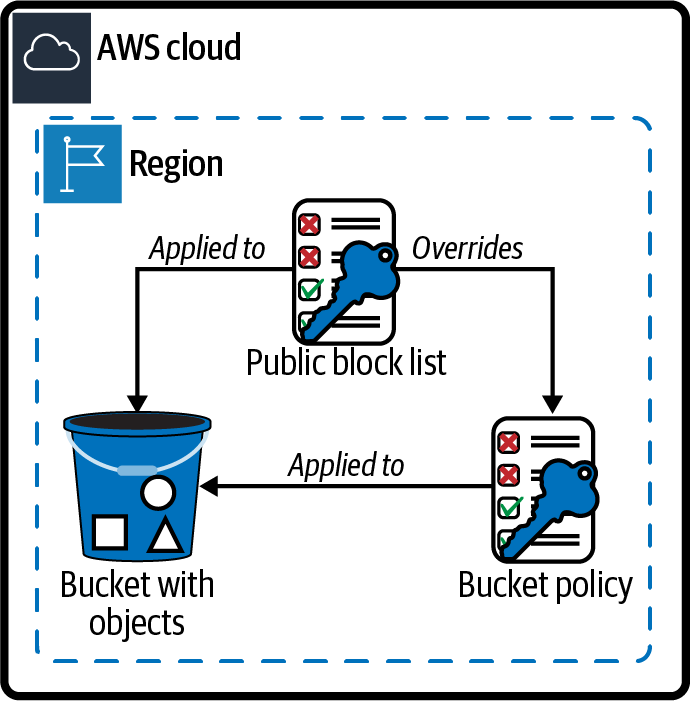
Figure 1-11. Blocking public access to an S3 bucket
Prerequisite
-
S3 bucket with publicly available object(s)
Preparation
Follow the steps in this recipe’s folder in the chapter code repository.
Steps
-
Create an Access Analyzer to use for validation of access:
ANALYZER_ARN=$(aws accessanalyzer create-analyzer \ --analyzer-name awscookbook109\ --type ACCOUNT \ --output text --query arn) -
Perform a scan of your S3 bucket with the Access Analyzer:
aws accessanalyzer start-resource-scan \ --analyzer-arn $ANALYZER_ARN \ --resource-arn arn:aws:s3:::awscookbook109-$RANDOM_STRING -
Get the results of the Access Analyzer scan (it may take about 30 seconds for the scan results to become available):
aws accessanalyzer get-analyzed-resource \
     --analyzer-arn $ANALYZER_ARN \
     --resource-arn arn:aws:s3:::awscookbook109-$RANDOM_STRING
You should see output similar to the following (note the
isPublicvalue):{ "resource": { "actions": [ "s3:GetObject", "s3:GetObjectVersion" ], "analyzedAt": "2021-06-26T17:42:00.861000+00:00", "createdAt": "2021-06-26T17:42:00.861000+00:00", "isPublic": true, "resourceArn": "arn:aws:s3:::awscookbook109-<<string>>", "resourceOwnerAccount": "111111111111", "resourceType": "AWS::S3::Bucket", "sharedVia": [ "POLICY" ], "status": "ACTIVE", "updatedAt": "2021-06-26T17:42:00.861000+00:00" } } -
Set the public access block for your bucket:
aws s3api put-public-access-block \
     --bucket awscookbook109-$RANDOM_STRING \
     --public-access-block-configuration \
"BlockPublicAcls=true,IgnorePublicAcls=true,BlockPublicPolicy=true,RestrictPublicBuckets=true"
Note
See the AWS article on the available
PublicAccessBlockconfiguration properties.
Validation checks
Perform a scan of your S3 bucket:
aws accessanalyzer start-resource-scan \
     --analyzer-arn $ANALYZER_ARN \
     --resource-arn arn:aws:s3:::awscookbook109-$RANDOM_STRING
Get the results of the Access Analyzer scan:
aws accessanalyzer get-analyzed-resource \
     --analyzer-arn $ANALYZER_ARN \
     --resource-arn arn:aws:s3:::awscookbook109-$RANDOM_STRING
You should see output similar to the following:
{
  "resource": {
  "analyzedAt": "2021-06-26T17:46:24.906000+00:00",
  "isPublic": false,
  "resourceArn": "arn:aws:s3:::awscookbook109-<<string>>",
  "resourceOwnerAccount": "111111111111",
  "resourceType": "AWS::S3::Bucket"
  }
}
Cleanup
Follow the steps in this recipe’s folder in the chapter code repository.
Discussion
One of the best things you can do to ensure data security in your AWS account is to always make certain that you apply the right security controls to your data. If you mark an object as public in your S3 bucket, it is accessible to anyone on the internet, since S3 serves objects using HTTP. One of the most common security misconfigurations that users make in the cloud is marking object(s) as public when that is not intended or required. To protect against misconfiguration of S3 objects, enabling BlockPublicAccess for your buckets is a great thing to do from a security standpoint.
Tip
You can also set public block settings at your account level, which would include all S3 buckets in your account:
aws s3control put-public-access-block \
    --public-access-block-configuration \
    BlockPublicAcls=true,IgnorePublicAcls=true,BlockPublicPolicy=true,RestrictPublicBuckets=true \
    --account-id $AWS_ACCOUNT_ID
You can serve S3 content to internet users via HTTP and HTTPS while keeping your bucket private. Content delivery networking (CDN), like Amazon CloudFront, provides more secure, efficient, and cost-effective ways to achieve global static website hosting and still use S3 as your object source. To see an example of a CloudFront configuration that serves static content from an S3 bucket, see Recipe 1.10.
1.10 Serving Web Content Securely from S3 with CloudFront
Solution
Create a CloudFront distribution and set the origin to your S3 bucket. Then configure an origin access identity (OAI) to require the bucket to be accessible only from CloudFront (see Figure 1-12).

Figure 1-12. CloudFront and S3
Prerequisite
-
S3 bucket with static web content
Preparation
Follow the steps in this recipe’s folder in the chapter code repository.
Steps
-
Create a CloudFront OAI to reference in an S3 bucket policy:
OAI=$(aws cloudfront create-cloud-front-origin-access-identity \ --cloud-front-origin-access-identity-config \ CallerReference="awscookbook",Comment="AWSCookbook OAI" \ --query CloudFrontOriginAccessIdentity.Id --output text) -
Use the
sedcommand to replace the values in the distribution-config-template.json file with your CloudFront OAI and S3 bucket name:sed -e "s/CLOUDFRONT_OAI/${OAI}/g" \ -e "s|S3_BUCKET_NAME|awscookbook110-$RANDOM_STRING|g" \ distribution-template.json > distribution.json -
Create a CloudFront distribution that uses the distribution configuration JSON file you just created:
DISTRIBUTION_ID=$(aws cloudfront create-distribution \ --distribution-config file://distribution.json \ --query Distribution.Id --output text) -
The distribution will take a few minutes to create; use this command to check the status. Wait until the status reaches “Deployed”:
aws cloudfront get-distribution --id $DISTRIBUTION_ID \ --output text --query Distribution.Status -
Configure the S3 bucket policy to allow only requests from CloudFront by using a bucket policy like this (we have provided bucket-policy-template.json in the repository):
{ "Version": "2012-10-17", "Id": "PolicyForCloudFrontPrivateContent", "Statement": [ { "Effect": "Allow", "Principal": { "AWS": "arn:aws:iam::cloudfront:user/CloudFront Origin Access Identity CLOUDFRONT_OAI" }, "Action": "s3:GetObject", "Resource": "arn:aws:s3:::S3_BUCKET_NAME/*" } ] } -
Use the
sedcommand to replace the values in the bucket-policy-template.json file with the CloudFront OAI and S3 bucket name:sed -e "s/CLOUDFRONT_OAI/${OAI}/g" \ -e "s|S3_BUCKET_NAME|awscookbook110-$RANDOM_STRING|g" \ bucket-policy-template.json > bucket-policy.json -
Apply the bucket policy to the S3 bucket with your static web content:
aws s3api put-bucket-policy --bucket awscookbook110-$RANDOM_STRING \ --policy file://bucket-policy.json -
Get the
DOMAIN_NAMEof the distribution you created:DOMAIN_NAME=$(aws cloudfront get-distribution --id $DISTRIBUTION_ID \ --query Distribution.DomainName --output text)
Validation checks
Try to access the S3 bucket directly using HTTPS to verify that the bucket does not serve content directly:
curl https://awscookbook110-$RANDOM_STRING.s3.$AWS_REGION.amazonaws.com/index.html
You should see output similar to the following:
$ curl https://awscookbook110-$RANDOM_STRING.s3.$AWS_REGION.amazonaws.com/index.html
<?xml version="1.0" encoding="UTF-8"?>
<Error><Code>AccessDenied</Code><Message>Access
Denied</Message><RequestId>0AKQD0EFJC9ZHPCC</RequestId><HostId>gfld4qKp9A93G8ee7VPBFrXBZV1HE3jiOb3bNB54fP
EPTihit/OyFh7hF2Nu4+Muv6JEc0ebLL4=</HostId></Error>
110-Optimizing-S3-with-CloudFront:$
Use curl to observe that your index.html file is served from the private S3 bucket through CloudFront:
curl $DOMAIN_NAME
You should see output similar to the following:
$ curl $DOMAIN_NAME
AWSCookbook
$
Cleanup
Follow the steps in this recipe’s folder in the chapter code repository.
Discussion
This configuration allows you to keep the S3 bucket private and allows only the CloudFront distribution to be able to access objects in the bucket. You created an origin access identity and defined a bucket policy to allow only CloudFront access to your S3 content. This gives you a solid foundation to keep your S3 buckets secure with the additional protection of the CloudFront global CDN.
The protection that a CDN gives from a distributed-denial-of-service (DDoS) attack is worth noting, as the end user requests to your content are directed to a point of presence on the CloudFront network with the lowest latency. This also protects you from the costs of having a DDoS attack against static content hosted in an S3 bucket, as it is generally less expensive to serve requests out of CloudFront rather than S3 directly.
By default, CloudFront comes with an HTTPS certificate on the default hostname for your distribution that you use to secure traffic. With CloudFront, you can associate your own custom domain name, attach a custom certificate from Amazon Certificate Manager (ACM), redirect to HTTPS from HTTP, force HTTPS, customize cache behavior, invoke Lambda functions (Lambda @Edge), and more.
Challenge
Add a geo restriction to your CloudFront distribution.
Get AWS Cookbook now with the O’Reilly learning platform.
O’Reilly members experience books, live events, courses curated by job role, and more from O’Reilly and nearly 200 top publishers.

