Chapter 4. Prototyping
By now, you should finally have enough theoretical background knowledge to get hands-on with some AI use cases. In this chapter, you’ll learn how to use a prototyping technique borrowed from product management to quickly create and put ML use cases into practice and validate your assumptions about feasibility and impact.
Remember, our goal is to find out quickly whether our AI-powered idea creates value and whether we are able to build a first version of the solution without wasting too much time or other resources. This chapter will introduce you not only to the theoretical concepts about prototyping, but also to the concrete tools we are going to use in the examples throughout this book.
What Is a Prototype, and Why Is It Important?
Let’s face the hard truth: most ML projects fail. And that’s not because most projects are underfunded or lack talent (although those are common problems too).
The main reason ML projects fail is because of the incredible uncertainty surrounding them: requirements, solution scope, user acceptance, infrastructure, legal considerations, and most importantly, the quality of the outcome are all very difficult to predict in advance of a new initiative. Especially when it comes to the result, you never really know whether your data has enough signals in it until you go through the process of data collection, preparation, and cleansing and build the actual model.
Many companies start their first AI/ML projects with a lot of enthusiasm. Then they find that the projects turn out to be a bottomless pit. Months of work and thousands of dollars are spent just to get to a simple result: it doesn’t work.
Prototyping is a way to minimize risk and evaluate the impact and feasibility of your ML use case before scaling it. With prototyping, your ML projects will be faster, cheaper, and deliver a higher return on investment.
For this book, a prototype is an unfinished product with a simple purpose: validation. Concepts such as a PoC or a minimum viable product (MVP) serve the same purpose, but these concepts have a different background and involve more than just validation. The idea of validation is so important because you don’t need to build a prototype if you don’t have anything to validate.
In the context of AI or ML projects, you want to validate your use case in two dimensions: impact and feasibility. That’s why it’s so essential that you have a rough idea of these categories before you go ahead and build something.
Here are some examples of things you can validate in the context of ML and AI:
-
Does your solution provide value to the user?
-
Is your solution being used as it was intended?
-
Is your solution being accepted by users?
-
Does your data contain enough signals to build a useful model?
-
Does an AI service work well enough with your data to provide sufficient value?
To be an effective validation tool, ML prototypes must be end-to-end. Creating an accurate model is good. Creating a useful model is better. And the only way to get that information is to get your ML solution in front of real users. You can build the best customer churn predictor in the world, but if the marketing and sales staff aren’t ready to put the predictions into action, your project is dead. That’s why you need quick user feedback.
When you prototype your ML-powered solution, don’t compromise on data. Don’t use data that wouldn’t be available in production. Don’t do manual cleanups that don’t scale. You can fix a model; you can fix the UI. But you can’t fix the data. Treat it the way you’d treat it in a production scenario.
A prototype should usually have a well-defined scope that includes the following:
- Clear goal
- For example, “Can we build a model that is better than our baseline B in predicting y, given some data x?”
- Strict time frame
- For example, “We will build the best model we can in a maximum of two weeks.”
- Acceptance criteria
- For example, “Our prototype passed the user acceptance test if feedback F happened.”
When it comes to technology, a prototype should leave it up to you to decide which technology stack is the best to achieve the goals within the time frame. Prototypes give you valuable insight into potential problem areas (e.g., data-quality issues) while engaging business stakeholders from the start and managing their expectations.
Prototyping in Business Intelligence
For decades, the typical development process for BI systems was the classic waterfall method: projects were planned as a linear process that began with requirements gathering, then moved to design, followed by data engineering, testing, and deployment of the reports or metrics desired by the business.
Even without AI or ML, the waterfall method is reaching its limits. That’s because several factors are working together. Business requirements are becoming increasingly fuzzy as the business itself becomes more complex. In addition, the technology is also becoming more complex. Whereas 10 years ago you’d have to integrate a handful of data sources, today even small companies have to manage dozens of systems.
When your project plan for a large-scale BI initiative is ready, it’s often already overtaken by reality. With AI/ML and its associated uncertainties, things aren’t going to get much easier.
To launch a successful AI-driven solution as part of a BI system, you must essentially treat your BI system as a data product. That means acknowledging the facts that you don’t know whether your idea will ultimately work out as planned, what the final solution will look like, and whether your users are interacting with it as expected. Product management techniques, such as prototyping, will help you mitigate these risks and allow for more flexible development. But how exactly can you apply prototyping in the realms of BI?
Reports in BI production systems are expected by default to be reliable and available, and the information they contain is accurate. So your production system isn’t the best choice for testing something among users. What else do we have?
Companies typically work with test systems to try out new features before putting them into production. However, the problem with test systems is that they often involve the same technical effort and challenges as the production system. Usually, the entire production environment is replicated for testing purposes: a test data warehouse, a test frontend BI, and a test area for ETL processes, because you want to make sure that what works on the test system also works in production.
In the sense of our definition, a prototype takes place before testing, as shown in Figure 4-1. For the prototype, you need deep vertical integration from data ingestion, over the analytical services, to the user interface, while keeping the overall technical complexity low.
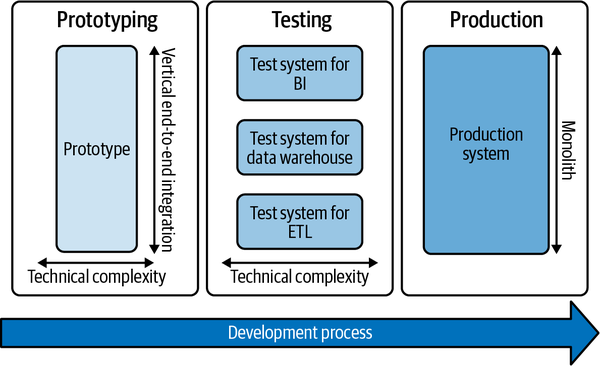
Figure 4-1. Prototyping in the software development process
In most cases, especially with monolithic BI systems, your production and test stack aren’t suitable for prototyping in just a few days or weeks. For our purposes, we need something less complex and lightweight.
Whatever tech stack you use for this, you should make sure of the following:
-
The tech stack supports all three layers of the AI use case architecture (data, analytics, and user interface) to ensure that data is available and fit for use, your models perform well enough on your data, and users accept and see value in your solution.
-
Your stack should be open and provide high connectivity to allow future integration into the test and perhaps even the production system. This aspect is essential because, if testing is successful, you want to enable a smooth transition from the prototyping phase to the testing phase. If you prototype on your local machine, it’ll be complicated to transfer the workflow from your computer to a remote server and expect it to work as smoothly. Tools like Docker will help you ease the transition, adding technical friction that no longer has anything to do with your original validation hypothesis.
Therefore, the perfect prototyping platform for AI-powered BI use cases offers high connectivity, many available integration services, and low initial investment costs. Cloud platforms have proven to meet these requirements quite well.
In addition, you should use a platform that gives you easy access to the various AI/ML services covered in Chapter 2. If you have the data available, prototyping the ML model should take no more than a maximum of two to four weeks, sometimes only a few days. Use AutoML for regression/classification tasks, AIaaS for commodity services like character recognition, and pretrained models for custom deep learning applications rather than training them from scratch.
To avoid wasting time and money unnecessarily on your next ML project, build a prototype first before going all in.
The AI Prototyping Toolkit for This Book
We’ll use Microsoft Azure as our platform for prototyping in this book. You could use many other tools, including AWS or GCP. These platforms are comparable in their features, and what we do here with Azure, you can basically do with any other platform.
I chose Azure for the following two reasons:
-
Many businesses are running on a Microsoft stack, and Azure will be the most familiar cloud platform to them.
-
Azure integrates smoothly with Power BI, a BI tool that is popular in many enterprises.
You may be wondering how a full-fledged cloud platform like Azure can ever be lightweight enough for prototyping. The main reason is that we don’t use the entire Azure platform, but only parts of it that are provided “as a service,” so we don’t have to worry about the technical details under the hood. The main services we’ll use are Azure Machine Learning Studio, Azure Blob Storage, an Azure compute resource, and a set of Azure Cognitive Services, Microsoft’s AIaaS offering.
The good thing is that although we’re still prototyping, the infrastructure would stand up to a production scenario as well. We would need to change the solution’s processes, maintenance, integrations, and management, but the technical foundation would be the same. We’ll go into this in more detail in Chapter 11.
I’ll try not to rely too much on features that work exclusively with Azure and Power BI, but keep it open enough so you can connect your own AI models to your own BI. Also, most Azure integrations into Power BI require a Pro license, which I don’t want to put you through. Let’s start with the setup for Microsoft Azure.
Working with Microsoft Azure
This section gives you a quick introduction to Microsoft Azure and lets you activate all the tools you’ll need for the use cases starting in Chapter 7. While you may not need all of these services right away, I recommend that you set them up in advance so you can focus on the actual use cases later instead of dealing with the technical overhead.
Sign Up for Microsoft Azure
To create and use the AI services from Chapter 7 onward, you need a Microsoft Azure account. If you are new to the platform, Azure gives you free access to all the services we cover in this book for the first 12 months (at the time of writing). You also get a free $200 credit for services that are billed based on usage, such as compute resources or AI model deployments.
To explore the free access and to sign up, visit https://azure.microsoft.com/free and start the sign-up process.
Note
If you already have an Azure account, you can skip ahead to “Create an Azure Compute Resource”. Be aware that you might be billed for these services if you are not on a free trial. If you are unsure, contact your Azure administrator before you move ahead.
To sign up, you will be prompted to create a Microsoft account. I recommend you create a new account for testing purposes (and take advantage of the free credit bonus!). If you have a corporate account, you can try to continue with that, but your company might have restrictions. Therefore, it may be best to start from scratch, play around a bit, and once you have everything figured out, continue with your company’s account.
On the following page, click “Create one!” (Figure 4-2).
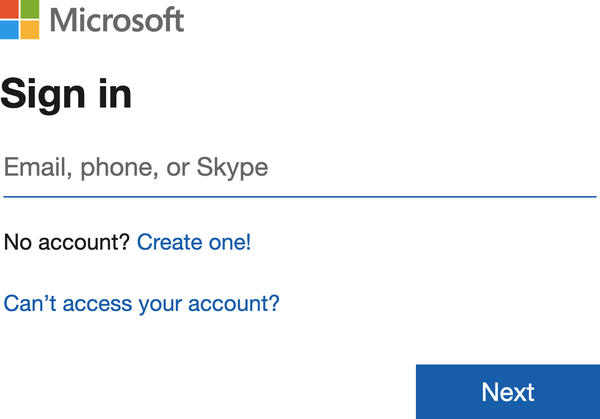
Figure 4-2. Creating a new Microsoft account
Next, enter your email address and click Next. Create a password and continue. After confirming that you are not a robot, you should see the screen in Figure 4-3.
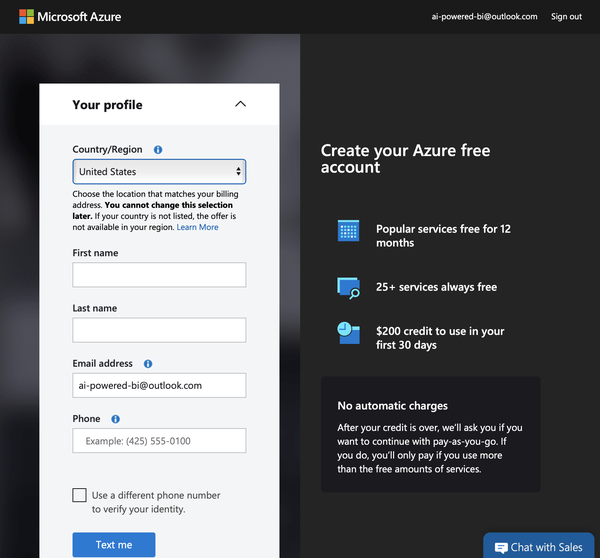
Figure 4-3. Azure sign-up prompt
You must confirm your account with a valid phone number. Enter your information and click “Text me” or “Call me.” Enter the verification code and click “Verify code.” After successful verification, check the terms and click Next.
You are almost there! The last prompt will require you to provide your credit card information. Why? It’s the same with all major cloud platforms. Once your free credit is used up or the free period expires, you will be charged for using these services. However, the good thing about Microsoft for beginners is that you will not be charged automatically. When your free period ends, you’ll have to opt for pay-as-you-go billing.
After successfully signing up, you should see the Azure portal screen shown in Figure 4-4.
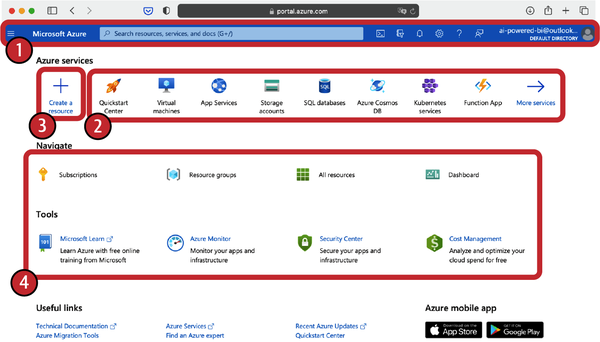
Figure 4-4. Azure portal dashboard
Welcome to Microsoft Azure! You can access this home page at any time by visiting portal.azure.com. Let’s quickly explore the Azure portal home page:
- Navigation bar (1)
- You can open the portal menu on the left or navigate to your account settings at the top right.
- Azure services (2)
- These are the recommended services for you. These may look different for you, especially if you are newly signed up.
- Create a resource (3)
- This will be one of the most commonly used buttons. You use it to create new resources like services on Azure.
- Navigate (4)
- This section contains tools and all the other items that take you to various settings. You will not need them for now.
When you see this screen, you are all set with the setup for Microsoft Azure. If you are having trouble setting up your Azure account, I recommend the following resources:
Create an Azure Machine Learning Studio Workspace
Azure Machine Learning Studio will be our workbench in Microsoft Azure to build and deploy custom ML models and manage datasets. The first thing you need to do is create an Azure Machine Learning workspace. The workspace is a basic resource in your Azure account that contains all of your experiments, training, and deployed ML models.
The workspace resource is associated with your Azure subscription. While you can programmatically create and manage these services, we will use the Azure portal to navigate through the process. Remember, everything you do here with your mouse and keyboard can also be done through automated scripts if you wish later.
Log in to the Microsoft account you used for the Azure subscription and visit portal.azure.com. Click the “Create a resource” button (Figure 4-5).
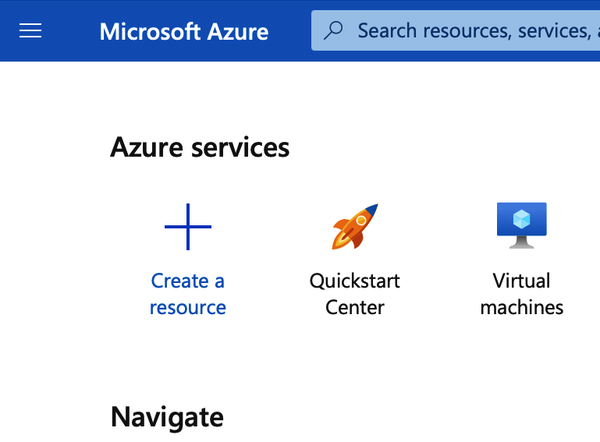
Figure 4-5. Creating a new resource in Azure
Now use the search bar to find machine learning and select it (Figure 4-6).
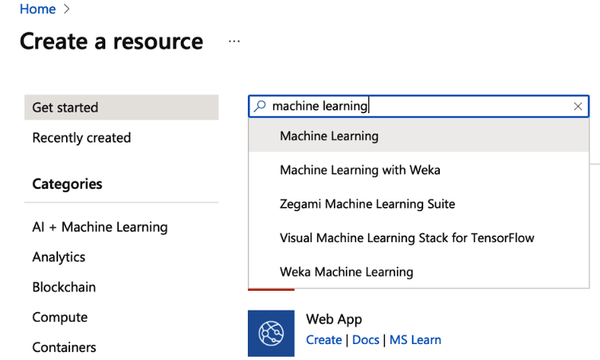
Figure 4-6. Searching for the ML resource
In the Machine Learning section, click Create (Figure 4-7).
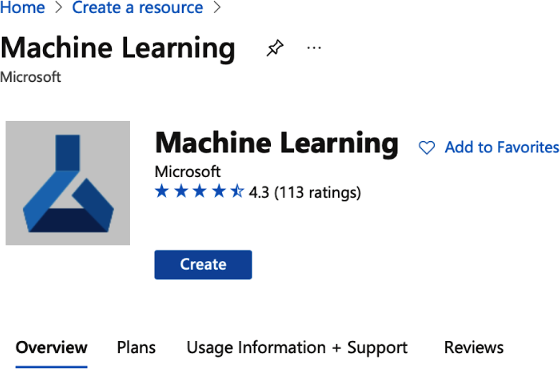
Figure 4-7. Creating a new ML resource
You need to provide some information for your new workspace, as shown in Figure 4-8:
- Workspace name
- Choose a unique name for your workspace that differentiates it from other workspaces you create. Project names are typically good candidates for workspace names. This example uses
auto-ml. The name must be unique within the selected resource group. - Subscription
- Select the Azure subscription you want to use.
- Resource group
- A resource group bundles resources in your Azure subscription and could, for example, be tied to your department. I strongly advise you to create a new resource group at this stage and assign any service you are going to set up for this book to this resource group. This will make the cleanup much easier later. Click “Create new” and give your new resource group a name. This example uses
ai-powered-bi. Whenever you see this reference anywhere, you need to replace it with the name of your own resource group. - Location
- Select the physical location closest to your users and your data resources. Be careful when transferring data outside of protected geographical areas such as the European Union (EU). Most services are typically available first in US regions.
Once you’ve entered everything, click “Review + create.” After the initial validation has passed, click Create again.
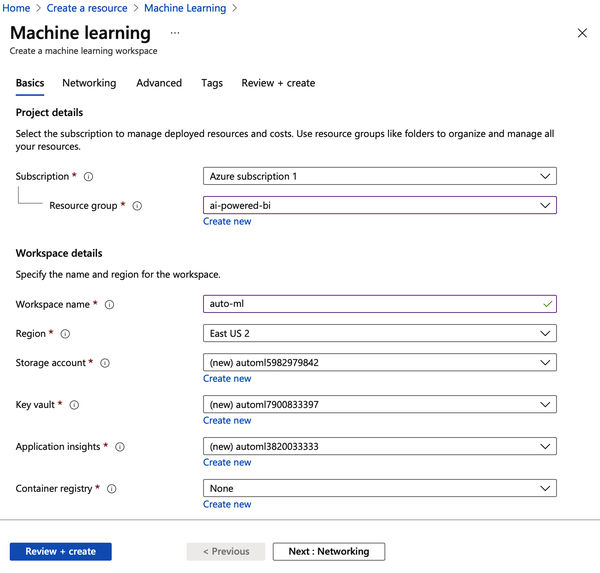
Figure 4-8. Configuring the ML resource
Creating your workspace in the Azure cloud can take several minutes. When the process is finished, you will see a success message, as in Figure 4-9.
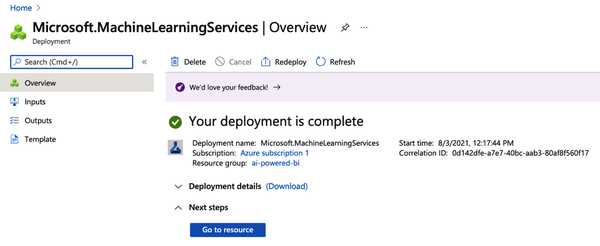
Figure 4-9. ML resource successfully created
To view your new workspace, click “Go to resource.” This will take you to the ML resource page (Figure 4-10).
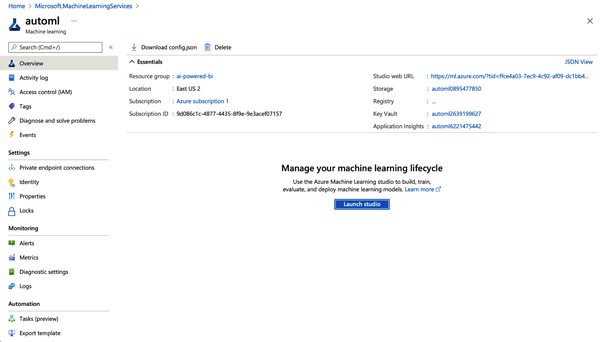
Figure 4-10. ML resource overview
You have now selected the previously created workspace. Verify your subscription and your resource group here. If you were to train and deploy your ML models via code programmatically, you could now also head over to your favorite code editor and continue from there.
But since we want to continue our no-code journey, click “Launch studio” to train and deploy ML models without writing a single line of code. This will take you to the welcome screen of the Machine Learning Studio (Figure 4-11). You also can access this directly via ml.azure.com.
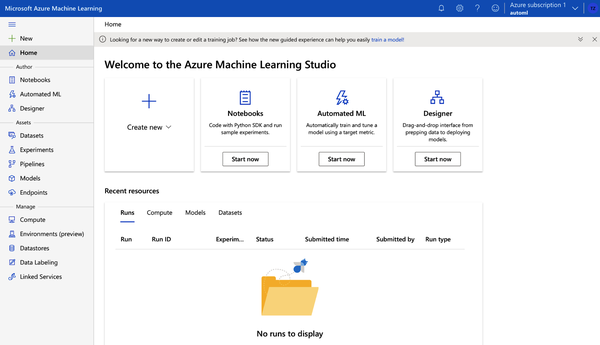
Figure 4-11. Azure Machine Learning Studio home
The Machine Learning Studio is a web interface that includes a variety of ML tools to perform data science scenarios for data science practitioners of all skill levels. The studio is supported across all modern web browsers (no, this does not include Internet Explorer).
The welcome screen is divided into three main areas:
-
On the left, you will find the menu bar with access to all services within ML Studio.
-
On the top, you will find suggested services and can directly create more services by clicking “Create new.”
-
On the bottom, you will see an overview of recently launched services or resources within ML Studio (which should still be empty by now, since you just set up your account).
Create an Azure Compute Resource
You have created an Azure subscription and a workspace for Machine Learning Studio. You can consider these things still as “overhead.” So far, you haven’t launched any service or resource that actually does something.
That’s about to change now. In the following steps, you will create a compute resource. You can imagine a compute resource as a virtual machine (or a cluster of virtual machines) where the actual workload of your jobs is running. On modern cloud platforms such as Microsoft Azure, compute resources can be created and deleted with a few clicks (or prompts from the command line) and will be provisioned or shut down in a matter of seconds. You can choose from a variety of machine setups—from small, cheap computers to heavy machines with graphics processing unit (GPU) support.
Warning
Once you create a compute resource and this resource is online, you will be charged according to the price mentioned in the compute resources list (e.g., $0.6/hour). If you are still using free Azure credits, this will be deducted from them. If not, your credit card will be charged accordingly. To avoid unnecessary charges, make sure to stop or delete any compute resource that you don’t need any more.
You’ll create a compute resource that you can use for all the examples in this book. In practice, you may want to set up different compute resources for different projects, as well as to have more transparency about which project incurs which costs. However, in our prototyping example, one resource is sufficient, and you can easily track whether the resource is running so that it doesn’t eat up your free trial budget.
You can create a compute resource directly in Azure ML Studio. Click the Compute option in the left navigation bar.
Then click “Create new compute,” and a screen like the one in Figure 4-12 will appear. To select the machine type, select the “Select from all options” radio button.
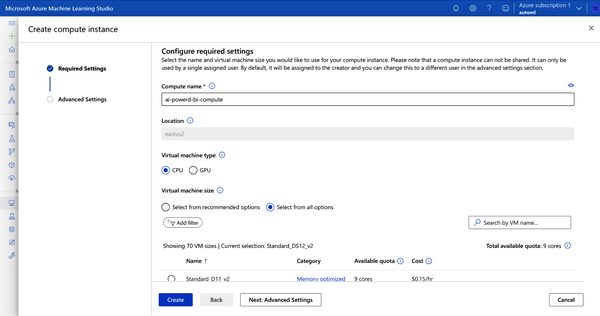
Figure 4-12. Creating a new compute instance
Here you can see all available machine types (Figure 4-13). The more performance you allocate, the faster an ML training usually will be. The cheapest resource available is a Standard_DS1_v2 machine with one core, 3.5 GB RAM, and 7 GB storage—which costs about $0.06 per hour in the US East region.
Type Standard_DS1 in the “Search by VM name” option and select the machine with the lowest price, as shown in Figure 4-13. You can really choose any type of machine here; just make sure that the price is reasonable, because we don’t need high performance at the moment.
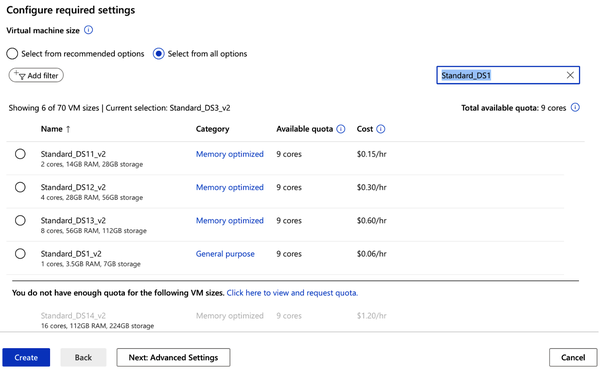
Figure 4-13. Choosing a Standard_DS11 machine
Click the Create button. This should take you back to the overview page of your computing resources. Wait for the resource to be created, which usually takes two to five minutes. The compute resource will start automatically once it’s provisioned (see Figure 4-14).
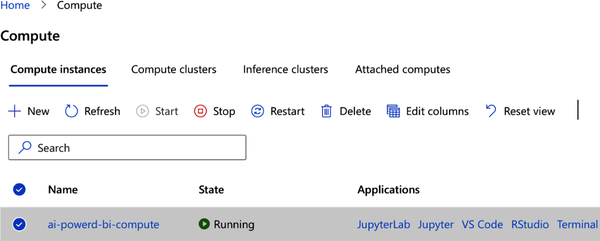
Figure 4-14. Compute resource running
Since you won’t need this resource until Chapter 7, select the resource and click Stop to prevent it from being encumbered. In the end, your compute resource summary page should look similar to Figure 4-15. Your compute resource should appear in the list, but its state should be Stopped.
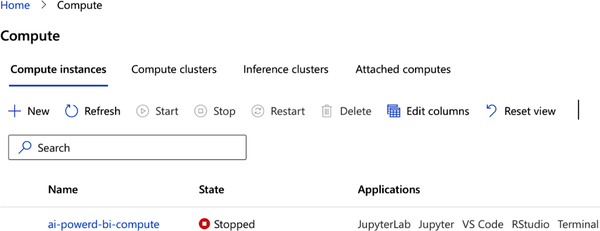
Figure 4-15. Compute resource stopped
Create Azure Blob Storage
The last building block you need for our prototyping setup is a place to store and upload files such as CSV tables or images. The typical place for these binary files is Azure Blob Storage; blob stands for binary large object—basically, file storage for almost everything with almost unlimited scale. We will use this storage mainly for writing outputs from our AI models or staging image files for the use cases in Chapter 7 onward.
To create blob storage in Azure, visit portal.azure.com and search for storage accounts. Click Create and create a new storage account in the same region where your ML Studio resource is located. Give this account a unique name, and then select standard performance and locally redundant storage, as shown in Figure 4-16. As this is only test data, you don’t need to pay more for higher data availability standards. Again, you will save data here only temporarily, and the expenses will be more than covered by your free trial budget.
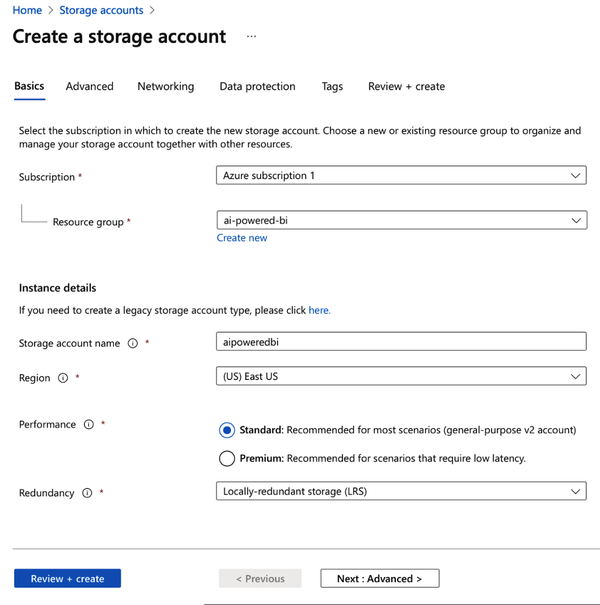
Figure 4-16. Creating a storage account
Once the deployment is complete, click “Go to resource.” You will see the interface shown in Figure 4-17.
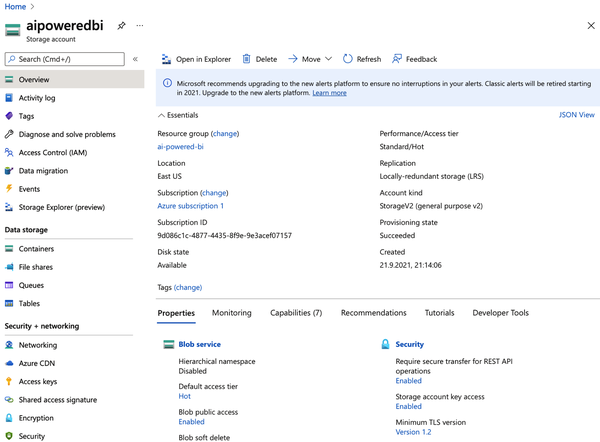
Figure 4-17. Azure storage account overview
Click “Access keys” on the left to open the screen shown in Figure 4-18. You will need these access keys when you want to access objects in that storage programmatically.
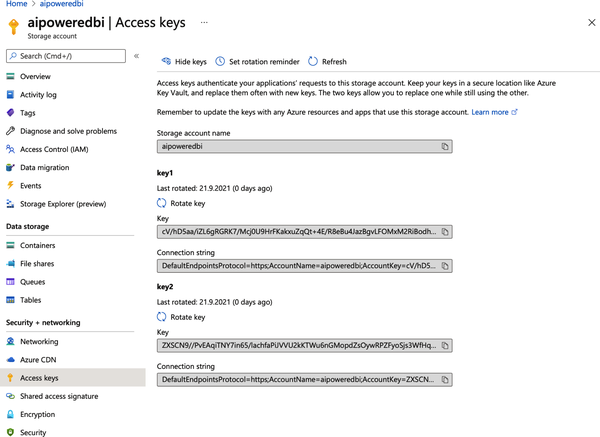
Figure 4-18. Access keys for the Azure storage account
Now that you have a storage account and keys to manipulate data here, you have to create a container, which is something like a file folder that helps organize files. Click the Containers option on the left-side menu and then click “+ Container” at the top of the screen, as highlighted in Figure 4-19.
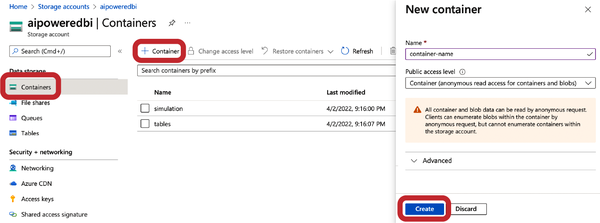
Figure 4-19. Creating an Azure Blob Storage container
Create a container called tables. Set the access level to Container, which will make it easier to access the files later through external tools such as Power BI. Create another Container called simulation with the same settings.
If you deal with sensitive or production data, you would of course choose Private here to make sure that authorization is needed before the data can be accessed. Voilá, the new container should appear in the list and is now ready to host some files.
Working with Microsoft Power BI
For the user layer, we will rely on Microsoft Power BI as our tool to display reports, dashboards, and the results from our AI models. Power BI comes in two versions: Power BI Desktop and Power BI Service.
Power BI Desktop is currently available only for Windows. This offline application is installed on your computer and has all the features you can expect from Power BI. If you have a Microsoft Office subscription, Power BI is most likely part of that. You can download Power BI from the Microsoft Power BI downloads page.
Power BI Service is an online version of Power BI that runs across all platforms, including Macs. It doesn’t currently have all the features of the desktop version, but new features are added regularly. I can’t give you a guarantee that all things we cover in this book will work on Power BI service, but it’s worth a try if you can’t or don’t want to install Power BI on your computer. You can get started with Power BI service at its Getting Started page.
If you’ve never worked with Power BI before, it might be useful to watch Microsoft’s 45-minute introductory course, which gives you a high-level introduction on how the tool works.
Warning
Unfortunately, Power BI does not always give exactly reproducible results. As you follow along with the use cases in this book, you may notice that some of your visuals and automated suggestions may not match the screenshots in this book. Don’t get confused by it too much, as the overall picture should still be the same, even if little variations appear here and there.
In case you don’t like using Power BI or want to use your own BI tool, you should be able to re-create everything in the case studies (except for Chapters 5 and 6) in any other BI tool as well, as long as it supports code execution of either Python or R scripts.
To run the Python or R scripts inside Power BI, you need to have one of these languages installed on your computer and Power BI pointed to the respective kernel. Check the following resources to make sure that Power BI and R, or Power BI and Python, are set up correctly:
Besides the clean Python or R engines, you need a few packages for working on the use cases later. For R, these packages are the following:
-
httr (for making HTTP request)
-
rjson (for handling the API response)
-
dplyr (for data preparation)
For the Python scripts, the equivalents are as follows:
-
requests
-
json
-
pandas
Make sure that these packages are installed for either the R or Python engine that Power BI is using in your case. If you don’t know how to install packages in R or Python, check out these YouTube videos:
Summary
I hope that this chapter has given you a solid understanding of a prototype in the context of data product development, and why it is highly recommended to start any AI/ML projects with a prototype first. By now, you should also have your personal prototyping toolkit ready so that you can tackle the practical use cases in the next chapters. Let’s go!
Get AI-Powered Business Intelligence now with the O’Reilly learning platform.
O’Reilly members experience books, live events, courses curated by job role, and more from O’Reilly and nearly 200 top publishers.

