ADOBE PREMIERE ELEMENTS 7 CLASSROOM IN A BOOK 247
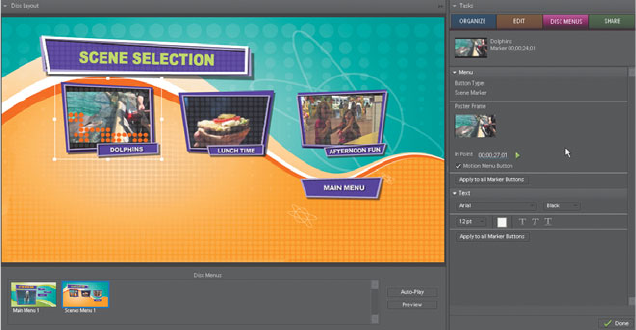
Note that Properties view now displays two sections: Menu options on top,
and Text options on the bottom. e Menu options are very similar to those
selected in the Menu Marker panel. Some, such as the Poster Frame In Point,
you can change directly in Properties view; others, such as the Button Type, you
have to return to the Menu Marker panel to modify.
5 Click the Scene Selection title in Scenes Menu 1. Adobe Premiere Elements
displays a bounding box around the title and displays only the Text options in
Properties view.
ose are three control sets of Properties view. Click the menu component you’d
like to edit, and Adobe Premiere Elements automatically opens the necessary con-
trols. As always, in addition to clicking the menu to open Properties view, you can
also choose Window > Properties from the Adobe Premiere Elements main menu
to open Properties view.
Customizing menus with video,
still images, and audio
You can customize your menus in Adobe Premiere Elements by adding a still
image, video, or audio to the menu. You can also combine multiple items, such as a
still photo and an audio clip. Alternatively, you can add a video clip and replace the
audio track with a separate audio clip.
Note that your customization options diff er based upon the selected menu tem-
plate. If the menu has a drop zone, like the template you’re working with in this
lesson, still images or video inserted into the menu will display in the drop zone.

248 LESSON 11 Creating Menus
Otherwise, with templates that lack drop zones, the inserted still image or video
will appear full-screen in the menu background. You’ll see an example of that in a
moment.
Although Adobe Premiere Elements allows you to customize a disc menu, keep
in mind that changes made will not be saved back to the template; they apply to
only the current project. If you would like to create custom templates to be used in
multiple projects, you can create one in Adobe Photoshop Elements, and then add
the template to Adobe Premiere Elements.
Adding a still image or video clip to your menu
You’ll use the same procedure to add a still image or video clip to a menu. In this
exercise, you’ll insert a video clip into a menu. By default, when you insert a video,
the audio plays with the video as well, though you can change this by inserting a
separate audio fi le, as you will do later.
Follow this procedure to add a video clip to your menu.
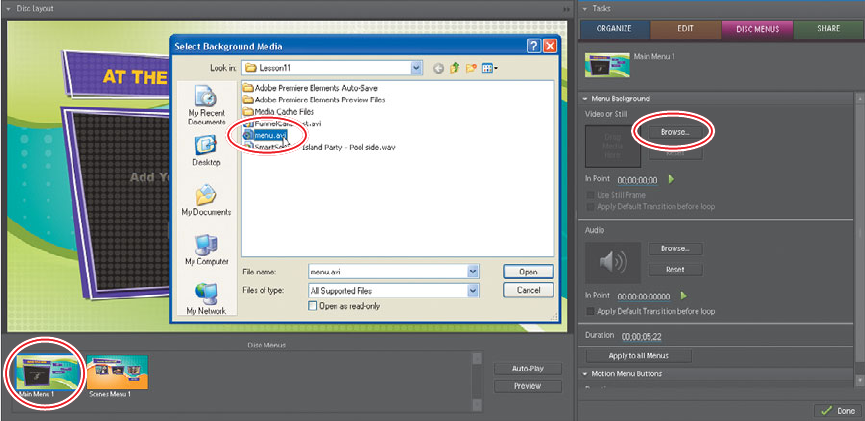
1 Under Disc Menus in the Disc Layout panel, click to select Main Menu 1. Click
in the main menu, being careful not to click one of the active buttons.
2 In Properties view, in the Menu Background box click the Browse button and
navigate to the Lesson11 folder and choose the Menu.avi clip. Press Open to
close the dialog and insert the clip into the menu panel. Note that you’d follow
this same procedure to select a still image to either fi t into the drop zone or use
as a full-screen background image.
Get Adobe Premiere Elements 7 Classroom in a Book now with the O’Reilly learning platform.
O’Reilly members experience books, live events, courses curated by job role, and more from O’Reilly and nearly 200 top publishers.

