Exploring the Media Center Interface
The sole reason for the existence of the Media Center remote control, which was
developed jointly by Microsoft and Dutch electronics maker Philips, is to provide
you with easy, across-the-room access to the Media Center interface (see Figure 4.7).
Created as a sleek, highly visual “one-stop” destination for all your entertainment
activities, Media Center’s animated transitions and simple menu structure seem
vaguely familiar, yet totally unlike any Windows desktop scheme that has come
before it.
CHAPTER 4 NAVIGATING XP MEDIA CENTER’S “10-FOOT” INTERFACE
59
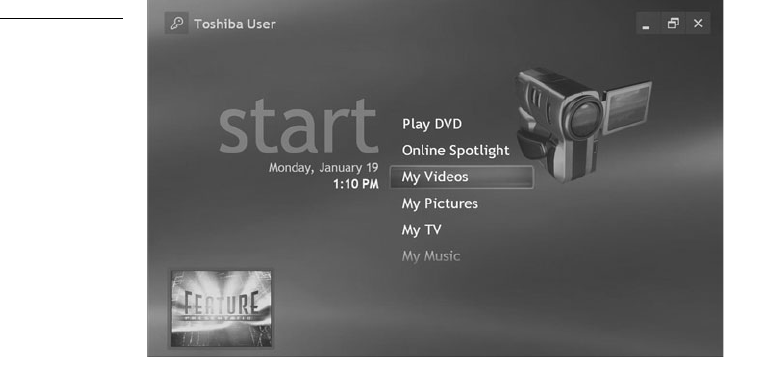
FIGURE 4.7
When you press
the green Start
button on the
remote control, it
will launch the
Media Center
interface; how-
ever, an inset
window (lower
left) always dis-
plays the current
media selection.
Switching from Media Center to the Windows XP Desktop
You can switch from the Media Center interface to the Microsoft Windows XP
desktop at any time. Simply press the green Start button on the remote control,
and then use the right-arrow key to select Minimize (see Figure 4.8), and press OK.
Media Center will continue to run in the background. You can also use your remote
control to maximize the Media Center screen, or to close the Media Center interface
altogether.
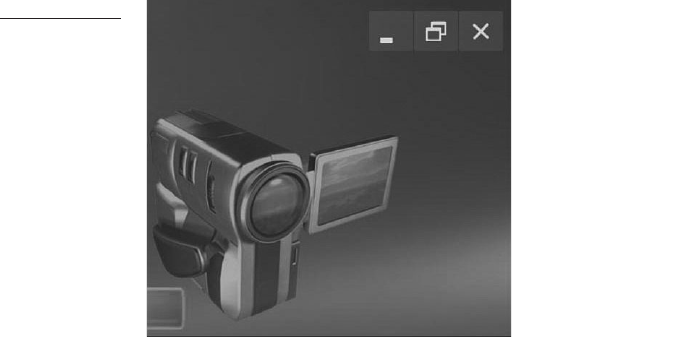
FIGURE 4.8
This close-up
shows the
onscreen buttons
in the upper-
right corner that
allow you to
maximize, mini-
mize, or close
the Media
Center interface
using your
remote control.
60
ABSOLUTE BEGINNER’S GUIDE TO WINDOWS XP MEDIA CENTER
Customizing Your “10-Foot” Look and Feel
One of the cool things you can do to really customize your Media Center experience
is add menu items. This allows you to select an application using the remote
control, and have the link to that application appear in the Media Center menu
stack right below the existing Media Center applications.
Adding Applications to the Start Menu
Here’s how to add items to the Media Center Start menu. Essentially, you’re going
to add a new application link to the Media Center Programs folder in the Windows
Start menu.
■ Create a shortcut to the desired application by placing the cursor over the
icon for the program you want to add, clicking the right mouse, and then
selecting Send To, Desktop (Create Shortcut).
■ Move or Copy the shortcut into the following folder: C:\Documents and
Settings\All Users\Start Menu\Programs\Accessories\Media Center\Media
Center Programs. (Instead of All Users in the pathname, you can specify a
particular user folder. In this way, different users will see different menu items
when they launch Media Center.)
■ When you launch Media Center, your new application link will appear in the
More Programs menu. When you select your application, the Media Center
user interface will be replaced by your application. The next time you launch
CHAPTER 4 NAVIGATING XP MEDIA CENTER’S “10-FOOT” INTERFACE
61
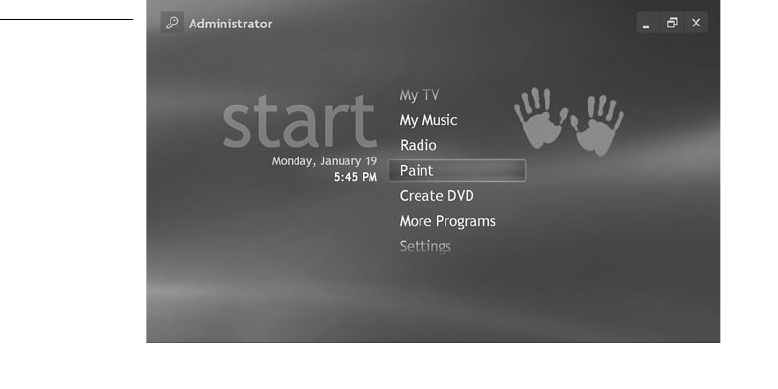
FIGURE 4.9
Following the
steps listed earlier,
a link called Paint
was created. A
graphics file called
mspaint.png—
a pair of green
handprints—was
placed in the
same directory.
When the Paint
item is selected,
the green hands
icon is displayed.
When you select
the Paint item, it
automatically
launches the MS
Paint drawing
program.
Media Center, the link will appear at the bottom of the main menu list,
before Settings. Make sure that the shortcut name is the same as the name of
the application, with no “shortcut_to_” prefix or filename extension.
If you want your custom menu to look really slick, you can add an associated icon.
It works like this: When you select an item from the Start menu item, an image (or
icon) appears at the upper right of the screen (see Figure 4.9). You can assign one of
your own images to any new menu item you add by doing the following:
■ Find or create a graphic image. It must be in Portable Network Graphics
(PNG) format, and it can’t exceed 300×300 pixels. (There are already
hundreds of PNG files on your system; you can run a search using
Windows Explorer.)
■ Give the file exactly the same name as the application you are launching
(with a PNG extension instead of an EXE extension, of course), and place it in
the same directory as that application—or “executable” file—on your hard
drive. For example, if you added a link for the mspaint.exe program to your
Media Center menu, you need to place a graphic file called mspaint.png
in the same directory as the .exe file (which happens to be C:\WINNT\
system32, in this case).
Get Absolute Beginner's Guide to Microsoft Windows® XP Media Center® now with the O’Reilly learning platform.
O’Reilly members experience books, live events, courses curated by job role, and more from O’Reilly and nearly 200 top publishers.

