HTTP with PHP
An excerpt from Lorna Mitchell's PHP Web Services, 2nd Edition
 Building (source: Pixabay)
When we make websites with PHP, the PHP part is always the server. When using APIs, we build the server in PHP, but we can consume APIs from PHP as well. This is the point where things can get confusing. We can create either a client or a server in PHP, and requests and responses can be either incoming or outgoing—or both!
When we build a server, we follow patterns similar to those we use to build web pages. A request arrives, and we use PHP to figure out what was requested and craft the correct response. For example, if we built an API for customers so they could get updates on their orders programmatically, we would be building a server.
Using PHP to consume APIs means we are building a client. Our PHP application makes requests to external services over HTTP, and then uses the responses for its own purposes. An example of a client would be a script that fetches your most recent tweets and displays them.
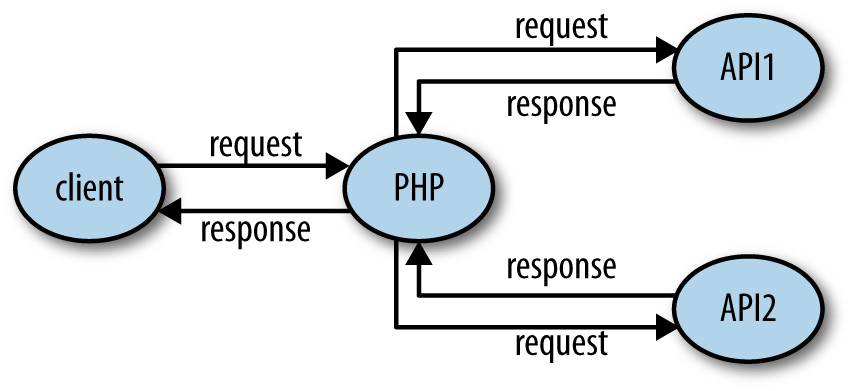
It isn’t unusual for an application to be both a client and a server, as shown in Figure 1. An application that accepts a request, and then calls out to other services to gather the information it needs to produce the response, is acting as both a client and a server.
Warning
When working on applications that are APIs or consume APIs, take care with how you name variables involving the word “request” to avoid confusion!

Making HTTP Requests
To be able to work with web services, it is important to have a very good understanding of how to work with HTTP from various angles. In this section we’ll cover three common ways of working with HTTP:
- Using command-line tools
- Using browser tools
- Using PHP itself
We’ll also look at tools specifically designed for inspecting and debugging HTTP in not available.
The examples here use a site that logs the requests it receives, which is perfect for exploring how different API requests are seen by a server. To use it, visit the site and create a new “request bin.” You will be given a URL to make requests to and be redirected to a page showing the history of requests made to the bin. This is my own favorite tool, not just for teaching HTTP but also when actually building and testing API clients.
There are a few other tools that are similar and could be useful to you when testing. Try out some of these:
- The reserved endpoints (http://example.com, http://example.net, and http://example.org) established by the Internet Assigned Numbers Authority.
- HTTPResponder is a similar tool and is on GitHub so you could host/adapt it yourself.
- A selection of endpoints with specific behaviors at httpbin.org.
Register your own endpoint at http://requestb.in and use it in place of http://requestb.in/example in the examples that follow.
Command-Line HTTP
cURL is a command-line tool available on all platforms. It allows us to make any web request imaginable in any form, repeat those requests, and observe in detail exactly what information is exchanged between client and server. In fact, cURL produced the example output at the beginning of this chapter. It is a brilliant, quick tool for inspecting what’s going on with a web request, particularly when dealing with something that isn’t in a browser or where you need to be more specific about how the request is made. There’s also a cURL extension in PHP; we’ll cover that shortly in Doing HTTP with PHP, but this section is about the command-line tool.
In its most basic form, a cURL request can be made like this:
curl http://requestb.in/example
We can control every aspect of the request to send; some of the most commonly used features are outlined here and used throughout this book to illustrate and test the various APIs shown.
If you’ve built websites before, you’ll already know the difference between GET and POST requests from creating web forms. Changing between GET, POST, and other HTTP verbs using cURL is done with the -X switch, so a POST request can be specifically made by using the following:
curl -X POST http://requestb.in/example
There are also specific switches for GET, POST, and so on, but once you start working with a wider selection of verbs, it’s easier to use -X for everything.
To get more information than just the body response, try the -v switch since this will show everything: request headers, response headers, and the response body in full! It splits the response up, though, sending the header information to STDERR and the body to STDOUT:
$ curl -v -X POST http://requestb.in/example -d name="Lorna" -d email="lorna@example.com" -d message="this HTTP stuff is rather excellent"
* Hostname was NOT found in DNS cache
*   Trying 54.197.228.184...
* Connected to requestb.in (54.197.228.184) port 80 (#0)
> POST /example HTTP/1.1
> User-Agent: curl/7.38.0
> Host: requestb.in
> Accept: */*
> Content-Length: 78
> Content-Type: application/x-www-form-urlencoded
>
* upload completely sent off: 78 out of 78 bytes
< HTTP/1.1 200 OK
< Connection: keep-alive
* Server gunicorn/19.3.0 is not blacklisted
< Server: gunicorn/19.3.0
< Date: Tue, 07 Jul 2015 14:49:57 GMT
< Content-Type: text/html; charset=utf-8
< Content-Length: 2
< Sponsored-By: https://www.runscope.com
< Via: 1.1 vegur
<
* Connection #0 to host requestb.in left intact
When the response is fairly large, it can be hard to find a particular piece of information while using cURL. To help with this, it is possible to combine cURL with other tools such as less or grep; however, cURL shows a progress output bar if it realizes it isn’t outputting to a terminal, which is confusing to these other tools (and to humans). To silence the progress bar, use the -s switch (but beware that it also silences cURL’s errors). It can be helpful to use -s in combination with -v to create output that you can send to a pager such as less in order to examine it in detail, using a command like this:
curl -s -v http://requestb.in/example 2>&1 | less
The extra 2>&1 is there to send the STDERR output to STDOUT so that you’ll see both headers and body; by default, only STDOUT would be visible to less. With the preceding command, you can see the full details of the headers and body, request and response, all available in a pager that allows you to search and page up/down through the output.
Working with the Web in general, and APIs in particular, means working with data. cURL lets us do that in a few different ways. The simplest way is to send data along with a request in key/value pairs—exactly as when a form is submitted on the Web—which uses the -d switch. The switch is used as many times as there are fields to include. To make a POST request as if I had filled in a web form, I can use a curl command like this:
curl -X POST http://requestb.in/example -d name="Lorna"
-d email="lorna@example.com"
-d message="this HTTP stuff is rather excellent"
APIs accept their data in different formats; sometimes the data cannot be POSTed as a form, but must be created in JSON or XML format, for example. There are dedicated chapters in this book for working with those formats, but in either case we would assemble the data in the correct format and then send it with cURL. We can either send it on the command line by passing a string rather than a key/value pair to a single -d switch, or we can put it into a file and ask cURL to use that file rather than a string (this is a very handy approach for repeat requests where the command line can become very long). If you run the previous request and inspect it, you will see that the body of it is sent as:
name=Lorna&email=lorna@example.com
We can use this body data as an example of using the contents of a file as the body of a request. Store the data in a file and then give the filename prepended with an @ symbol as a single -d switch to cURL:
curl -X POST http://requestb.in/example -d @data.txt
Working with the extended features of HTTP requires the ability to work with various headers. cURL allows the sending of any desired header (this is why, from a security standpoint, the header can never be trusted!) by using the -H switch, followed by the full header to send. The command to set the Accept header to ask for an HTML response becomes:
curl -H "Accept: text/html" http://requestb.in/example
Before moving on from cURL to some other tools, let’s take a look at one more feature: how to handle cookies. Cookies will be covered in more detail in not available, but for now it is important to know that cookies are stored by the client and sent with requests, and that new cookies may be received with each response. Browsers send cookies with requests as default behavior, but in cURL we need to do this manually by asking cURL to store the cookies in a response and then use them on the next request. The file that stores the cookies is called the “cookie jar”; clearly, even HTTP geeks have a sense of humor.
To receive and store cookies from one request:
curl -c cookiejar.txt http://requestb.in/example
At this point, cookiejar.txt contains the cookies that were returned in the response. The file is a plain-text file, and the way that a browser would store this information is pretty similar; the data is just text. Feel free to open this file in your favorite text editor; it can be amended in any way you see fit (which is another good reminder of why trusting outside information is a bad idea; it may well have been changed), and then sent to the server with the next request you make. To send the cookie jar, amended or otherwise, use the -b switch and specify the file to find the cookies in:
curl -b cookiejar.txt http://requestb.in/example
To capture cookies and resend them with each request, use both the -b and -c switches, referring to the same cookiejar file with each switch. This way, all incoming cookies are captured and sent to a file, and then sent back to the server on any subsequent request, behaving just as they do in a browser. This approach is useful if you want to test something from cURL that requires, for example, logging in.
Another command-line tool well worth a mention here is HTTPie, which claims to be a cURL-like tool for humans. It has many nice touches that you may find useful, such as syntax highlighting. Let’s see some examples of the same kinds of requests that we did with cURL.
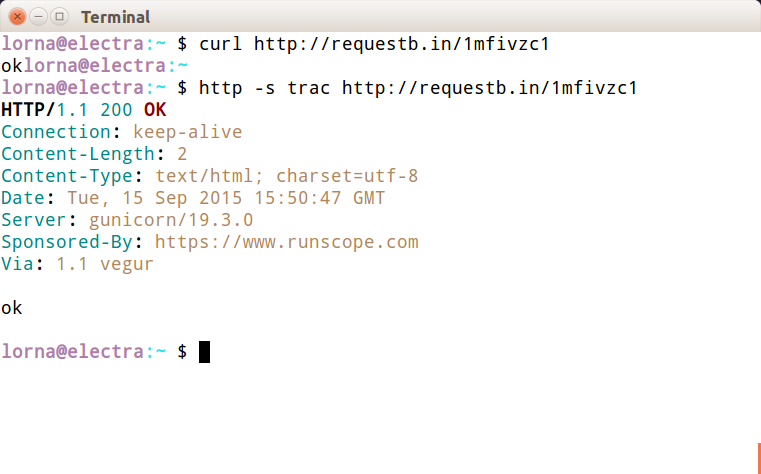
The first thing you will probably notice (for example, in Figure 2) is that HTTPie gives more output.

You can control what HTTPie outputs with the --print or -p switch, and pass H to see the request header, B to see the request body, h to see the response header, or b to see the response body. These can be combined in any way you like and the default is hb. To get the same output as cURL gives by default, use the b switch:
http -p b http://requestb.in/example
HTTPie will attempt to guess whether each additional item after the URL is a form field, a header, or something else. This can be confusing, but once you’ve become used to it, it’s very quick to work with. Here’s an example with POSTing data as if submitting a form:
$ http -p bhBH -f http://requestb.in/example name=Lorna email=lorna@example.com message="This HTTP stuff is rather excellent"

POST /example HTTP/1.1
Accept: */*
Accept-Encoding: gzip, deflate
Connection: keep-alive
Content-Length: 80
Content-Type: application/x-www-form-urlencoded; charset=utf-8
Host: requestb.in
User-Agent: HTTPie/0.8.0

name=Lorna&email=lorna%40example.com&message=This+HTTP+stuff+is+rather+excellent

HTTP/1.1 200 OK
Connection: keep-alive
Content-Length: 2
Content-Type: text/html; charset=utf-8
Date: Tue, 07 Jul 2015 14:46:28 GMT
Server: gunicorn/19.3.0
Sponsored-By: https://www.runscope.com
Via: 1.1 vegur

ok
To add a header, the approach is similar; HTTPie sees the : in the argument and uses it as a header. For example, to send an Accept header:
$ http -p H -f http://requestb.in/example Accept:text/html

GET /149njzd1 HTTP/1.1
Accept: text/html
Accept-Encoding: gzip, deflate
Connection: keep-alive
Content-Type: application/x-www-form-urlencoded; charset=utf-8
Host: requestb.in
User-Agent: HTTPie/0.8.0
Whether you choose cURL or HTTPie is a matter of taste; they are both worth a try and are useful tools to have in your arsenal when working with HTTP.
Browser Tools
All the newest versions of the modern browsers (Chrome, Firefox, Opera, Safari, Internet Explorer) have built-in tools or available plug-ins to help inspect the HTTP that’s being transferred, and for simple services you may find that your browser’s tools are an approachable way to work with an API. These tools vary between browsers and are constantly updating, but here are a few favorites to give you an idea.
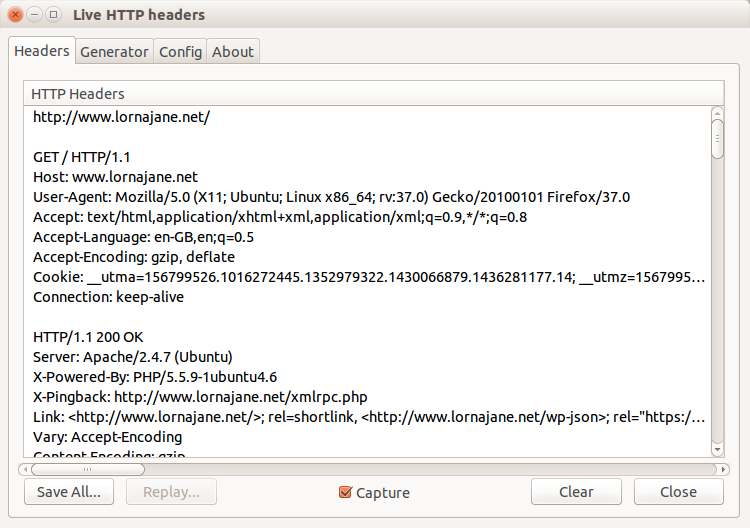
In Firefox, this functionality is provided by the Developer Toolbar and various plug-ins. Many web developers are familiar with FireBug, which does have some helpful tools, but there is another tool that is built specifically to show you all the headers for all the requests made by your browser: LiveHTTPHeaders. Using this, we can observe the full details of each request, as seen in Figure 3.

All browsers offer some way to inspect and change the cookies being used for requests to a particular site. In Chrome, for example, this functionality is offered by an extension called “Edit This Cookie,” and other similar extensions. This shows existing cookies and lets you edit and delete them—and also allows you to add new cookies. Take a look at the tools in your favorite browser and see the cookies sent by the sites you visit the most.
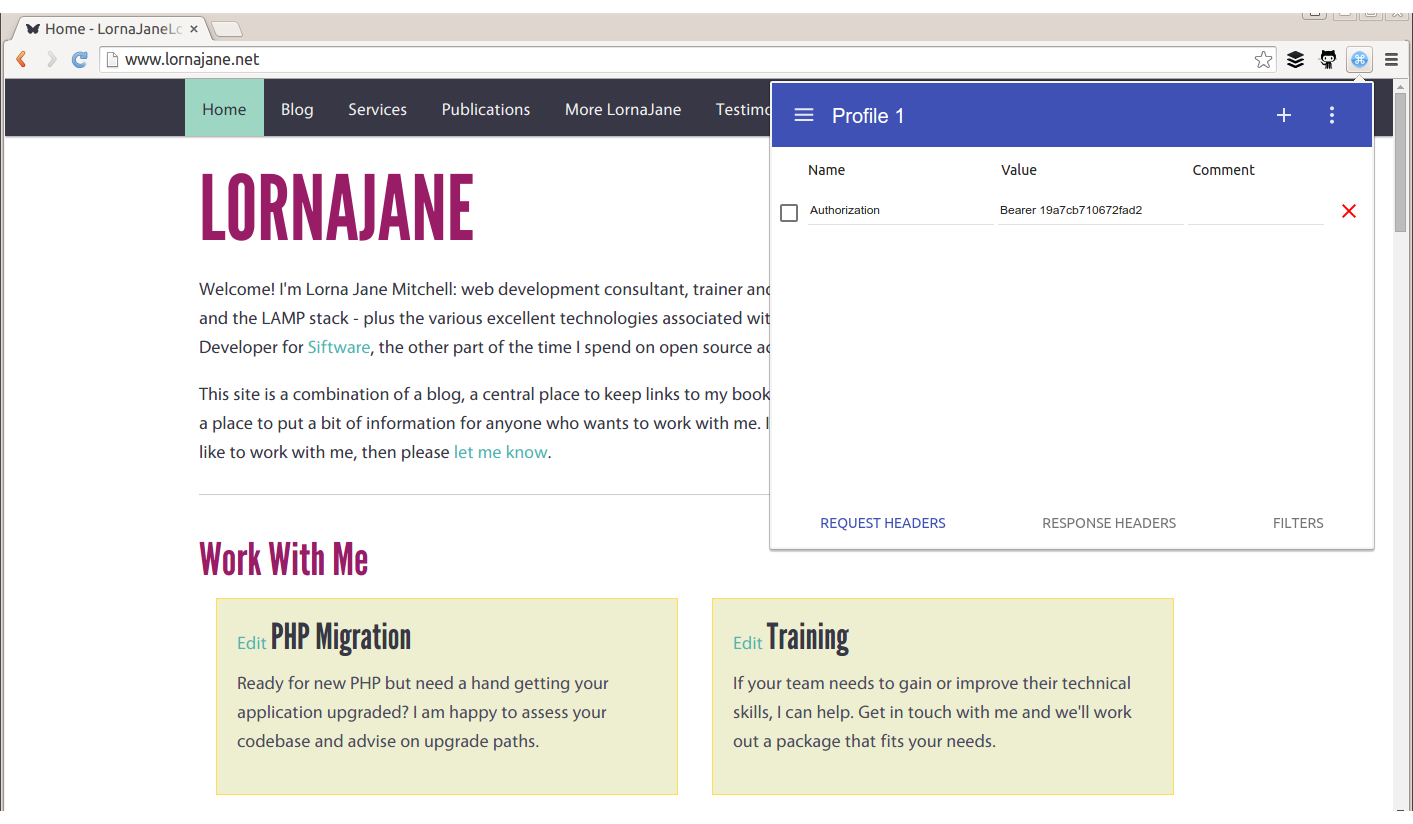
Sometimes, additional headers need to be added to a request, such as when sending authentication headers, or specific headers to indicate to the service that we want some extra debugging. Often, cURL is the right tool for this job, but it’s also possible to add the headers into your browser. Different browsers have different tools, but for Chrome try an extension called ModHeader, seen in Figure 4.

Doing HTTP with PHP
You won’t be surprised to hear that there is more than one way to handle HTTP requests using PHP, and each of the frameworks will also offer their own additions. This section focuses on plain PHP and looks at three different ways to work with APIs:
- PHP’s cURL extension (usually available in PHP, sometimes via an additional package)
- PHP’s built-in stream-handling functionality
- Guzzle (a PHP library)
Earlier in this chapter, we discussed a command-line tool called cURL (see Command-Line HTTP). PHP has its own wrappers for cURL, so we can use the same tool from within PHP. A simple GET request looks like this:
<?php$url="http://www.lornajane.net/";$ch=curl_init($url);curl_setopt($ch,CURLOPT_RETURNTRANSFER,true);$result=curl_exec($ch);curl_close($ch);
The previous example is the simplest form; it sets the URL, makes a request to its location (by default this is a GET request), and capture the output. Notice the use of curl_setopt(); this function is used to set many different options on cURL handles and it has excellent and comprehensive documentation on http://php.net. In this example, it is used to set the CURLOPT_RETURNTRANSFER option to true, which causes cURL to return the results of the HTTP request rather than output them. There aren’t many use cases where you’d want to output the response so this flag is very useful.
We can use this extension to make all kinds of HTTP requests, including sending custom headers, sending body data, and using different verbs to make our request. Take a look at this example, which sends some JSON data and a Content-Type header with the POST request:
<?php$url="http://requestb.in/example";$data=["name"=>"Lorna","email"=>"lorna@example.com"];$ch=curl_init($url);curl_setopt($ch,CURLOPT_POST,1);curl_setopt($ch,CURLOPT_POSTFIELDS,json_encode($data));curl_setopt($ch,CURLOPT_HTTPHEADER,['Content-Type: application/json']);curl_setopt($ch,CURLOPT_RETURNTRANSFER,true);$result=curl_exec($ch);curl_close($ch);
Again, curl_setopt() is used to control the various aspects of the request we send. Here, a POST request is made by setting the CURLOPT_POST option to 1, and passing the data we want to send as an array to the CURLOPT_POSTFIELDS option. We also set a Content-Type header, which indicates to the server what format the body data is in; the various headers are covered in more detail in not available.
The PHP cURL extension isn’t the easiest interface to use, although it does have the advantage of being reliably available. Another great way of making HTTP requests that is always available in PHP is to use PHP’s stream-handling abilities with the file functions. In its simplest form, this means that, if allow_url_fopen is enabled (see the PHP manual), it is possible to make requests using file_get_contents(). The simplest example is making a GET request and reading the response body in as if it were a local file:
<?php$result=file_get_contents("http://www.lornajane.net/");
We can take advantage of the fact that PHP can handle a variety of different protocols (HTTP, FTP, SSL, and more) and files using streams. The simple GET requests are easy, but what about something more complicated? Here is an example that makes the same POST request as our earlier example with JSON data and headers, illustrating how to use various aspects of the streams functionality:
<?php$url="http://requestb.in/example";$data=["name"=>"Lorna","email"=>"lorna@example.com"];$context=stream_context_create(['http'=>['method'=>'POST','header'=>['Accept: application/json','Content-Type: application/json'),'content'=>json_encode($data)]]];$result=file_get_contents($url,false,$context);
Options are set as part of the context that we create to dictate how the request should work. Then, when PHP opens the stream, it uses the information supplied to determine how to handle the stream correctly—including sending the given data and setting the correct headers.
The third way that I’ll cover here for working with PHP and HTTP is Guzzle, a PHP library that you can include in your own projects with excellent HTTP-handling functionality. It’s installable via Composer, or you can download the code from GitHub and include it in your own project manually if you’re not using Composer yet (the examples here are for version 6 of Guzzle).
For completeness, let’s include an example of making the same POST request as before, but this time using Guzzle:
<?phprequire"vendor/autoload.php";$url="http://requestb.in/example";$data=["name"=>"Lorna","email"=>"lorna@example.com"];$client=new\GuzzleHttp\Client();$result=$client->post($url,["json"=>$data]);echo$result->getBody();
The Guzzle library is object-oriented and it has excellent documentation, so do feel free to take these examples and build on them using the documentation for reference. The preceding example first includes the Composer autoloader since that’s how I installed Guzzle. Then it initializes both the URL that the request will go to and the data that will be sent. Before making a request in Guzzle, a client is initialized, and at this point you can set all kinds of configuration on either the client to apply to all requests, or on individual requests before sending them. Here we’re simply sending a POST request and using the json config shortcut so that Guzzle will encode the JSON and set the correct headers for us. You can see this in action by running this example and then visiting your http://requestb.in page to inspect how the request looked when it arrived.
As you can see, there are a few different options for dealing with HTTP, both from PHP and the command line, and you’ll see all of them used throughout this book. These approaches are all aimed at “vanilla” PHP, but if you’re working with a framework, it will likely offer some functionality along the same lines; all the frameworks will be wrapping one of these methods so it will be useful to have a good grasp of what is happening underneath the wrappings. After trying out the various examples, it’s common to pick one that you will work with more than the others; they can all do the job, so the one you pick is a result of both personal preference and which tools are available (or can be made available) on your platform. Most of my own projects make use of streams unless I need to do something nontrivial, in which case I use Guzzle as it’s so configurable that it’s easy to build up all the various pieces of the request and still understand what the code does when you come back to it later.
