4 tips for an effective Docker-based workflow
Learn how to make your CI/CD pipeline work for you.
 Logistics (source: falco via Pixabay)
A Docker continuous integration/continuous delivery (CI/CD) pipeline can be a wonderful tool. It allows changes to be deployed quickly and reliably, it reduces the time from development to production, and it increases team velocity. It can improve security and aid in debugging.
A typical Docker-based CI/CD workflow is to push changes to a version control system, which will automatically be built into Docker containers, tested, and pushed to an image registry (whether it’s private, or public like Docker Hub). From there the CI/CD system may automatically pick up the new images and deploy to staging or production, or there may be a manual deployment step. A few best practices, noted below, will help you get the most out of your pipeline.
1. Don’t use latest
Anyone with a production CI/CD system will have figured this out, but it’s worth covering anyway. If you’re running images tagged latest in production, you’re in a bad place; almost by definition, you can’t roll back—there’s simply no way of saying “latest -1.”
So, it’s best to come up with a more meaningful tag for your images. The two obvious examples are the version of the image (e.g., myapp:v1.2.7) or the git hash of the code inside the image (e.g., 40d3f6f, which can be retrieved with git rev-parse --short).
2. Add some labels
Both the git hash and version are useful data to have when debugging. But there’s only space for one of those in the tag. For this reason, it makes sense to stick this and other metadata into labels, which can be added in the Dockerfile or at build time (e.g., docker build --label org.label-schema.vcs-ref=$(git rev-parse HEAD) …).
To get the metadata back when debugging, use docker inspect; e.g.:
docker inspect amouat/metadata-test | jq .[0].Config.Labels
{
  "org.label-schema.docker.dockerfile": "/opt/Dockerfile",
  "org.label-schema.license": "BSD",
  "org.label-schema.name": "Metadata Test Container",
  "org.label-schema.vcs-ref": "b1a04e77ab0dc130f93f310ed2e03691146fb73d",
  "org.label-schema.version": "1.0.7"
}
This example uses fields from the emerging label-schema standard available at http://label-schema.org/. Such metadata can make it much easier to trace issues back through the pipeline to the source of the problem and also opens the door to useful tooling such as microbadger.
3. Make builds (almost) repeatable
Dockerfiles are great, but one problem is that if you run the same Dockerfile twice, you don’t necessarily end up with the same results. For example, files downloaded from the internet may change between runs. The same goes for software installed via the OS package manager (e.g., apt or yum). This means that two builds from the same Dockerfile can end up running different software and causing unforeseen problems in production.
To ensure that software downloaded in a Dockerfile via curl or wget hasn’t changed, you can take a checksum of the file and verify it (as is done in the Dockerfile for the Redis official image). This also protects against file corruption and malicious tampering.
To guard against OS packages changing, you can specify the required version in the install command. For example, instead of running:
RUN apt install cowsay
Try:
RUN apt install cowsay=3.03+dfsg1-6
This advice should also be applied to base images; e.g., instead of:
FROM debian:latest
Use:
FROM debian:7.11
Note that these techniques still won’t completely protect you against changes; downloads can break, and both packages and images may be updated without name changes. Getting around these issues requires more work, such as hosting local mirrors and using digests to identify images. Be aware that there is a trade-off here: By locking down versions of software, you gain repeatability but lose automatic updates with bug fixes and other features.
4. Scan your images
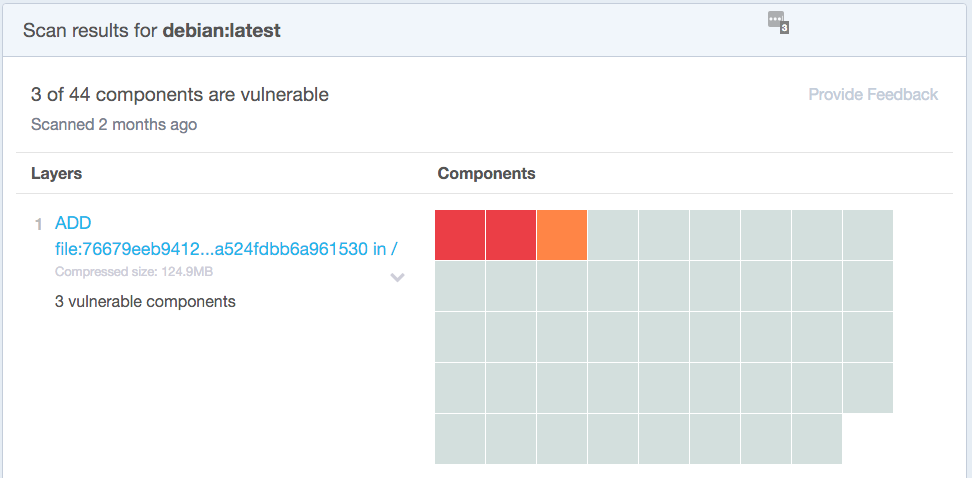
There are some fantastic services for automatically scanning images for known security vulnerabilities. These services can—and should—become a part of your CD pipeline. Whenever an image is built, it should automatically be scanned and a “bill of health” produced, such as shown in the following Docker Security Scanning report for the debian:latest image on Docker Hub:

By keeping the list of vulnerabilities as small as possible, you can drastically reduce attackers’ ability to exploit your system. Unfortunately, it is rarely possible to get the vulnerability tally down to zero, as new vulnerabilities are constantly being found, and it takes time for images to be updated in response. Because of this, you will need to examine each vulnerability in turn and decide if it affects your container and what mitigation needs to be taken, if any.
There are several services to choose from, and which one you use will depend on your specific requirements. Some of the major differences include where the service runs (on-premises or as a remote service), the cost, the style of checking (some services scan all binaries while others rely on OS package lists), and integration with existing tooling or environments. Some of the most popular options include Clair from CoreOS (which is open source), Docker Security Scanning, Peekr from Aqua Security, and Twistlock Trust.
Conclusion
By creating meaningful tags for images, adding metadata via labels, aiming to lock down versions of software in repeat Dockerfile builds, and auto-scanning images for security vulnerabilities, you can enhance your Docker CI/CD pipeline to further improve efficiency, reliability, and security.
This post is a collaboration between NGINX and O’Reilly. View our statement of editorial independence.
