Chapter 4. Report Sharing, Change Notifications, and Reminders
As you’ve learned by now, QuickBase is an amazingly flexible information container. You can stuff it with almost endless amounts of addresses, milestones, tasks, documents, whatever, and never once will you hear it complain, “Hey, buddy, I’m tired.” But sometimes you want your super-powered database to speak up. Sometimes you want to share with others the sleek and info-rich reports you learned about in Chapter 2. Or perhaps certain people need to know when certain records have changed. And maybe everyone—you, your colleagues, definitely the boss’s shiftless nephew—needs a little nudge now and again to remember when something’s due. No problem.
This chapter shows you how to turn QuickBase from quiet recipient to bold communicator. You’ll learn, for example, how to share reports with anyone who needs to see them. Even better, QuickBase is happy to send off recurring reports that get automatically dispatched. For the folks in the trenches who need to know about small-scale changes, just a few mouse clicks let you make sure they’re notified whenever a record changes. And for those in need of a nudge, QuickBase is ready to keep the team on target: Email reminders are quick and easy to program.
Sending Reports to Yourself and Others
The reports you learned about in Chapter 2 are a great way to get a filtered look at just the data you’re interested in. A well-designed report—whether it’s a table, chart, calendar, timeline, or spreadsheet—helps visually summarize the key info you’ve been packing into your QuickBase applications.
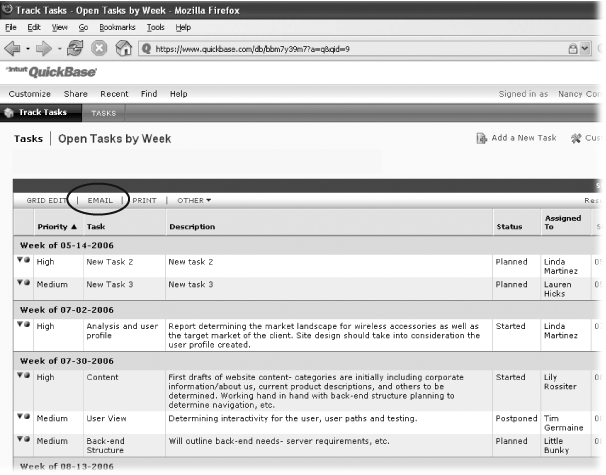
QuickBase reports (like the example in Figure 4-1) serve up a selection of your data in a visually pleasing and easy-to-digest format. Sounds like the sort of info you’d want to share with everyone—not just you and your fellow QuickBase users, but anyone you work with, like vendors, suppliers, and maybe even your proud parents. Good news: QuickBase makes it easy to distribute your reports far and wide. You can email or print individual reports, or you can set up subscriptions, recurring reports that QuickBase automatically sends out for you.
Quickly Emailing Individual Reports
When you want to email a report (to another QuickBase user or to anyone with an email address), you can do so right from QuickBase. It’s fast and easy—just follow these steps:
Open or create the report you want to email (see Chapter 2 for all you ever wanted to know about reports). In the header at the top of the report, click the Email link.
QuickBase opens a page that looks like Figure 4-2.
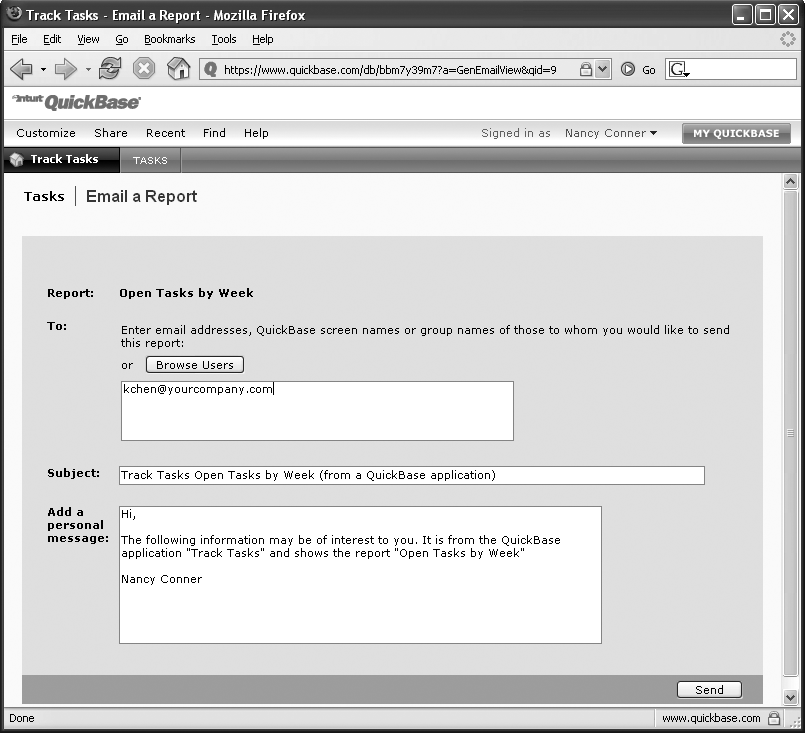
Figure 4-2. When you want to send a report via email, type recipients’ names into the topmost box, or click Browse Users to choose from QuickBase users with access to the application. In the other boxes, you can write your own subject line and a custom email message. When everything looks good, click Send to zip the report off to everyone on your recipient list.In the top text box, type in the email addresses of whomever you want to receive the report. You can type in a bunch of addresses; be sure to separate them with a comma, a semicolon, or by hitting Enter after each address.
QuickBase starts you off with a suggested subject line and some text for your email message. If you want, you can edit these. Just click in the appropriate text box and type away. When you’re done, click Send.
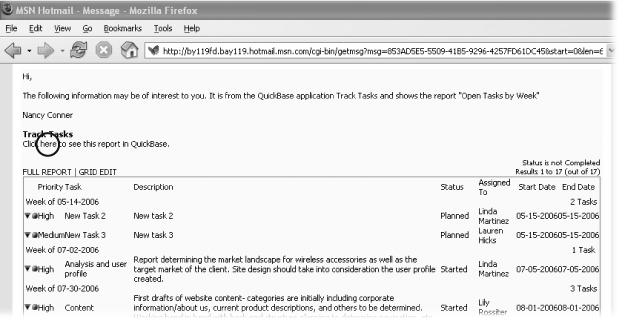
The email you send contains a copy of the report itself plus a link to the report in QuickBase, as shown in Figure 4-3. QuickBase also sends an email to your registered email address, letting you know that the email went out in your name. (That way, if anyone else is using your QuickBase account to send out emails, you know about it.)
Printing Reports
When you need a hard copy of a report to pass around the table at a meeting or include in a printed document, you can print right from QuickBase. Here’s how:
Open the report you want to print. In the dark blue bar that appears above the records, click Print.
The Print Options box opens.
Choose one of these options:
To print the records exactly as they look on your screen, choose “Print the report,” and then click OK.
To print each record on its own individual page, choose “Print all records displayed (one per page).” QuickBase calls this “form view” format (a form contains selected fields, rather than all the fields, for each record; to learn how to create custom forms, see Creating a Custom Form). If there’s more than one form available for this table, a drop-down list of forms appears; choose the one you want (or “All fields”), and then click OK.
QuickBase shows you a print preview Web page and opens your browser’s Print dialog box.
If everything looks OK, click Print.
QuickBase sends the report to your printer.
Tip
If you want to print whatever’s on your screen at the moment, you can do so from the Customize menu. Just click Customize→“Print this page”. QuickBase opens a window showing you exactly what will print (if part of your report is cut off here, it will be in the printed document, too) and a Print window. In the Print window, select the number of copies and click OK to send the page to your printer. This fast, simple way to print is useful when you want to print a list of fields or user screens that don’t have a Print button of their own.
Creating Report Subscriptions
If you have a report that needs to go out regularly, like a monthly sales report or a weekly project update, you can create a scheduled report subscription, which automatically emails a particular report on a periodic basis—you decide whether the report goes out monthly, weekly, or daily.
Subscribing to reports for yourself
If you’re an ordinary user without administrator-level access to an application, you’re limited to creating subscriptions only for yourself. That’s still a handy way of keeping up to date on what’s happening with the applications you regularly use. For example, is Marcia still topping all the other sales reps on cold calling this month?
Note
Administrators get much broader sending privileges, as explained in the next section.
Subscribing to a report is a piece of cake:
Open the application you’re interested in subscribing to. Click Customize→Personal Automated Emails.
The Personal Automated Emails page opens. If you have any current subscriptions, you’ll see them in a table on this page. (If you’re in a multi-table application, look in the far-left Table column to see which subscription belongs to which table in your application.)
Click Create a New Email.
The “Choose a new email type to create” box appears. This box has three choices: Email Notification, Subscription, and Reminders (Stay on Top of Things with Email Notifications).
Turn on the Subscription radio button. If you’re in a multi-table application, choose a table from the Table drop-down list. Click the Create button.
The Emails: New Subscription page, shown in Figure 4-4, appears.
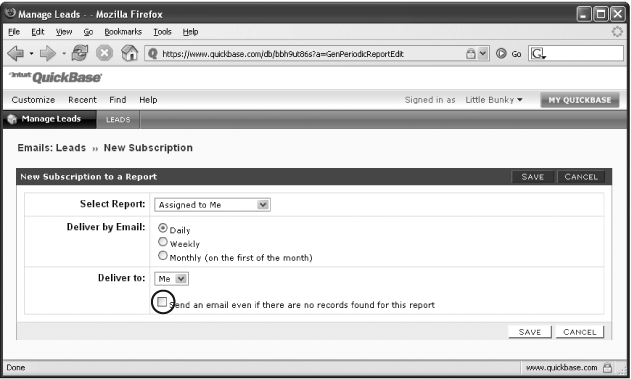
Figure 4-4. The Emails: New Subscription page is your control center for setting up new subscriptions. QuickBase presents a drop-down list of the available reports you can subscribe to. Select the report you want and how often you want to receive it (daily, weekly, or on the first day of each month). Turn on the “Send an email even if there are no records found for this report” checkbox (circled) if you want to get the report—whether there’s data in it or not.Use the Select Report drop-down menu to choose the report you want. Specify how often you want to receive the report: daily, weekly (you choose which day of the week), or monthly (on the first day of each month).
“Me” already appears as the choice in the “Deliver to” drop-down menu. In fact, if you don’t have administrative privileges, it’s your only choice.
When you’re done, click Save.
QuickBase takes you back to the Personal Automated Emails page, with your new subscription listed. See Modifying Report Subscriptions for info on how to delete your subscription or put it on hold (if you’re going away on vacation, for example).
Sending subscriptions to others
It may sound like something straight out of Publishers Clearing House, but if you’re an administrator, then you have the power to send subscriptions to anyone associated with your application—any viewer, team member, or manager—whatever their role. So if you want to make sure that everyone on your team has a list of open issues before the next meeting, you can create a report of open issues, and then set up a report subscription and sign your team up to receive that report via email.
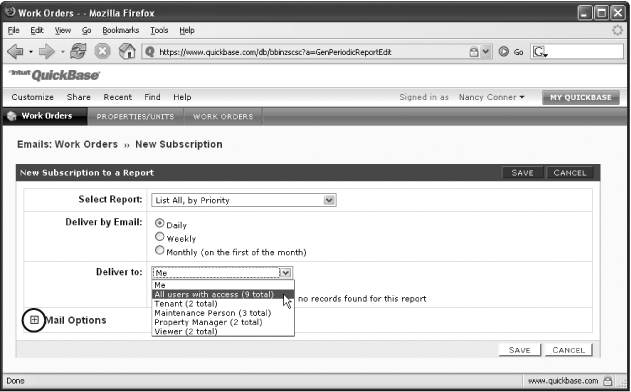
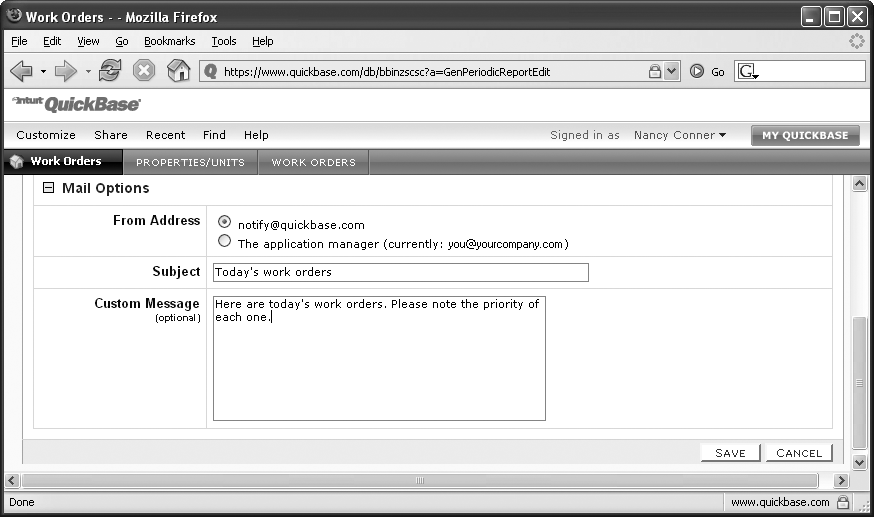
If you’re an application’s administrator, you have some extra options on the Customize menu. Select Customize→Create a new→Email Subscription from the menu bar. If you’re in a multi-table application, QuickBase asks you to choose a table. Do that, and then QuickBase takes you to the Emails: New Subscription page, which looks pretty much like the page in Figure 4-4, except that, as an administrator, you have more decisions to make. (Ain’t that always the way?) For administrators, the “Deliver to” drop-down menu is loaded with all kinds of choices (not just Me). Click the “Deliver to” drop-down menu to choose from a list of users to subscribe to this report, as shown in Figure 4-5. You can subscribe all users who have access to the application or subscribe users based on their roles. There’s also a new section: Mail Options. So if you want to add your own subject line or message, click the plus sign next to Mail Options and type in your text, as shown in Figure 4-6.
Note
When you choose to send a subscription from QuickBase, the From address says notify@quickbase.com. If you want it to come from you, the From address looks like something along these lines: charlesatlas@globehoisting.com (via QuickBase) <notify@quickbase.com>.
Modifying Report Subscriptions
Unlike magazine publishers, QuickBase won’t make you wait 6 to 8 weeks to change your subscription. You can edit, temporarily hold, or completely cancel any subscription in just a few steps, as explained in the following sections.
Editing a Subscription
If you want to edit your report subscription—perhaps daily emails are cluttering up your inbox and you only need to see the updated report once a week—follow the first two steps for creating a new subscription (Subscribing to reports for yourself): Open the application, and in the menu bar click Customize→Personal Automated Emails to get to the Personal Automated Emails page.
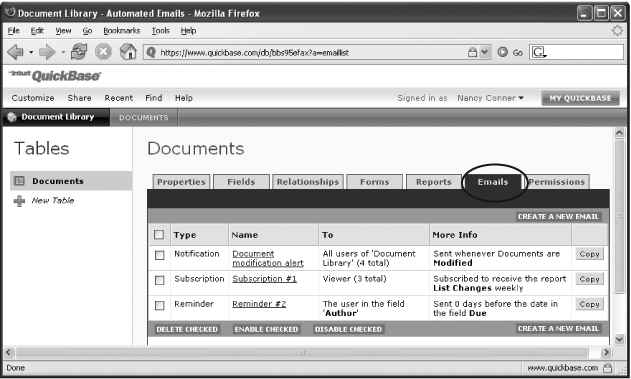
If you’re an administrator, select Customize→Tables to get to the Tables page, shown in Figure 4-7. If you’re in a multi-table application, select the table you want the left-hand Tables list, and then click the Emails tab.
Whichever route you take, you’ll see a list of the automated emails for this application. Find the subscription you want to change and click its name. This opens a page like the one back inFigure 4-4, where you can make whatever changes you want. Click Save when you’re done.
Temporarily Disabling a Subscription
When you go on vacation, you don’t want newspapers piling up on your doorstep and letters spilling out of your mailbox, so you suspend newspaper delivery and tell the Post Office to hold your mail. In the same way, you can suspend your QuickBase report subscriptions—QuickBase calls it disabling your subscription.
Start by going to the Email Notifications, Reminders and Subscriptions page: from any page in the application, click Customize→Personal Automated Emails. (Application administrators click Customize→Tables, choose the table you want if you’re in a multi-table application, and click the Emails tab.) Turn on the left-hand checkbox next to the subscription you want to suspend, and then click the Disable Checked button.
Disabled subscriptions remain visible in your subscriptions list, marked Disabled in big, bold, red letters—you can’t miss ’em.
When you’re back from vacation and done showing off your tan, you can re-enable any subscriptions you’ve suspended. On the Personal Automated Emails page (for personal subscriptions) or the Emails tab of the Tables page (if you’re an administrator), turn on the checkbox next to any and all disabled subscriptions you want to reactivate, and then click Enable Checked. QuickBase restores the subscriptions, and you’re back on schedule.
Note
Administrators can disable and enable subscriptions for all subscribers. Users who aren’t administrators can do this only for themselves.
Deleting a Subscription
When a subscription has run its course (for example, when your team has successfully completed a project and you’ve finished popping champagne corks), you won’t need regular updates anymore. To delete a subscription, go to your Personal Automated Emails page: From any page in the application, click Customize→Personal Automated Emails. If you’re an administrator who’s deleting a subscription for a bunch of people, go to the Emails tab of the Tables page by clicking Customize→Tables, making sure you’ve got the right table (in a multi-table application), then clicking the Emails tab. Turn on the checkbox to the left of the subscription you want to delete, and then click Delete Checked. QuickBase asks you to confirm the deletion; click OK and it’s gone forever.
Triggering Change Notification Emails
You can keep everyone on the same page with notifications about the latest data coming into or out of your applications. Whenever someone adds, deletes, or changes a record, QuickBase can send out an email notification of the change to everyone on the application’s notification list.
Setting up notification emails is different for application administrators than it is for users who don’t have administrative privileges. The next two sections take you through both procedures.
Signing Up for Emails for Yourself
Ever have someone create a new work order for you...and then forget to tell you about it? Or maybe you’re a manager who wants to keep an eye on purchase orders as they’re coming in (do those clowns in Marketing really need 5,000 red rubber noses?). If you want to be the first to know when someone adds, changes, or deletes a record, follow these steps:
Open the application you want and then click Customize→Personal Automated Emails.
The familiar Personal Automated Emails page appears. If you currently have any email notifications set up for that application, you see them on this page.
Click Create a New Email.
The “Choose a new email type to create” box appears.
Turn on the Email Notification radio button. If you see a Table drop-down list (which means you’re in a multi-table application), then select the table you want. Click Create.
The Emails: New Notification page, shown in Figure 4-8, opens.
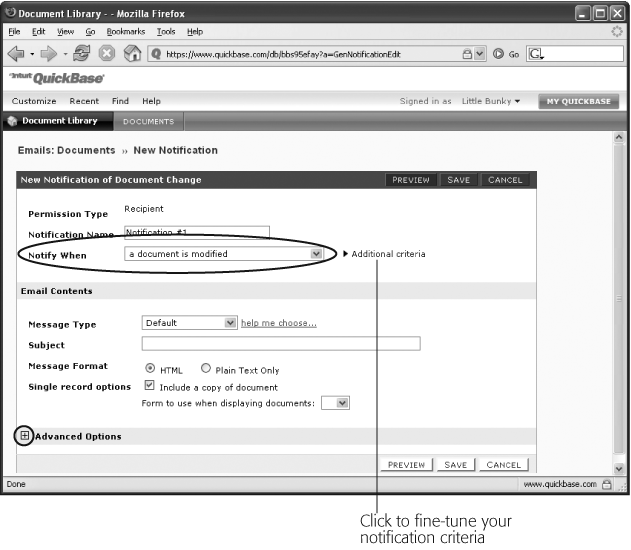
Figure 4-8. The Notify When drop-down list (circled) lets you select whether you want notification when a record is added, modified, or deleted (or any combination of those actions). You can fine-tune your notification criteria by specifying that certain fields or conditions will trigger a notification email: Click the “Additional criteria” link to do so. Click the plus sign (circled) next to Advanced Options if you want notification only of either single record changes or batch record changes (as in an import), or to change the From address on your notification emails (usually email comes from notify@quickbase.com, but you can also have it sent from the application manager’s address.)You’ve got a bunch of choices to make here:
If you want to give this notification a name (making it easy to find later on), type that name into the Notification Name text box. It’s always a good idea to give a notification a descriptive name; two months from now, you don’t want to be looking thought a long list of emails trying to remember whether the notification you want to delete is the one named Notification #15 (or Notification #16 or Notification #17...).
The Notify When drop-down menu lets you specify what kind of change you’re interested in: when someone adds, modifies, or deletes a record—or any combination of those changes. So you can get a notification only when someone modifies a record; when someone adds a new record or modifies an existing one; when someone changes or deletes a record; when any addition, change, or deletion happens; and so on.
Click the “Additional criteria” link to narrow your notification criteria, so you receive only the emails you need to see. You can set a specific field or fields to trigger a notification (so you get an email, for example, when someone uploads a new version of a document but not when someone tweaks its title) or a certain kind of change, such as when a task becomes three days overdue or its priority changes to High.
The Message Type drop-down menu gives you two choices about the body of the notification email: You can receive a QuickBase-authored default message or a custom email message that you write. (Since you’re just sending notifications to yourself, something like this always sounds good: Hi, Gorgeous! Looking good today. Oh, by the way, there’s been a change in a Project Issues record.)
Note
When you select Custom Message from the Message Type drop-down menu, a text box appears for you to type in your message. This box has two tabs: Single Record Version and Multiple Record Version. Customizing Your QuickBase Emails explains the difference and offers tips on writing custom messages.
The Subject text box is where you type the subject line you want for notification emails. Something like New sales lead added or Document edited will clue you in to the kind of change as soon as a notification hits your inbox.
If you like pictures in your email, make sure the HTML radio button is turned on. If you’re more the plain-vanilla type—no pictures, no graphics, no buttons, just the (text-based) facts, ma’am—turn on the Plain Text Only radio button.
Tip
If you want to highlight your brand in the emails QuickBase sends out for you, be sure to turn on the HTML radio button. You need that radio button turned on for emails to display your logo. For more on getting your logo into your QuickBase emails, jump to “Customizing the Look of Your Notification Emails.”
If you want a copy of the new or changed record included in the email, turn on the “Include a copy of record” checkbox (the name of the checkbox reflects the kind of record you’re working with in this particular application: document, issue, lead, timecard, and so on).
If you’ve created your own custom forms—for example, you want records to show different fields to users who are assigned different roles—you can select the custom form you want from the “Form to use when displaying documents” drop-down menu.
You can also fine-tune your notifications using the Advanced Options. You’ve got two choices under Advanced Options. First, you can choose to trigger notifications only for one-at-a-time record changes or for all-at-once multiple changes (as in an import). Second, you can receive your notifications with a QuickBase From address (emails will arrive from notify@quickbase.com) or, if seeing the boss’s name makes you sit up and pay attention, you can receive notifications with the application administrator’s email address in the From line. If you choose that option, the From address of your notifications will look something like this: thebigboss@yourcompany.com (via QuickBase) <notify@quickbase.com>
Note
When QuickBase sends out an email with an application administrator’s name in the From line, it sends that administrator a heads-up email to let them know that an email went out in his or her name.
When you’ve made your selections, click Preview if you want to see what your notification email will look like. When everything looks good, click Save.
The Email Notification Preview page opens, displaying your new notification. Now, whenever someone adds, changes, or deletes a record (depending on your selections), QuickBase shoots you an email that tells you about the record and contains a link to that record in QuickBase.
Sending Notification Emails to Others
If you’re an application’s administrator, you’ve got a few more options when you’re setting up email notifications. These options relate to who can receive the notification emails: Depending on how you set this up, QuickBase will notify you alone, a specific user or group of users, or anyone in the world with an email address.
To set up email notification as an administrator, choose Customize→Create a new→Email Notification. If you’re in a multi-table application, pick the table you want to create the notification for. The Emails: New Notification page for administrators looks a little different than it does for other users, as you can see in Figure 4-9.
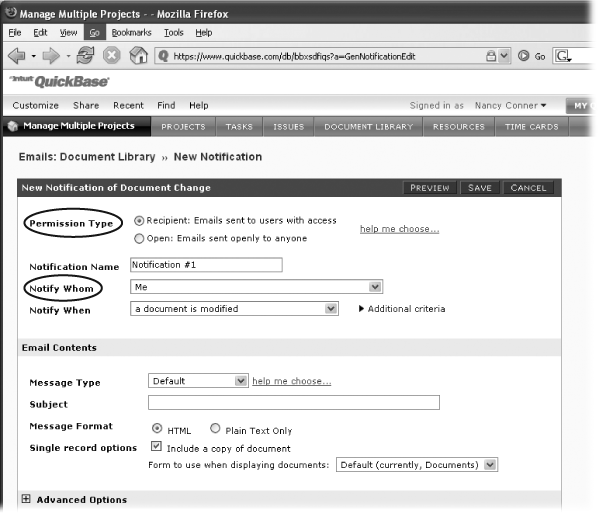
Fill out the fields in the way you want. There are a couple of administrator-only options to consider:
Permission Type. You can set Permission Type to Recipient, which means that QuickBase sends notification emails only to QuickBase users who have access to this application, or to Open, which means that QuickBase sends notification emails to the email addresses you specify—whether or not the people with those addresses are QuickBase users. Which should you choose? The box in Choosing a Permission Type gives some tips for making your decision.
Notify Whom. QuickBase lets you fine-tune your list of notification recipients. If you set Permission Type to Open, Notify Whom presents a text box—just type in the email addresses of whomever you want to get notification emails (you can separate addresses with commas or by hitting Enter). If you set Permission Type to Recipient, QuickBase shows you a drop-down list next to Notify Whom that includes the following options:
Yourself.
All users with access to this application.
A specific list of users. When you choose this option, QuickBase lets you browse users or type in the email addresses, screen names, or group names of a specific set of users.
Yourself when you are listed in a specific field. For example, you can send yourself a notification when your name appears in the Requested By or Record Owner field.
The user whose name is listed in a specific field. If you want to make sure that Joe Green knows when you’ve assigned him a new work order, for example, you can choose to send a notification to the user whose name appears in the Assigned To field.
After you’ve filled out all the information, click Preview to take a peek at how the email notification will look. When everything looks good, click Save.
Note
When you copy an application (Save Time: Be a Copycat), you can also copy that application’s list of users. When you do this, however, QuickBase disables the email notifications in the copy. If you want to enable them, navigate to the Emails tab of the Tables page (Customize→Tables, choose a table if you’re in a multi-table application, and then click the Emails tab), turn on the checkbox next to any notifications you want QuickBase to send, and then click the Enable Checked button.
Tip
When you create an Open notification, you can send a notification to email addresses that appear in your data and are stored in an Email Address field. Here’s how: When you’re creating the notification, click the Notify Whom drop-down menu and then select “The email addresses listed in the field: Email.” Notifications will go to all email addresses listed in the email field of the different records in the application.
Editing, Disabling, and Deleting Email Notifications
After you’ve created an email notification, you can tinker with it in the following ways:
Edit. If you want to change anything about a notification, you can—the kind of change that triggers a notification, the fields of interest, the list of recipients, whatever. To edit a personal change notification (which you created just for yourself), get to the Personal Automated Emails page: Open the application and click Customize→Personal Automated Emails. If you’re an administrator and you’re going to edit a notification you created for others, open the application, click Customize→Tables, select the table you want from the left-hand list (for multi-table applications), and then click the Emails tab. From there, the steps are the same whether you’re editing a personal or administrator-created notification: Click the name of the notification you want to change, make your changes, click Save, and you’re done.
Disable. To put notifications on hold while you’re away from the office, open the application and then select Customize→Personal Automated Emails. This lands you on the Personal Automated Emails page. (Administrators see the notifications they’ve created by clicking Customize→Tables, making sure they’ve got the right table, and then clicking the Emails tab.) Either way, you see a table listing all your notifications for this application. The left-hand column of that table holds checkboxes; turn on the checkbox for any notification you want to disable. Click Disable Checked, and QuickBase will quit sending you those notifications until you enable them again.
Enable. When you’re ready to start getting notifications again, follow the steps for disabling a notification. All disabled notifications have Disabled next to their name. To re-enable a notification, turn on the left-hand checkbox and then click Enable Checked. Then watch your inbox for those notifications to start flying back in.
Delete. The process for deleting a notification is almost identical to the process for disabling one. After you’ve turned on the checkbox of the notification you want to delete, though, click Delete Checked. To make sure you didn’t click the wrong button, QuickBase asks for confirmation that you really, really want to delete this notification. Click OK to confirm, and wave bye-bye to that notification.
Tip
To save time, you might want to set up a notification that’s similar to one that already exists—for example, an administrator might want to notify one set of people when a new purchase request comes in and another set of people when it’s approved. It’s easy to copy an existing notification. If it’s a personal notification for your eyes only, navigate to the Personal Automated Emails page (Customize→Personal Automated Emails). If you’re an administrator, choose Customize→Tables and then click the Emails tab. Whichever route you take, you’ll see a table of notifications in the application. Find the notification you want, and then click its Copy button in the far-right column. QuickBase creates an exact copy of the notification. If you’ve copied the New Purchase Order notification, for example, the copy’s name will be (imaginatively) “Copy of New Purchase Order.” You can then edit (and rename) the copied notification however you’d like.
Sending Reminders
When it’s up to you to make sure that everyone on your team meets their deadlines, sending a reminder can be an effective way to keep people on task. You can set QuickBase up to send automatic reminders by email before a task is due. If you habitually need to chase someone down for overdue tasks, you can also send an automatic reminder after the task’s due date.
Creating Reminders
To have QuickBase give someone an automatic nudge, follow these steps:
Note
Only application administrators can create email reminders. So if you’re a user without administrative privileges, feel free to skip this section. If you’re a user who wants administrative privileges, contact the application’s manager.
Open the application you want to create the reminder for. Select Customize→Create a new→Email Reminder (choose a table if you’re in a multi-table application). Or you can take the scenic route: Customize→Personal Automated Emails→Create a New Email→Reminders→Create. (If you don’t have permission to create reminders, here’s where you find out: QuickBase tells you so and offers you a chance to email the application’s manager to request that permission.)
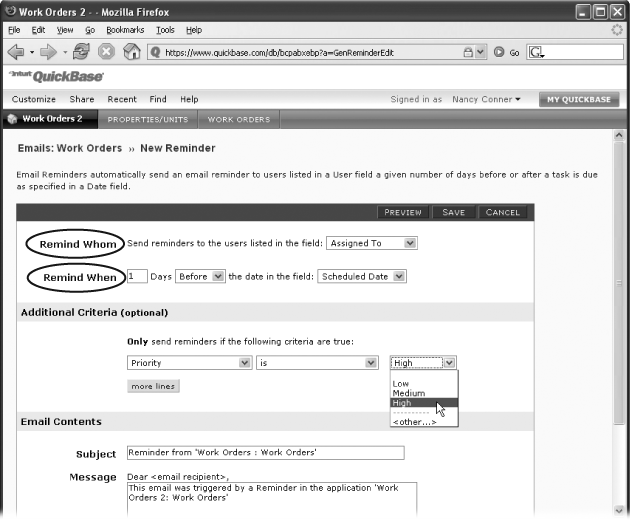
Whether you took the long way or the short way, QuickBase lands you on the Emails: New Reminder page, shown in Figure 4-10.
Fill in the appropriate info. When you’re done, click Preview to see what the reminder will look like; click Save to create the reminder. Here are the different fields you can set for a reminder:
In the Remind Whom drop-down menu, choose the person or people you want to notify. For example, for an upcoming work order, you’d want to remind the person named in the Assigned To field. Or you might want to send a reminder to the last person who modified a record.
The Remind When field is where you specify when you want the reminder sent. Pick the number of days and whether you want the reminder to go out before or after the date field you choose, which might be, for example, the date a task is scheduled or the date the record was created or modified. You can send out a reminder to update a record one week after the record was created, for example, or you can send out a reminder that a task is due five days before the scheduled deadline.
Under Additional Criteria, you can tweak when a reminder goes out. This gives you a lot of control so that you’re not inundating your people with more reminders than they can handle. For example, you might choose to send out reminders only for those tasks assigned a Priority of High. The options QuickBase provides here relate to the fields in the particular application you’ve chosen.
If you want, customize the reminder’s subject line and contents.
QuickBase saves your reminder and sends out an email at the time you specified.
Editing, Disabling, and Deleting Reminders
As with report subscriptions and email notifications, you can edit, suspend, or delete reminders. To do so, first get to the Emails tab of the Tables page: Open the application that contains the reminder and select Customize→Tables (if you’re in a multi-table application, choose the table you want from left-hand list), and then click Emails. The Emails tab shows a table containing all the reminders, subscriptions, and notifications for this table. Look in the Type column of the Emails table for the Reminders you’ve created. When you find the one you want, you can perform any of the following actions:
Edit. To edit a reminder, find the reminder you want to modify and click its name. This opens the Reminder Email page (shown back in Figure 4-10). Make whatever changes you want, and then click Save when you’re finished.
Copy. When you need a new reminder that’s similar to an existing one, click the reminder’s far-right Copy button. QuickBase copies the reminder, with “Copy of” in front of the name. You can then edit the copy (see above) to make whatever changes you’d like the new reminder to have.
Disable. If someone’s on vacation, they probably don’t need reminders of what’s going on back at the office. To suspend reminders while someone’s away from their job, go to the Reminders page. Find the left-hand checkbox for the reminder you want to put on hold. Turn on the checkbox, and then click Disable Checked. QuickBase won’t send that reminder unless you re-enable it.
Enable. To get a disabled reminder going again, go to the Reminders page and find the reminder you want. (All disabled reminders say Disabled in big red letters after their name.) Turn on the left-hand checkbox and click Enable Checked. The reminder’s good to go.
Delete. If the person you’ve been reminding no longer needs an occasional nudge from QuickBase, you can delete a reminder. It’s just like disabling: Go to the Reminders page and turn on the checkbox for the reminder you want to delete. Click Delete Checked, and then click OK to confirm.
Customizing Your QuickBase Emails
QuickBase takes a load off your mind by remembering to send out important notification emails. But what if those emails, with their terse wording and generic look, are just so not you? You can add interest to the emails QuickBase sends on your behalf by customizing your notification emails’ text, look, or both.
Customizing the Text of Your Notification Emails
You don’t have to go with QuickBase’s generic (read: boring) message for email notifications. You can create a custom message that calls attention to a particular field within the changed record or that offers instructions or commentary to people who receive the notification.
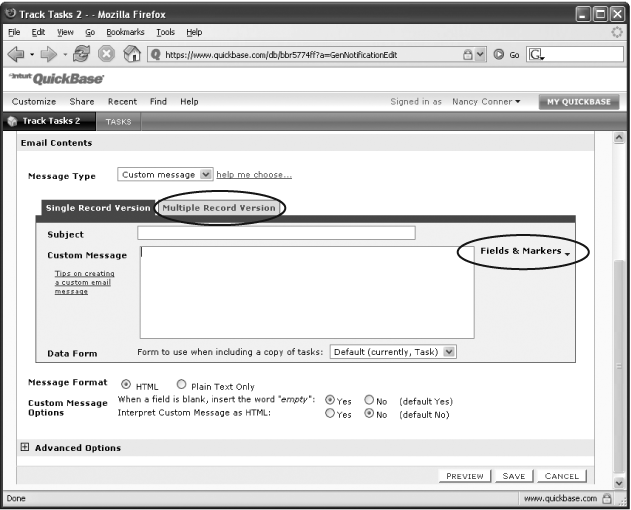
Start by choosing “Custom message” in the Message Type drop-down menu shown in Figure 4-11. As soon as you make that choice, the text box shown in Figure 4-11 appears. When you click in either the Subject or the Custom Message text box, the Fields & Markers menu appears. This menu is where you’ll embed various fields into the body of your email. That means that the contents of the embedded field, such as a phone number or modification date, appear in the body of the email. (The contents of the Fields & Markers menu are specific to the application you’re working with. So a purchase request application has fields like PO Number and Priority; a time-tracking application has fields like Billing Rate or Total Time for Week; a property management application has Unit Number, and so on.)
If all this feels a bit theoretical, here’s an example to help you understand just how handy this customization tool can be: Say you need to keep your people aware when a contact’s name changes. You don’t just want to tell them there’s a new contact—you want to supply the contact’s actual name. So if the lead at Weasel Systems, Philip Collier, has left the business to become a haberdashery consultant (Phil always did wear nice hats), you want QuickBase to notify people ASAP that Phil is gone and that Ernestine Woolgar has replaced him. To trigger an email notification like that, type The lead has changed from [old.FirstName] [old.LastName] to [FirstName] [LastName] into the Custom Message text box. From now on, QuickBase emails name changes to your team as soon as someone modifies the first or last name field in a record in that application. In the case of the Weasel Systems example, the email would read The lead has changed from Philip Collier to Ernestine Woolgar.
To make sure that the previous notification goes out only in the case of a name change, click the “Additional criteria” link next to the Notify When drop-down menu (see Figure 4-11), turn on “When specific fields change,” and then turn on the First Name and Last Name checkboxes. Otherwise, recipients will get the email when someone makes any kind of change to the record.
When you tell QuickBase to send out a notification for each record change (as in the example), QuickBase sends out an email every time someone adds, modifies, or deletes a record (depending on how you’ve set up the notification). What if someone adds or changes a whole bunch of records at once, by importing a client list, for example? If there are 100 names on the list, you don’t want to flood your team’s inboxes with 100 separate emails.
For this kind of multi-record change, click the Multiple Record Version tab of the Custom Message box, to send one email with a notification of a whole bunch of record changes. When you click this tab and then click in either the Subject or the Custom Message text box, QuickBase displays a Markers drop-down menu. Click Markers to see what kinds of markers are available for your custom email. For example, you can have your email display the name of the application with all the changes and a link to the table that’s changed, the table itself, or a summary of the changes. When you make a choice from the Markers drop-down menu, the marker magically appears in the text box, so you don’t have to remember the names of all the different markers.
When QuickBase sends a notification about multiple changes, the email consists of a heading (which appears only once at the beginning of the email) and a body (which contains each individual record change). You can embed some markers in the heading only, some in the body only, and some in either—keep reading to find out which values are which.
There’s one marker that can go only in the heading section of your notification email: %SummaryReport% . This marker presents a summary report of all the records that have changed. So if someone has added 100 new names to the Sales Leads application, this marker sends a summary table, giving an overview of the new leads.
Here’s a list of what you can embed in the body (only) of an email, followed by the marker you use to embed it (some of these markers appear in the handy Fields & Markers menu mentioned earlier):
Field value. To embed a field value, type the name of the field inside square brackets. So if the field value is price, you’d type [price] (or select [price] from the Fields & Markers drop-down menu). QuickBase inserts the contents of that field into the notification email.
What a field’s value used to be. When you want to include what the field used to hold—you might want to show, for example, a change in price—type old and a period, then the name of the field, inside square brackets. So to show the old price (a good idea if you’re running a sale), you’d type [old.price].
The changed record. To include the whole record that’s changed, type this: %RecData%.
A link to the changed record. If you want to insert a link to the record that’s changed, type %RecLink%.
The changed record’s label. In QuickBase, a record’s label has nothing to do with pop stars or music companies; instead, it’s the value of its key field. To include this info in your email, type %RecLabel%.
The changed record’s ID. QuickBase assigns each record its very own, built-in identification number. The marker to include this ID in your email is %RecID%.
You can embed the following info in either the body or the heading of an email:
The name of the application that contains the changed record. This one’s particularly useful when you have a bunch of applications to keep track of. Put the application’s name right in the email to make sure everyone’s straight about what changed where. Type %AppName%.
A link to the application. To include a link to the application that holds the changed record, use this marker: %AppLink%.
The name of the table that holds the changed record. This can be good information to share when the changed record is part of a multi-table application. Type %dbname%.
The table’s ID. Just like individual records, tables have ID numbers. To include the ID in notification emails, type %dbid%.
Customizing the Look of Your Notification Emails
When it comes to sending out up-to-the-moment information, you couldn’t ask for a better personal assistant than QuickBase. But, truth be told, the emails themselves can look a bit dull. How about snazzing up the emails QuickBase sends on your behalf, maybe with the corporate logo, the slogan of the moment, or a link to your company’s Web page? Customizing QuickBase’s emails is a particularly good idea if QuickBase sends emails to your customers or clients, making it clear that the emails come from your organization.
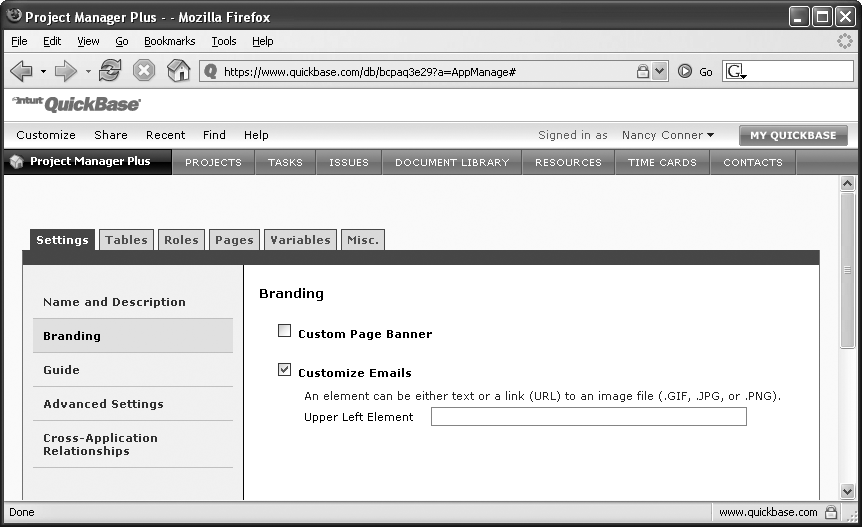
To put your personal stamp on the notification emails QuickBase sends from your application, start by opening the application. Click Customize→Application to get to the page shown in Figure 4-12. Make sure the Settings tab is selected, and then click Branding in the left-hand menu. Turn on the Customize Emails checkbox.
Type the custom text you want your emails to display in the Upper Left Element text box. What you type in here appears in the top-left part of emails QuickBase sends from this application. You can also link to an image file (see “Using an Image as a Hyperlink”) or to a Web site (see the box “Turning Text into a Link” that follows).
Note
Don’t see Application on the Customize menu? That means you don’t have permission to make application-wide changes. If you think you should have such permission, talk to the application’s administrator: to find the administrator’s name, go to your My QuickBase page and look at the application in Details format. The name you want is in the Manager column.
Using vCard and iCalendar with QuickBase
You’ve probably wished from time to time that there was an easy way to get contact info and appointment details out of QuickBase records and into an email, address book, or calendar program. In the past, your options were either copying and pasting, or typing until your fingertips got sore. Now, QuickBase works with vCard and iCalendar, two industry-standard formats that let you exchange data with other programs: vCard is for exchanging contact information (think of it as an electronic business card), and iCalendar works with calendar data, letting users easily download appointments, meeting invitations, and task information. Once you’ve set up a vCard or iCalendar field in your application, users can download, store, or send contact and calendar information as easily as clicking a button.
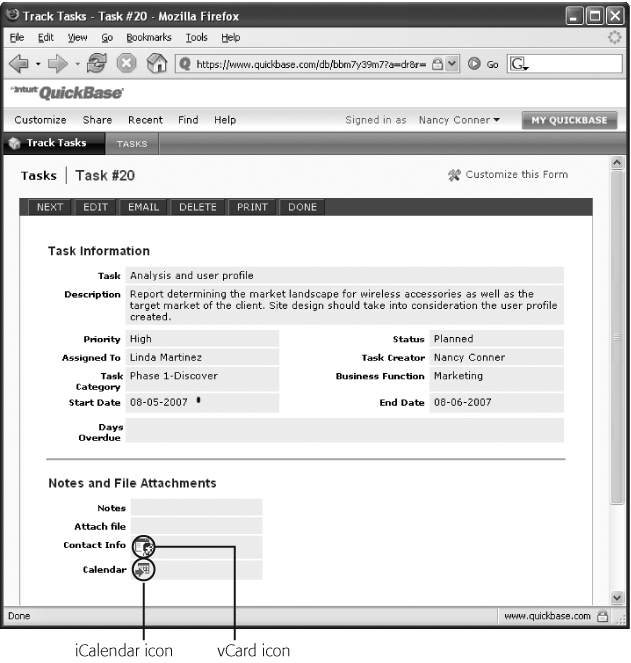
Here’s how vCard and iCalendar work: When an application has a vCard field (for contact info) or an iCalendar field (for tasks and appointment info), QuickBase displays an icon with the records in that application, as shown in Figure 4-13. A user who sees that icon can click it to download the fields you’ve associated with the vCard or the iCalendar field. For example, Sharon Choe might click the vCard icon to download information about a sales lead—name, phone number, email (whatever fields you’ve chosen). Once she’s downloaded the info, Sharon can open it in Outlook (and many other email programs) and then email or store it. iCalendar works the same way, except it bundles information that you might find on a calendar: start date, end date, appointment time, and so on.
Sound good? Here’s how to add vCard and iCalendar fields to an application:
Open the application to which you want to add a vCard or iCalendar field. If you’re adding vCard, choose a table that holds contact information, like Sales Leads or Customers. If you’re adding iCalendar, choose a table that holds time-related records, like Tasks or Projects. Then select Customize→Create a New→Field. (Or, you can click your way to the Fields tab of the Tables page: Customize→Tables→Fields, and then click the upper-right Create New Fields button; for more on using the Tables page to add fields, see Add a field.)
The Add Fields page opens.
Type in a name for your new field. For vCard, you might name the field Contact Info; for iCalendar, something like Calendar works well. From the Type drop-down menu to the right of the name, choose either vCard or iCalendar as the field type. Click Add Fields.
QuickBase creates the new field and asks whether you’d like to add it to any custom forms in the application.
Choose either Yes or “Not right now.” You can always add the field to custom forms later, but it’s a good idea to do it now, to give your users wide access to this feature.
QuickBase returns you to the Fields tab of the Tables page, where your new field appears in the list of fields with a black arrow pointing to it. But you’re not done yet, as QuickBase reminds you. In the Fields table’s Info column, your new field shows Incomplete Settings, marked in red to get your attention. What QuickBase is telling you is that you need to let the vCard or iCalendar field know which fields to bundle up in its info packet for users to download.
To complete the settings for your vCard or iCalendar field, click its name.
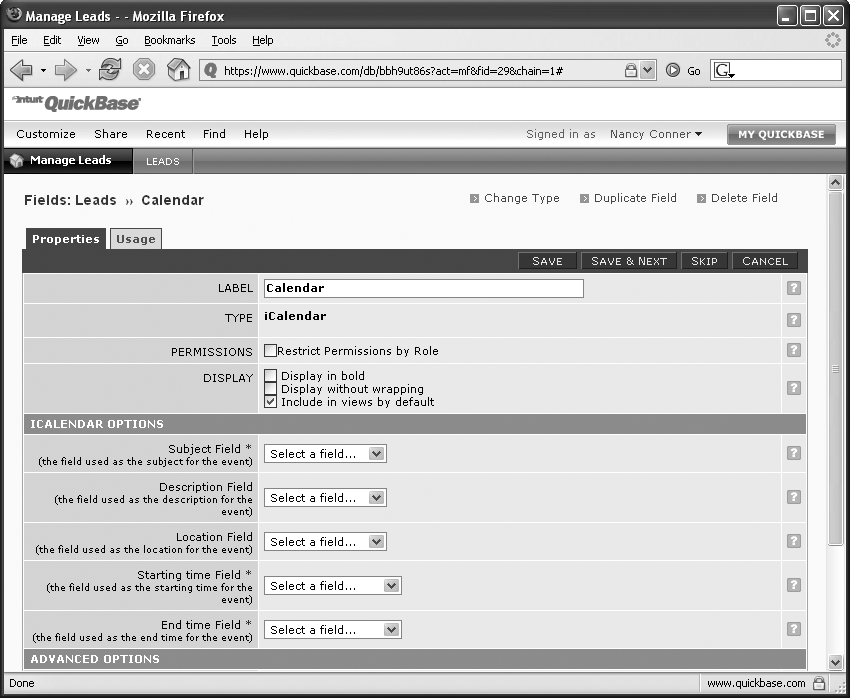
The Field Properties page opens. On this page, adjust the properties—like the name of the field or how it displays its contents—of whatever field you choose. The Field Properties page relates to the specific field you chose. vCard and iCalendar fields have a special section all their own, as Figure 4-14 shows.
In the vCard Options or iCalendar Options section, select the fields you want your vCard or iCalendar field to hold.
Because these two field types hold different information, there are some differences in what you’ll select here:
vCard. For a vCard field, you must specify a Name field—contact info at its most basic—and in some cases an email field. You can also include job title, business and cell phone numbers, fax number, address, notes, and company.
iCalendar. For an iCalendar field, you need to select a Subject field (the field whose contents will serve as the subject for the iCalendar event, like Task), Starting Time and End Time fields, and an Organizer field (a User field, like Task Creator, that indicates who’s setting up the meeting or event). The Location and Description fields are optional.
Note
The Starting Time and End Time fields must be of the field type Date/Time, Date, or Work Date for iCalendar to work with them. (If you use a Date or a Work Date field here, their values show up in Outlook as all-day events, because these fields have no time of day info.) Time of Day fields won’t cut it here, because iCalendar needs to know the date—not just the time—of the scheduled event.
When you’ve chosen your fields, click Save.
QuickBase saves your settings and returns you to the Tables page.
Now, when someone opens a record in your application, they’ll see the vCard or iCalendar icon (as you saw back in Figure 4-13). When they click the icon, they download the information in the vCard or iCalendar field (which contains the fields you just selected) for that record. They can store it on their computer or open it with a program like Outlook—from there, they can store contact info in their address book or add meeting details to a Calendar program.
Get QuickBase: The Missing Manual now with the O’Reilly learning platform.
O’Reilly members experience books, live events, courses curated by job role, and more from O’Reilly and nearly 200 top publishers.

