Chapter 1. Signing Up and Taking a Quick Tour
The hardest challenge you’ll ever face with QuickBase is quickly describing what it is. A highly customizable database? A workflow management system? A Web site that can make your working life a whole heckuva lot easier? Yes, yes, and yes.
Because it helps with so many different tasks, QuickBase doesn’t fit neatly into the program categories we’re used to talking about—database or spreadsheet programs, contact managers, or project management applications, for instance. But whatever you want to call it, at heart, QuickBase is an amazingly powerful and endlessly customizable database, whose greatest tools are offered up to you, lucky QuickBase user, even as you’re shielded from some of the highly technical underpinnings that power everything it can do.
Whatever information your business relies on, QuickBase lets you share it easily with those who need it. QuickBase provides a secure, centralized place to store, work with, and share data: reports, specifications, spreadsheets, price lists, client information, work orders, invoices, purchase orders—any kind of data your organization uses. So wherever your team members are, they can get on the Internet, sign in to QuickBase, and view, add, and edit data. They can submit billable hours, track leads, share documents, submit and prioritize change requests—whatever. QuickBase’s flexibility lets you create forms that work for your business and display your data in a variety of different ways, using charts, tables, timelines, and more.
Half your mental investment in QuickBase is made just getting acquainted with all the various virtual levers, switches, boxes, and forms that you have at your disposal. That’s what this book is designed to do. In this chapter you’ll take your kickoff tour so you know your way around this machine. Specifically, you’ll learn how to:
Register to use QuickBase
Respond to an invitation to join a QuickBase application
Use your My QuickBase page, your home page inside QuickBase
Set your preferences and manage your account information
Get started with an application
Use an application’s Dashboard page
Note
You’ll see the term application used everywhere within QuickBase. An application is simply QuickBase-speak for a database that stores and organizes your information. You might be invited to join someone else’s application, or you can create your own.
Creating an Account
Think of a QuickBase account as your nametag that lets you roam the halls of a giant data storage warehouse, crammed full of all kinds of interesting tidbits. The account gives you access to names and contact info, requests from fellow QuickBase users, and a timeline of who’s doing what on a project—everything you need to know to get your job done, all in one place. It’s all essential stuff. But you can’t peek at it if you’re not registered. Registering takes only a few seconds—and then you’re good to go.
To register with QuickBase, you take one of two routes:
Create a brand-new account. When you’ve got information you want to organize—client lists, expense reports, inventory spreadsheets, your vintage baseball card collection—open a new account to get started. The first 30 days are free.
Accept an invitation. When someone has information they want to share with you—you’ve just joined a new project management team or a client wants your opinion on a report—that person sends you an email invitation to join their application.
Either way, you’ll be up and running on QuickBase in no time.
Creating a New Account
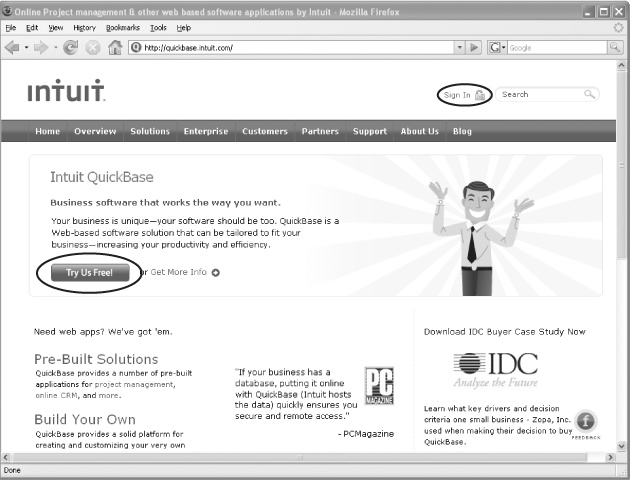
If you want to create a new account to sniff around QuickBase and try out its features, you can do so for free with a 30-day trial. (When you’re ready to pull the trigger and pay for an account, just click the “Subscribe now” link in the bottom-left part of your My QuickBase page—that’s the first page you see when you sign in to the site.) Head over to the QuickBase home page at www.quickbase.com (Figure 1-1), and then follow these steps:
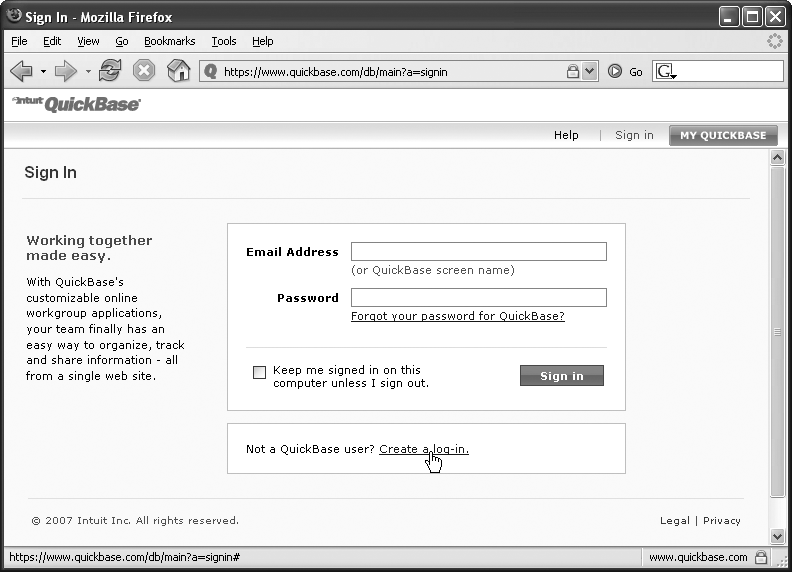
In the upper-right corner, click the “Sign in” link.
The Sign In page, shown in Figure 1-2, opens.
Figure 1-2. QuickBase’s Sign In screen. When registering for a new account, click the “Create a log-in” link. (If you type in your email address and then click “Create a log-in,” the box that pops up has your email address all filled in.) If you’ve already got a QuickBase account, enter your email address and password here to gain access to the site. If you have an account and you’ve forgotten your password, clicking the “Forgot your password for QuickBase?” link lets you reset it—just make sure the new password is one you’ll remember!Click the “Create a log-in” link.
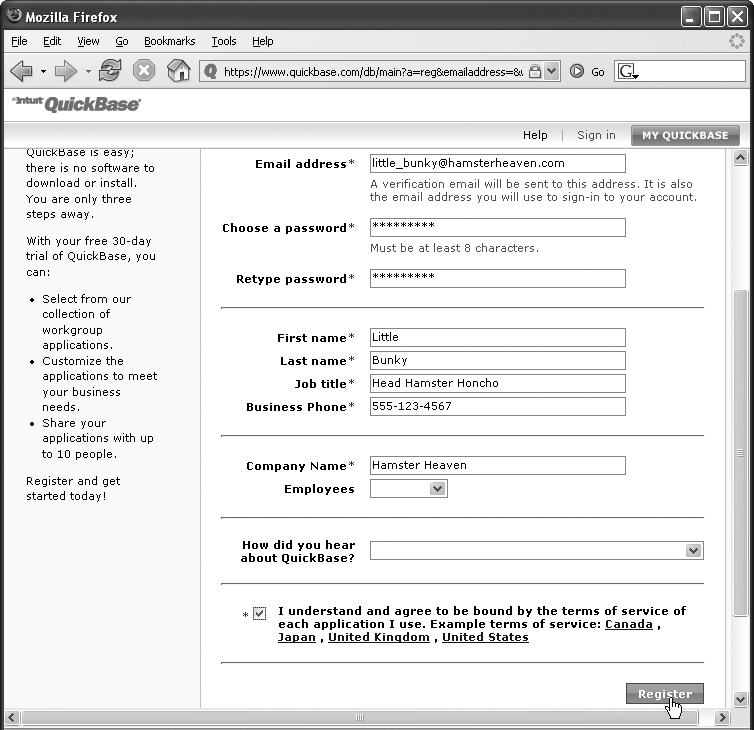
The Register page, shown in Figure 1-3, opens. Registration requires three steps: Register, Verify, and Sign In. Get the process started by typing in your email address. Then choose a password (it has to be at least eight characters long), confirm the password, and type in your first and last names. QuickBase also requires some information about your company and your role in it, so fill that in, too. Read QuickBase’s terms of service (if you’re into that sort of thing) by clicking on whatever country you live in. Turn on the checkbox to indicate you agree to the terms, and then click the Register button.
Note
Currently, QuickBase accounts are available only to residents of the United States, Canada, the United Kingdom, and Japan.
Check your email for a message about your QuickBase registration. In the email, click the “click here” link.
You’re whisked back to QuickBase for the next step.
Sign in to QuickBase for the very first time. QuickBase has already filled in your email address; all you need to do is type in the password you chose back in step 2, and then click the “Sign in” button.
Presto! You’re registered.
Note
If for some reason the “click here” link in your verification email doesn’t work, scroll to the bottom of the email for further instructions. There’s a link you can copy and paste into your Web browser to finish the registration process.
Accepting an Invitation
If someone with a QuickBase account wants you to start using one of their QuickBase applications, you’ll get an email invitation to join QuickBase. The email has the name of the application and the words “QuickBase Invitation” in the subject line.
The body of the email contains a link to a page within QuickBase; click that link to go to the Register page, which tells you that QuickBase has started to create an account for you. The Register page is identical to the one shown in Figure 1-3. Enter your name and a password, and QuickBase takes you straight to the application’s Dashboard page (Getting Started with Applications). From there, you can work with the application in whatever capacity the administrator who invited you has assigned.
Note
If you’re invited to work with someone else’s QuickBase application, you may or may not have the ability to create your own applications. It depends on the permissions (usage rights) that you’ve been granted. If you don’t see a Create a New Application button in the upper-right part of your My QuickBase page, you don’t have permission to create applications. Permission levels range from viewer—a role that lets you look at an application but not play with it—to billing account administrator, who’s the Great Grand Pooh-bah of a QuickBase billing account. (A billing account is the umbrella that gathers together all the applications of one paying customer—for example, your company might have just one billing account, but many applications within that account.)
For any given account, the billing account administrator has the power to decide who can create applications, who can manage them, and who can’t have access to the account at all. If you’re missing that Create a New Application button and you want to create your own applications, talk to the person who invited you and ask them to give you “create applications” permission.
Signing In
After you have a QuickBase account, you can sign in from any of the public pages on the site. Just look in the upper-right corner for the “Sign in” link. This whisks you right to the Sign In page shown back in Figure 1-2. Type in your email address or your QuickBase screen name (Edit user information) if you have one, enter your password, and then click the “Sign in” button. If it’s all correct, QuickBase takes you right to your My QuickBase page (Using Your My QuickBase Page).
Tip
If you don’t share a computer with anyone else, you can save yourself some typing by staying permanently signed in to QuickBase. On the Sign In page, just turn on the checkbox that says, “Keep me signed in on this computer unless I sign out.” If you choose this option, it’s still a good idea to sign out at the end of the day or if you’re going to be away from your computer for a while—you don’t want someone else messing with your business while you’re at lunch or in a meeting.
Forgot your password?
It happens to the best of us. When you registered with QuickBase you selected a password that would be easy to remember and tough for anyone else to crack—only now, you can’t for the life of you remember what it was. To get back into the QuickBase Kingdom, just follow these steps:
On the Sign In page (glance back to Figure 1-2), type in your email address, and then click the “Forgot your password for QuickBase?” link. (Or you can just click the link and then fill in the email address on the next page.) This opens the “Forgotten Password—Step 1” page. Verify that the email address is the one you used to register for QuickBase and then click Next.
For obvious security reasons, QuickBase needs to verify that you are who you say you are. So it sends a verification email to the address you entered. When that email arrives in your inbox, you have 90 minutes to respond. (If you don’t respond in that time, your old password remains in effect.) The verification email contains a link; clicking it takes you to the “Forgotten Password—Step 2” page, where you choose a new password. Type it in twice and click OK. This takes you back to the Sign In page, where you can sign in using your brand-new password.
Signing out
All good things must come to an end, even a session of working in QuickBase. To sign out of QuickBase, look in the upper-right corner of any QuickBase page, where you’ll see the words “Signed in as” and your name. Next to your name is a little drop-down arrow. Clicking the arrow gives you a couple of options: Sign Out and Edit User profile—bet you can guess which one signs you out. When you click Sign Out, the page that opens lets you sign in again or jump over to the QuickBase home page.
Using Your My QuickBase Page
Your My QuickBase page (Figure 1-4) is your home within QuickBase. It’s the page you see when you first sign in, your command center, your bird’s-eye view of everything in your QuickBase account. From it, you can work with existing applications or create new ones (if you’ve got permission to do so; see the Note in Accepting an Invitation). You can take a look at the reports (ways of displaying your data) you work with most often. And you can manage your account information, search for an application, create and manage groups of folks who’ll work on an application—whatever you want to do with QuickBase, this page is your starting point.
Tip
When you’re signed in to QuickBase, you’re never more than a click away from your My QuickBase page. Whatever page you’re on, just look in the upper-right corner for the bright orange My QuickBase button. Click it to zip back to your My QuickBase page.
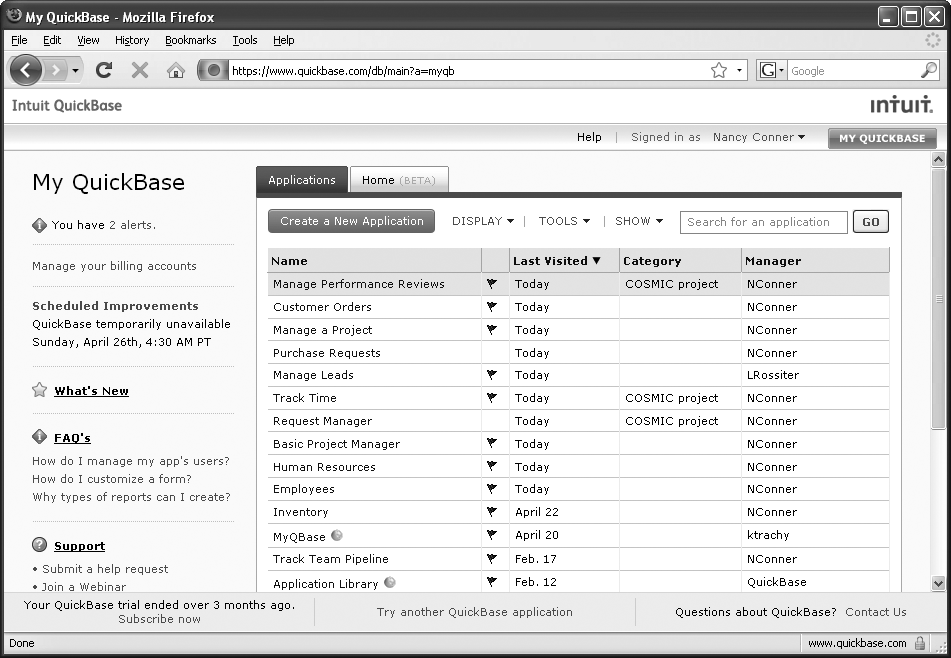
Viewing and Organizing Your Applications
QuickBase applications are databases that let you and your team tackle projects—like tracking sales figures, managing spreadsheets of customer accounts, developing requirements specifications, and so on. The rest of the chapters in this book show you everything you need to know about the different types of applications and how to work with them. But before you focus on those details, it’s worth taking a brief look at how to manage the applications on your My QuickBase page. Your starting point is the Applications table, which shows every application you have access to.
Tip
As the number of your applications grows, it can get just a wee bit harder to find the specific application you want. So QuickBase helps you out. To find a particular application, look at the menu options in the bar just above the Applications display; click Tools→Search for an application. A search box opens. Type in any word or phrase, and QuickBase hunts through the names and descriptions of all your applications. Once your QuickBase account has 20 or more applications, QuickBase makes searching even easier by making the search box a permanent feature on the right-hand side of your My QuickBase page. So when your list of applications grows as long as your arm, shift your eyes to the right to find the “Search for an Application” box.
You can display your My QuickBase applications in either Icons format (little database symbols with application names) or in Details format (a table that tells you all about who manages an application, when you last opened it, and more). To switch from Icons format to Details format—or vice versa—click Display just above the list of applications, and then select either Icons or Details.
When you scan the detailed list of your QuickBase applications, you’ll probably notice a bunch of icons next to many application names. Here’s what they mean.
Not everyone likes to see a hundred little flags waving all over the place. The quick ’n’ easy way to clear the update icons is to look just under the blue bar that says Applications for the Tools button, then click Tools→“Clear flags”. A box appears, asking you to confirm. Click OK, and wave goodbye to the flags.
Clearing flags means that you remove all the New and Updated flags from all your applications. But it doesn’t affect anyone else’s flags. So if you clear the flags from your My QuickBase page, you don’t have to worry about George in the Peoria office missing an important update when he gets back from his vacation.
You can sort the information in your detailed Applications table in a number of different ways:
By application name. Just click the Name header to sort applications alphabetically by name, in either ascending or descending order. If the triangle next to the Name is pointing up, the names are in ascending order; if it’s pointing down, they’re descending.
By when you last worked with an application. Click Last Visited to find applications you worked with most recently or those you haven’t worked with in a long time. (This is QuickBase’s standard way of organizing your applications: the ones you visited most recently appear at the top of the list.)
By category. If you’ve created a category and assigned some applications to it, you can sort applications by category so that all applications belonging to a certain category appear together; click Category to sort applications in this way. (Read on to learn how to create a category.)
By manager. Click the Manager header to sort alphabetically by manager name in ascending or descending order. In QuickBase, a manager is the person who has administrative rights to control an application.
If things get crowded, you can reorganize, hide, or permanently delete one or more of your applications. In Details display (see above), right-click any application in the Applications table (don’t right-click the application’s name; click the row that it’s in). The menu that appears (Figure 1-5) lets you manage your applications in the following ways:
Tip
If you’ve hidden an application and then have a change of heart, you can find it again and restore it to your Applications list. Search for it by clicking Applications→Search for an application. In the Search box that appears, you can search for all applications you have access to; find the banished application, and then click Add to bring it home to My QuickBase.
Set, clear, or edit category. Categories help you organize your applications. A category simply groups similar applications to make it easy to find them. See Using categories to organize your applications for the lowdown on creating and using categories.
Delete this application. If you created an application, you can delete it using this menu. Deleting an application removes it entirely from QuickBase. Only the manager of an application or the administrator of a corporate account can delete an application.
Using categories to organize your applications
As your list of applications grows, you’ll want a quick and easy way to organize your applications so you can find the info you need when you need it.
The best way to do this is with categories, which work like a filing system. You simply create the categories that make sense to you, and then organize applications into those categories. Because you’re the one creating the categories and sorting applications into those categories, your organization reflects the way you work and think. Your categories appear only on your My QuickBase page; no one else sees them. So you can’t mess up anyone else’s categories—and they can’t mess with yours.
Here’s how to create a category and put an application into it:
Start from your My QuickBase page. Make sure it’s set to Details display rather than Icons display.
What’s the difference? Icons display merely lists the names of your applications, along with little pictures of databases. Details display shows you a table that lists your applications and gives you some information about each one (when you last visited the application, who manages it, and any category you’ve assigned the application to). If you’re in Icons display, look above all those icons for the Display button and click Display→Details.
In the detailed list of applications, find an application you want to categorize and right-click its row.
A shortcut menu pops up, listing the application’s name at its top.
Click “Assign a category to this application”.
The New Categories box appears, asking you to name the new category. You can categorize your applications however you like; the categories affect only your own My QuickBase page. So you might categorize applications by project name, by office location, by people you like working with—whatever works for you.
Type in the name of your new category, and then click OK.
The new category’s name appears in the Category column of the application. QuickBase also adds the category you just created to the menu that pops up when you right-click an application, making it easy to add other applications to that category. After you’ve created at least one category, you can sort applications by category: just click the Category header to sort in ascending or descending alphabetical order.
Tip
A quick way to add a new category to the pop-up menu is to use the Tools menu (just above the applications list). Click Tools→Edit categories. The Edit Categories box lets you edit (or delete) existing categories or create new ones.
After you’ve created and assigned some categories, you can tweak them in a few different ways:
Edit a category. To change the name of a category (maybe you misspelled Project Cosmic as Project Comic and want to fix the typo—no matter how appropriate the misspelled name is), click Tools→Edit categories. The Edit Categories box displays all your existing categories, each in a text box. Click the category name you want to change, and then edit away. Click OK when you’re done.
Delete a category. When you don’t need a category anymore—maybe your sunblock company closed its Anchorage sales office and there’s no longer a need for an Alaska category—click Tools→Edit categories. In the box that pops up, find the category you want to get rid of, highlight it, and then press the Delete key. Click OK, and the category is history.
Note
When you delete a category, you don’t delete the applications associated with that category. Instead, they become uncategorized.
Uncategorize an application. If you want to remove an application from a category without deleting the category itself, go to your My QuickBase page’s Application list (make sure you’re looking at a table of applications in Details display), find the application you want, and right-click it. From the pop-up menu that appears, select “Clear category”. You’ve set the application free.
Reassign an application from one category to another. This isn’t like divorce and remarriage—you don’t have to unhitch an application from its previous category before you can assign it to a new one. Reassigning an application takes one short step. From the Details display of applications in My QuickBase, right-click the application you want; from the pop-up menu, select the name of the new category. Out with the old, in with the new.
Tip
To reduce clutter, you can display applications from one particular category. After you’ve created at least one category, new options appear on the Show menu above the Applications table: “Show all categories” (this is the default setting) and “Show [category name]”—for example, if you’ve created a category called Northeast Region, this option will say Show Northeast Region. To show applications in a specific category, click Show and then select the category you want to display. Applications that belong to other categories (or that haven’t been categorized) magically disappear. (To get them back, use the same menu to choose a different category or show all categories.)
Hiding an application from My QuickBase
When you don’t need a particular application anymore—it’s obsolete or expired, for example—you don’t need it cluttering up your My QuickBase page. When you still want just-in-case access to an old application’s data, it’s easy to remove a single application from your Applications list: Start in Details display and right-click the application’s row. When the shortcut menu pops up, select “Remove from List”. The application still exists and you still have access to it, but it’s no longer on the list of applications on your My QuickBase page.
Restoring an application you’ve hidden
Oops—you hid an application from the list and you need it back—now. Luckily, you can find the application and get it back on your list without much trouble. Just take these steps:
Find the AWOL application: From your My QuickBase page, click Tools→Search for an application.
The “Search for an Application” box appears.
In the text box, type in the name of the application you’re looking for (or some part of it), and then click Search.
A list of applications appears.
Find the one you want, and click Add. Or you can click the name of an application to open it and verify that it’s the one you want.
Either way, the application is back in your Applications list when you return to My QuickBase.
Tip
When you’ve got more than 20 applications in your Applications list, the “Search for an Application box” appears on the right-hand side of your My QuickBase page. Save yourself a step in the search process by typing your search terms directly into this box.
What if you’re drawing a complete blank on the application’s name? You can still get it back. In step two above, leave the text box blank and click Search. Doing so brings up the “Search for an Application” page, which offers you these choices:
Search for text in the name or description of an application. (This option is the same as the one you get with the regular quick Search, but it’s not much help if you can’t remember anything about the application’s name.)
List all applications that I manage.
List all applications that are accessible by the group (you type in the name of a QuickBase group).
Choose one and click Search. By scanning the list of applications that you have access to, or that a group you belong to can access, you can easily find the missing application.
Warning
Don’t confuse removing an application with deleting it. When you remove an application from your My QuickBase, the application still exists, but it no longer appears in your Applications list. When you delete an application, you get rid of the application (and all its data) completely. It’s gone, kaput, kablooey—and you can’t get it back.
Keeping Tabs on Your Data: Using the Home Tab
Your My QuickBase page has a customizable tab called the Home tab, where you can select and display reports from your QuickBase applications. In QuickBase, a report is a way of showing your application’s data. You can take all or part of a table’s data and display it in a graphic format like a pie chart or a line chart. You can also create crosstab reports, summary tables, and timelines. (Chapter 2 tells you all about reports.) After you’ve created some reports for different applications, you can gather together the reports you view most often right on your My QuickBase page. The Home tab lets you display up to six reports, chosen from all of your applications. In addition, you can create text boxes for the Home tab and fill them with whatever information you want—a task list, notes to yourself, whatever. As you’ll see, you can even embed a link to another Web page. It’s your Home tab; what you do with it is up to you.
The Home tab can hold a maximum of 10 items, including up to six reports. So if you have five reports, for example, you can also have up to five text boxes. If you have three reports, you can have up to seven text boxes, and so on.
Note
The Home tab is still in beta, which means that QuickBase’s developers are still testing it—and they want your feedback. After you’ve tried out the Home tab, let the good folks at Intuit know what you think. Open the Home tab and click its upper-right Send Beta Feedback link. A dialog box opens; type in your praise, suggestions, complaints—whatever—then click Submit to send your thoughts to QuickBase’s developers.
Adding a Report to the Home Tab
The first time you click the Home tab on your My QuickBase page, you see a page like the one in Figure 1-6, which displays placeholders for your reports and text boxes. To add a report, follow these steps:
In the upper-left corner of the placeholder you want to replace with a report, click Add→Report.
The Add Report dialog box appears, which lists all the applications in your account in alphabetical order.
In the dialog box, turn on the radio button for the application that contains the report you want, and then click Next.
The Add Report dialog box changes to show a list of the tables in that application.
Turn on the radio button of the table whose data the report displays, and then click Next.
The dialog box displays a list of the reports associated with that table.
Turn on the radio button of the report you want and click Add.
QuickBase displays the report you chose on the Home tab. As the data changes in the table that generates the report, the report changes, as well.
To add another report, simply repeat those steps (you can have up to six reports on the Home tab). When you’re finished adding reports, click Done. The page changes to show just your reports, without their frames, as shown in Figure 1-7.
Note
If you try to add a new report when you’ve already got six on the Home tab, QuickBase displays a dialog box telling you that you already have the maximum number of reports on the tab. If you want, you can delete a report from the tab (Working with Elements on the Home Tab) and then add a new one.
Tip
If you want to edit or view a particular record in the report, click the record’s Edit or View button (as appropriate). QuickBase opens that record, ready for you to work with it.
Adding a Text Box to the Home Tab
In addition to reports, you can also add text boxes to the Home tab to store and display reminders, a list of phone numbers, links to sites and online documents, or whatever you’d find helpful to see on your My QuickBase page. To add a text box, you first open a text editor and then use that editor to enter the info you want. Here’s how:
On your My QuickBase page’s Home tab, click the upper-left “Edit this page” button.
The page changes to show a frame around each existing element on the page. (If you haven’t yet added any elements to the Home tab—that is, if the tab looks like Figure 1-6—you won’t see an “Edit this page” button. In that case, skip ahead to step 2.)
Click Add→Text Editor.
QuickBase opens a text editor, right on the Home Tab, as shown in Figure 1-8. This text editor has formatting buttons similar to those found in your favorite word-processing program, such as font size, bold, italic, and so on.
Type in the text area and use the various buttons to format your text. When you’re finished typing, click the Home tab’s upper-left Done button.
QuickBase closes the text editor and displays your text in its own box.
Working with Elements on the Home Tab
After you’ve added some reports and text to the Home tab, you can work with those elements in various ways. To do so, click the Home tab and then click “Edit this page”. The tab changes to show each element inside a frame. When it does, you can do the following:
Add a new report. Click Add→Report where you want the report to appear, and then follow the steps for adding a report (see page xx).
Edit text. If you need to change or edit the contents of an existing text box, just click the “Edit this page” button. When you do, all the text boxes on the page magically turn into text editors. Just click the text editor you want and make your changes. Click Done when you’re finished.
Insert a link into text. To insert a hyperlink that whisks you off to another Web page, click “Edit this page” to open the Home tab’s text boxes as text editors. Select the text you want to hold the link and then, on the formatting toolbar, click the Link button, which looks like some links of chain. The Link Options dialog box opens. In this box, type or paste in the Web address of the page you’re linking to. If you want the link to open in a new window, turn on the “Open in a new window” checkbox. You can add an description of the page you’re linking to, if you like (it’s optional). (This description appears when you hover your cursor over the link.) When you’re finished, click outside the Link Options box to close it.
Remove a link from text. If you want to get rid of a link in some text, click “Edit this page” and select the text that has the link you’re deleting. Click the Link button to open the Link Options box. At the bottom of the box, click “Remove link from text”. QuickBase removes the link and closes the dialog box.
Move an element. To move a report or text box to a different spot on the Home tab, click the blue bar at the top of the report, and then drag the element to its new location. Let go of the mouse button to drop the element into place.
Delete an element. In the blue bar at the top of the report or text box, click the right-hand X and QuickBase removes the element from the Home tab. QuickBase doesn’t ask you to confirm the deletion and there’s no Undo button, so make sure you really want to delete the element. This is especially important for text boxes, because you lose your text when you delete a text box.
Note
Deleting a report from the Home tab doesn’t affect the report itself or the application where the report lives. If you accidentally delete a report, simply add the same report again.
Managing Your Account Information
My QuickBase is the place to go when you need to change or manage information about your QuickBase account. To get started, look on the right-hand side of your My QuickBase page and click your “Signed in as” name, then select Edit User Profile. (To zip over to your User Profile page even faster, you can simply click the “Edit your user profile” link in the upper-right Welcome box.) This takes you to the User Profile page, shown in Figure 1-9.
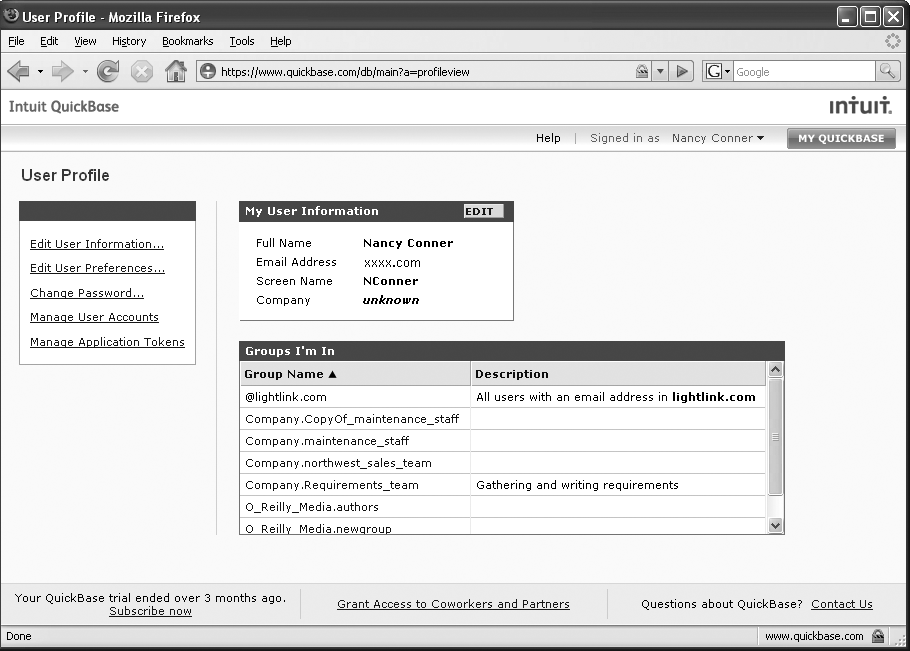
On the left-hand side of the User Profile page is a box with four links. These let you edit or otherwise manage your account.
Note
When you manage your account information, the clock is ticking. For security, QuickBase gives you up to 60 minutes to make changes—but that’s all. When those 60 minutes are up, the page expires and you lose any work you haven’t saved. So if you’re making extensive changes to your account information, be sure to save frequently.
Edit user information
You can change your first name, last name, or email address. (If you type in a new email address, you’ll have to verify it by responding to an email.) You can also create a screen name. The main advantage of having a screen name is that it hides your email address; when someone looks you up through the User Picker, they see your screen name, first and last name, and the word private instead of an email address. (They can still send you email through QuickBase, but your address isn’t visible.) So if you’re the super-secret type, a screen name is a good idea. If you’ve got a screen name, you can also use it (instead of your email address) to sign in to QuickBase, saving yourself a couple of keystrokes.
Note
Individuals control their own user information. Application managers and billing account administrators can’t touch it.
Edit user preferences
They say no two snowflakes are alike, and QuickBase users have just as much variety. This section lets you manage some aspects of how you see and experience QuickBase:
Icon style. When you look at a QuickBase table, you see a series of rows and columns. Each row represents a record—a purchase request, a client’s contact information, a work order, and so on. Each column represents a field, a piece of information within that record, such as the purchase request number, item description, estimated cost, and so on. At the beginning of each row in a table are two small buttons labeled EDIT and VIEW. To view or work with a record—to see a purchase request, for example, or to update the number of boxes of copier paper listed in the request—you click one of those buttons.
If you don’t want the labeled buttons cluttering up your table, you can change them to letters that take up less space: E for editing and V for viewing (makes sense, huh?). When setting your preference, select Descriptive if you want the labeled buttons or Small if you want the symbols.
Newsletter. QuickBase sends out an occasional newsletter with news and info. If you want to receive it, turn on the checkbox. If you change your mind, come back and uncheck the box.
Edit contact preferences. Click the link at the bottom of the User Preferences box to limit how much promotional contact you have with QuickBase. You can turn on checkboxes to indicate that you don’t want promotional phone calls, email, or postal mail from QuickBase. (You’ll still get messages related to your QuickBase account, such as service messages and renewal notices).
Change password
You can change your QuickBase password whenever you like. (For security, it’s not a bad idea to change your account password every few months.) Just type in your current password, and then type in the new one and confirm it. Click Save Changes and you’ve got yourself a new password.
Manage user accounts
QuickBase lets you have several different accounts all associated with the same email address. (These are really several different screen names linked to one email address. QuickBase treats each screen name like a separate account.) Why would you want to do this? One reason is if you’re a manager setting up roles (Creating a Brand-New Role) for an application. To see what the different roles can do, you can create several different accounts tied to your own email address, assign different roles to each account, and then see how the restrictions associated with a role affect users in that role.
To create multiple accounts (each using a different screen name) for your email address, follow these steps:
From your My QuickBase page, click your “Signed in as” name→Manage User Accounts.
This opens the Multiple User Accounts page, shown in Figure 1-10.
Click “register with a new screen name”.
The Register page opens, with your email address already filled in.
Type in the screen name and password for the new account, turn on the Terms of Service agreement checkbox, and then click Register.
QuickBase sends a verification email to your registered email address.
Check your email. When the verification email arrives from QuickBase (it’ll probably show up within a couple of minutes, but could take up to an hour), open it and then click the verification link.
As soon as you respond to the email from QuickBase, your new account is ready. The new screen name is linked to the name and email address you first used to open your QuickBase account.

Note
When you have more than one account associated with your email address, you need to let QuickBase know which screen name represents your main account, which QuickBase calls your default account. (This is the account you use most. If you’re creating a new screen name to test permission levels, for example, you don’t want to make the test screen name your default account. To select or change your default account, start from My QuickBase and select “Edit your user profile”→Manage User Accounts. Turn on the radio button next to the screen name you want as your main account, and then click OK.
To sign in with an alternate account, use that account’s screen name on the Sign In page.
Tip
Need to change your name in your QuickBase account? Maybe you got married or divorced, had a religious conversion, or woke up convinced you’d be much happier going by Twinkle Starshine from now on. To change your name in QuickBase, start from your My QuickBase page. On the right-hand side, select “Edit your user profile”. Alternatively, click the arrow next to your “Signed in as” name, and then click Edit User Profile. Either route gets you to the User Profile page, where you’ll see a box called My User Information. In that box, click the Edit button. In the User Information box that opens, type in your new name, and then click Save Changes.
Managing Your Billing Account
If you’re the first person in your organization to create a QuickBase account, then you’re also the proud parent of a billing account, which is how Intuit keeps track of how many people in your company are using QuickBase (that number’s important, since subscriptions come in 10-, 100-, 500-, 2,000-user varieties). Fortunately, you don’t have to worry about any of these money or subscriber-count issues unless you’re the billing account administrator. (You can figure this out by looking at the left-hand side of your My QuickBase page: if there’s no link that says “Manage your billing account,” skip ahead to Alert! Alert! and thank the bean counters that someone else is footing the bill.) If you’re still reading, that means you need to know how QuickBase billing works.
When you open a new account, you can create applications and invite others to join them (and those folks, in turn, can invite other people to join). This means that many QuickBase users can be associated with one billing account. If you start with a free 30-day trial of QuickBase, for example, up to 10 people can use that one billing account—or more than 10 if you subscribe to a QuickBase service plan at the end of those 30 days. Regardless of how many people are associated with your billing account, you’ll want to know your way around the Manage Billing Account page, which is where you, oh generous bill payer, can keep tabs on where your money is going. To get started, on your My QuickBase page, click the “Manage your billing account” link, which takes you to the Manage Billing Account page, shown in Figure 1-11. This page has six tabs—Summary, Applications, Groups, Permissions, Deny, and Users with Access—each of which are discussed in the sections that follow.
Note
The billing account administrator doesn’t control user access to applications (that’s the application manager’s job), but a billing account administrator does have the power to deny a user access to the entire account—and therefore any application within it.
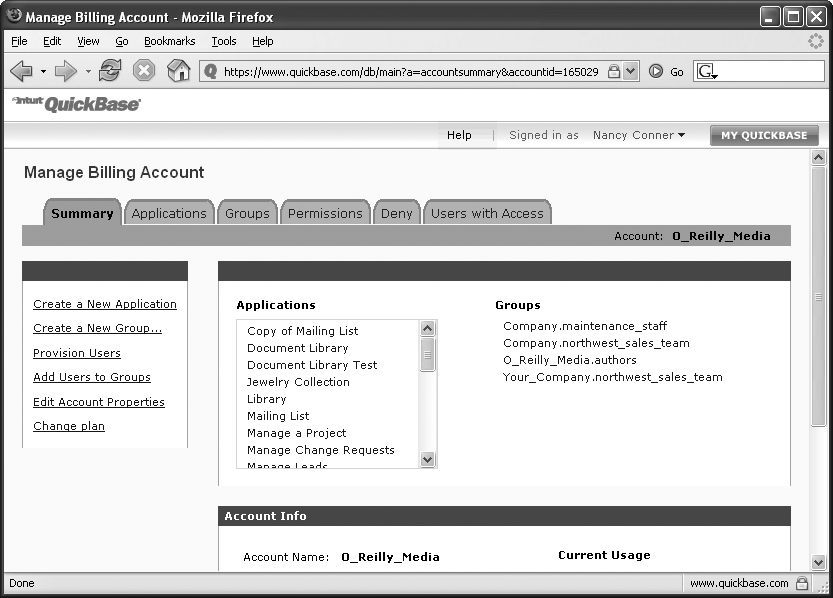
Summary tab
The Summary tab gives you information about your account, including applications, service plan and usage statistics, time zone, and company information.
Tip
Click the name of your plan (QuickBase Trial Plan, QuickBase 100+ Monthly Plan, and so on) for a quick reminder of that plan’s limits: number of users, space for applications, and space for files. Compare those figures with the Current Usage stats to see whether you need to upgrade your service plan. Details on each plan are shown in Table 1-1.
Use the left-hand menu to perform these actions:
Create a New Application. Chapter 6 and Chapter 7 tell you everything you ever wanted to know about creating applications, whether you want to use a QuickBase-provided template or start from scratch.
Create a New Group. Creating a group helps you organize your users: it’s simply a set of users you gather together into a named entity. You can also create a new group from the Groups tab (Groups tab discusses groups in more detail).
Provision Users. Imagine you’re dealing with a new consultant or employee, and you want this person to have access to some of your account’s applications—but not others. Before an application manager even invites a new user to join, you—or anyone with full management privileges—can provision that user. Provisioning a user means you assign him to a group that you choose. Then, when an application manager invites that new user to join an application, the new guy’s permissions are already set, according to the group you added him to.
Add Users to Groups. Clicking this link whisks you over to the Groups tab, where you can find users and add them to your groups.
Edit Account Properties. Here, you can do the following:
Edit the name of your organization’s QuickBase account: You can name your account whatever you like, just make sure that the name is at least four characters and does not include any spaces.
Grant (or take away) permission to make applications available to anyone on the Internet: Turn on the checkbox if you want to allow anyone (even non-QuickBase users) accessible to your applications; make sure the box is clear if you don’t.
Change the email address for your billing account.
Change your account’s time zone: The time zone you select is the one that determines the dates and times for all applications in the account.
Review the QuickBase terms of service.
Change plan. If you’re on the 30-day free trial, you can subscribe to one of QuickBase’s four service plans shown in Table 1-1. Whichever level of plan you choose, you can pay either monthly or annually.
Note
Annual plans simplify paying for your QuickBase account, but there are a few things you should know about paying annually. If you choose to pay once a year, you’ve signed up for a full year of service. That means if you decide to cancel or downgrade your QuickBase account, you don’t get a refund or credit. And if you sign up for an annual account, you can’t switch to a monthly account. But here’s the good news: You can upgrade at any time. So as the number of QuickBase users in your organization grows, so can your service plan.
Applications tab
This tab shows you a list of all the applications in your account, and displays the following info:
Application name
Number of users of that application
Application size in KB
Size of any attached files, also in KB
Note
As billing account administrator, it’s part of your job to keep an eye on the size of the applications in your billing account. Each billing plan allows only so much space for your applications and attachments, as explained in Table 1-1, so it’s up to you to rein in any application managers who are hogging all the space. (If you’re not sure which plan your company has or what its limitations are, you can easily find out. From My QuickBase, click “Manage your billing account”. On the Summary tab of the Manage Billing Account page, look in the Account Info section for Plan. Click the name of your plan to get a pop-up window that spells out how much space your plan has for applications and attachments, and also the number of users.)
Number of tables
Application manager’s name
Notes
Date someone last modified the application
If you want to email an application’s manager, click the manager’s name. In the box that opens, click Send Mail, type in your subject and message, and then click Send.
Tip
The fastest way to delete an application is to turn on the checkbox to the left of the application’s name, and then hit the Delete Selected button in the very top or very bottom row of the Applications table. You can select and delete a bunch of applications at once.
A busy organization is likely to have tons of applications showing up on this page. You don’t have to scroll through them all to find the one you want. Above the table of applications is the Find Applications box. Type in the name of the application you want (or some part of it), and then click Find. The table shrinks down to display only those applications that have your search term in the name.
Click the name of any application to get more detailed information about the application or to perform one of these actions:
Show application stats. This repeats some of the information from the main Applications tab, but adds details like creation date, number of records or documents in the application, and how many times someone’s visited that application: both the total number of hits and today’s hits. (QuickBase shows you the hit count for all users; it doesn’t break that number down to tell you that Gilbert Allen has opened the application 15 times today while Sue Caldwell hasn’t looked at it since last Tuesday.)
Delete application. This is how you remove an application from QuickBase—permanently. To make sure you don’t delete an application by mistake, you have to confirm your decision to get rid of the application.
Transfer application. To switch management of an application from one user to another, click this link, and then type in the screen name or email address of the person you want to take over the application. The person you transfer to has the option to accept or reject the transfer.
Note
When you transfer an application, you can transfer the application’s management, its ownership, or both. What’s the difference? Money, mostly. An application’s manager is its main administrator, but the manager doesn’t incur any billing obligations. An application’s owner represents the account to which that application is billed.
Groups tab
Groups are a convenient way to organize users. For example, say you’re gathering the business requirements for a Web site you’re thinking about launching. You need to be able to share drafts of your evolving specifications with a wide range of people: your requirements-gathering team, end-users, managers, corporate sponsors, and developers. (Marketing and Legal are going to want a peek at them, too.) Even though you need to give all those people access to your draft specification, you don’t want just anybody jumping in and making changes to the document. So you can sort people into groups, and then assign each group its own role (Assign a group a role). You might have a group called viewers who can read documents (but not edit them) and another group called team members, who can add new documents and edit existing ones. That way you don’t have to worry about who’s getting their thumbprints all over your spec.
If you can create and share an application, you can also create a group. What makes groups especially useful is that they let you invite users and assign roles en masse.
Note
For the whole story on creating and working with groups, check out Chapter 9.
The main page of the Groups tab shows you the names of any groups you’ve created and how many users are in each group. Click a group’s name to go to the Manage Group page, where you can find more information about that group: the group’s description, who’s in it, each person’s permission level (member, manager, or both), and the billing account the group belongs to.
The Manage Group page’s left-hand menu also lets you do these nifty things:
Add users to the group, one at a time or en masse. You can even add a whole group to another group.
Copy the group.
Delete the group.
Edit the group’s properties: Change the group’s name or description, associate it with a different billing account, or let other managers help out with group management.
List applications accessible to this group.
Permissions tab
This tab shows you a list of users who have your permission to create and manage applications within your account. From here, you can email those users, change their level of management (the options are full management, support level, and no management), bestow or take away the ability to create applications, and add or remove users who have management privileges.
What do the different management levels entail? Full management means that a user can delete any application or group in the account, view an application’s permissions list, edit the membership of any group in the account, and grant a user account-management permission. In other words, dole these privileges out with caution: Full managers have the same powers as the billing account administrator (Managing Your Billing Account).
Support-level management is more limited—these managers can’t, for example, edit group membership or delete an application managed by someone else. They also lack the power to change the billing plan and set administrative rights like the ones discussed in this section. What these managers can do is manage applications: create new ones, create and assign roles, invite and manage users, and all the neat stuff described from Chapter 6 onward.
Note
The names listed on the Account Permissions page belong to people who have permission to create or manage applications. If a person’s not on the list, she may still be able to use the applications in your account, she just can’t create or manage them. You can add people to this list, though. If you want to grant account-management powers to someone, add the person to this list and then set permissions.
Deny tab
This tab lets you deny any user access to all applications in your account. It’s handy when, for example, an employee leaves your organization and you don’t want that person to come back and fiddle with your data.
To deny someone access to your applications, follow these steps:
Click Add User. (This might seem counterintuitive, since you’re excluding a user, but what you’re really doing is adding this user to your Deny List.)
The Select a User box opens.
Click the drop-down arrow on the “Make a selection” menu. Select “Search for a specific user”.
The Search for a User box appears.
In the text box, type in the name, email address, or screen name of the user you want to deny. Click OK.
The user’s name appears in the Search Results area of the Select a User box.
If the name’s not already highlighted, select the name you want. Click the Add button.
The name of the user you’re denying jumps to the right-hand list of names.
Repeat if you want to deny more than one user. When all the users you want to deny are in the right-hand list, click Done.
The name of the user you’ve denied appears in the Deny List on the Deny tab of your Manage Billing Account page.
Click Save Changes.
You’ve locked out that user. Users on the Deny List have zero access to the applications in the account, even if someone has given them permissions to access a particular application.
But what if Harold H. Brown has retired to Maui, but Harold G. Brown is still on your team—and you denied access to the wrong Hal? If you make a mistake and deny a user who should have access, it’s easy to fix. On your Manage Billing Account page, click the Deny tab and find the user whose access you want to restore. Turn on the checkbox in the “remove” column (to the left of the user’s name), and then click Save Changes. Voilà—Harold G. Brown is back in business. (Don’t forget to go back and deny Harold H. Brown, just in case he gets tired of sipping daiquiris on the beach and wants to peek at some data that’s no longer his business…)
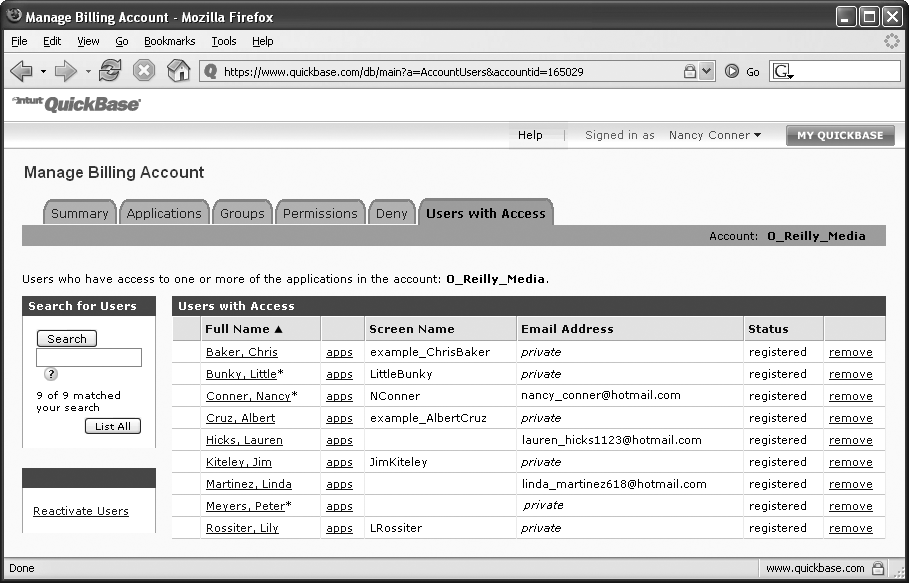
Users with Access tab
This tab shows you a list of all users who have access to applications within the account, as shown in Figure 1-12. From this tab, you can take the following actions:
Note
QuickBase hides the email addresses of users who’ve chosen a screen name, marking their email addresses private. If you want to contact someone with a private email address, click his name and send the email through QuickBase.
View all applications that a user has access to. Click the “apps” link to get this information.
Check a user’s status. If you’ve invited someone to join an application and they haven’t responded, you can follow up with that person; just click his name to fire off an email.
Remove a user. When you click the “remove” link, QuickBase gives you the option to deny the user access to the QuickBase applications in your account or simply to remove that user from a group you’ve assigned her to (or both). For example, if Tina Kulak jumps from Sales to Marketing, you still want her to have access to your QuickBase applications—just the appropriate ones for her new role. So you’d take Tina out of the Sales group and add her to the Marketing group. (See Creating a Group and Adding Members to learn how to add a user to a group.)
Tip
You can also deactivate a user by clicking the “remove” link—if you “own” the user’s email address; see Deny? Deactivate? What’s the Diff?.
Search for a user. Use the left-hand Search box to find a particular user in a long list. Just type in the name you’re looking for and click Search. To return to the full list, click List All.
Reactivate a user. If you’ve deactivated someone’s QuickBase account (see Deny? Deactivate? What’s the Diff?) and want to restore that person’s access to the site, click the Reactivate Users link.
Alert! Alert!
The right-hand side of your My QuickBase page displays an alerts section, shown in Figure 1-13. An alert is a message about your QuickBase account that typically deals with one of the follwing issues:
Another QuickBase user has invited you to join an application.
Another QuickBase user would like you to take over management or ownership (or both) of an application; see Note for an explanation of how these two terms differ.
QuickBase is letting you know that your account is getting close to its service plan limit.
Note
Busy people can easily overlook a new alert on their My QuickBase page. To make sure that you don’t miss an important alert, QuickBase also emails you whenever you receive a new alert. The email has a link you can click to go straight to the alert.
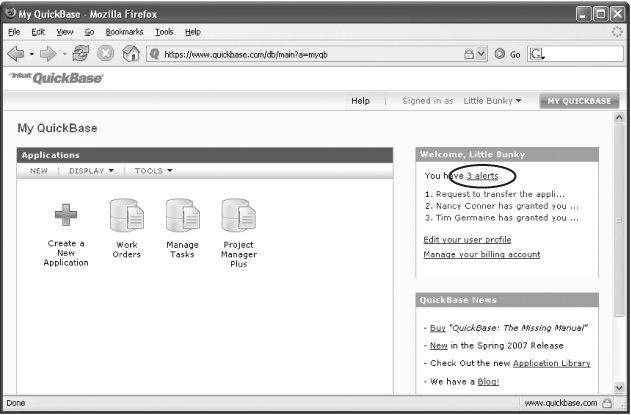
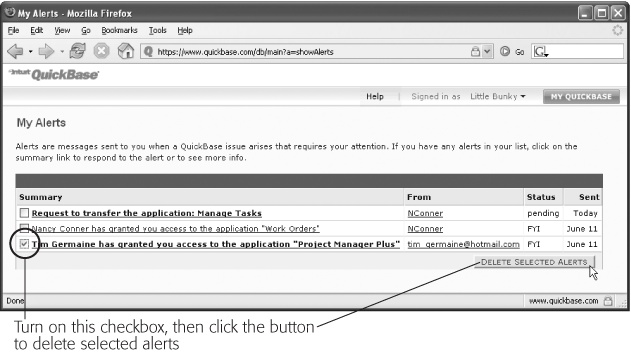
To read an alert, go to the Welcome box and click the “alerts” link. This opens your My Alerts page, shown in Figure 1-14. Find the alert you want to read in full and click its title. If an alert requires some action from you (for instance, if someone wants you to take over the management of an application), follow the instructions inside the alert. For example, to accept an application transfer, click Continue→Accept.
You probably don’t want dozens of alerts hanging around after you’ve read them. To delete an alert, turn on the checkbox to the left of the alert’s title (same goes for any others you want to delete), and then click Delete Selected Alerts.
Getting Started with Applications
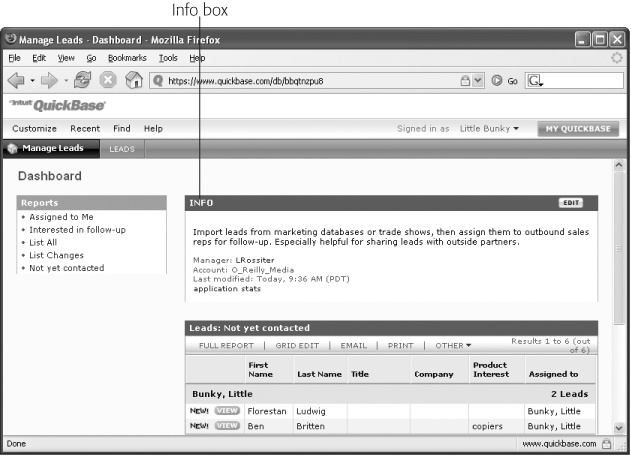
Just as your My QuickBase page is your control center for everything you do in QuickBase, each application has its own home page: the Dashboard (Figure 1-15). The Dashboard is your starting point for working with any application. Usually, it’s the page you see when you open an application. (If you’re invited to join an application [Accepting an Invitation], the link in the email welcoming you takes you directly to the application’s Dashboard.)
Getting to the Dashboard of any application is a snap. From My QuickBase, look in the Applications box for the application you want, then click its name (in Details display) or its picture (in Icons display). Or, if you’re knee-deep in an application’s records and want to get back to the Dashboard, click the application’s name in the upper-left corner of any page in the application. (Next to the application’s name is a little picture of a house, reminding you to click here to return to this application’s home page—its Dashboard.)
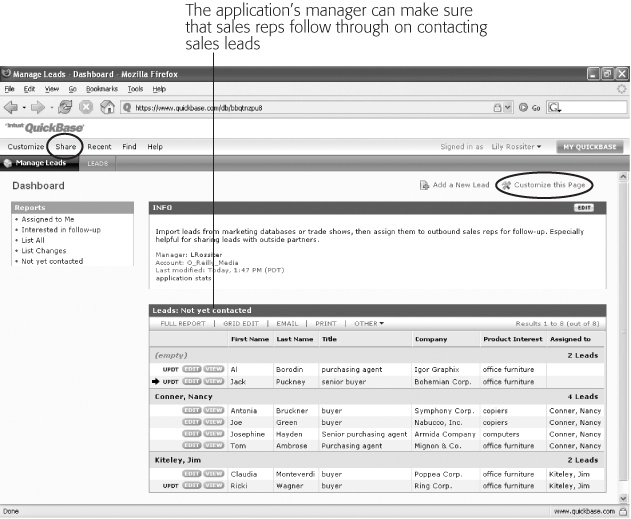
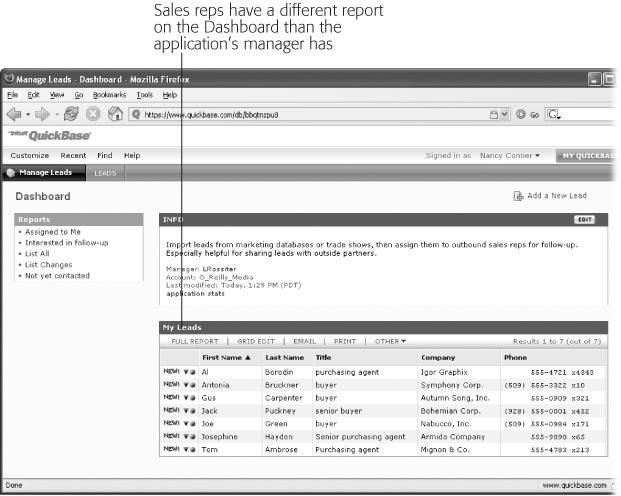
Administrators can create and assign different Dashboards for different roles (for an explanation of roles, see Managing Roles). So if you’re looking at a Sales Leads application, for example, you’ll have a different Dashboard depending on whether you’re a Viewer, a Sales Rep, or a Manager. Figure 1-16 and Figure 1-17 illustrate the difference between the Sales Leads Dashboards for a manager and a sales rep.
Administrators can do all sorts of nifty things from their Dashboard (see The Administrator’s Dashboard for details). If you’re a QuickBase user who’s joining someone else’s application, your options are more limited (but almost as nifty). You can:
Open an existing report (a report is how QuickBase displays your data).
View a particular record (a piece of information your application holds, like a purchase request or a work order).
Add a record to the application.
Modify an existing record within the application.
Find records you’ve worked on recently.
Create a new report.
Modify a report you’ve created—as long as you have Save Shared Reports permission.
Create notifications to alert you about additions or modifications to the application’s data.
The sections that follow dish up all the juicy details.
Open an Existing Report
Reports are an amazingly helpful QuickBase tool: They let you display your application’s data in different ways to make it easier to find what you’re looking for.
For example, in the Manage Leads application shown in Figure 1-15, a sales rep might want to see only those leads that have expressed interest in a follow-up call—a report already exists to put that information right at his fingertips. The sales rep would select the “Interested in follow-up” from the left-hand Reports menu, then pick up the phone and start calling.
As another example, in a Work Orders application, a property manager might want to know how many repairs the tenants are paying for versus how many the management company is paying for. To find out, she’d choose the “% of Billable vs Nonbillable” report to see this info in an easy-to-read chart. In contrast, a maintenance supervisor might want to see all the work orders for the current month or a list of all work orders ranked by priority. And a maintenance worker would want to check out the My Assigned Work Orders report. The different reports let people who need the data see it in the way that makes most sense to them.
Chapter 2 explains everything you ever wanted to know about reports (including how to create your own). The Dashboard page’s left-hand Reports menu lists a smorgasbord of pre-existing reports to choose from. Click any title to display the report you want.
View a Record
No matter how much data you pack into your QuickBase application, it won’t do you any good if you can’t look at it. Imagine attempting to fix a software bug when you don’t know what the problem is, or trying to figure out this month’s payroll when you can’t see anybody’s timecard. Kind of like playing darts while blindfolded.
When you want to look at a particular record, click the record’s Display button (it’s either a button that says VIEW or a small blue dot, depending on how you’ve set your User Preferences—see Managing Your Account Information). The record opens so you can see its details.
Add or Modify a Record
It’s easy to add a new record to an application. For example, say you work in a property management office and a tenant calls to report a broken second-story window that needs fixing, thanks to Junior’s amazing pop fly. You go to the Dashboard page of the Work Orders application, look in the upper-right corner for the “Add a New Work Order” link, and click it. (If you’re working in a multi-table application, you need to find the table you want to add the record to. Table names appear in the blue bar at the top of the page: click the table name, and then click “Add a New Record”.) The Add Work Order page opens, letting you create, prioritize, and assign the work order (thanks to the easy-as-pie maneuvers you’ll learn in Chapter 4, you can have QuickBase automatically email your instructions to your expert window-fixing specialist). When you’ve finished entering the information, click Save and you’re done. Help is on the way to your tenant—until the next time the kids play baseball.
Whatever kind of records you’re working with in an application, you can easily add a new one. If your application consists of just one table holding just one type of record, look for the upper-right “Add a New Record” link. The exact name of this link depends on the kind of records your table holds. For example, in a Document Library application, the link will say “Add a New Document”, and in a Purchase Order application, the link will say, “Add a New Purchase Order”. If an application contains more than one kind of record—such as work orders and rental units—you need to choose the right table before you can add a new record. So if your real estate management company has bought a new apartment complex and you need to create a new record for each unit, you’ll look in the blue bar at the top of the page for the table name (in this case Properties/Units). Click the table name, and then select “Add a New Record”—again, the name of the record depends on the type of record you’re adding.
Modify a record
Sometimes you need to change the information in an existing record. For example, say you’ve scheduled the work order to fix a tenant’s broken window pane, and then the same tenant calls to report that an unfortunate croquet accident has demolished the screen door. You want to update the work order to include both repairs.
The first thing to do is find the record. A quick way to do this is to open a report that you know holds the record. So start by checking out the Dashboard page’s left-hand Reports menu. Looking back at Figure 1-15, you might choose Current Month’s Scheduled Work Orders or Open Work Orders by Priority.
Find the record you want (see the next section), and then click Edit. (This might be a button with the word “Edit” or the letter E, depending on how you’ve set your User Preferences.) The Edit Work Order page opens. Make your changes, and then click Save. Then hope the tenant sends the kids to a movie before they decide to play murder ball.
When you edit an individual record, QuickBase gives you several options of how to proceed after you’ve made your changes. These options appear as buttons at the bottom of the Edit page:
Click Save to save your changes and return to the last page you viewed.
Click Save & Next to save your changes to this record and jump ahead to the next record.
Click Skip to go to the next record without making changes to this one.
Click Delete to erase this record from the application.
Find an Existing Record
When an application grows to hold hundreds and hundreds of records, you can’t easily find the record (or group of records) you’re looking for just by eyeballing the list. That’s what Find is for.
To search for records in an application, click Find in the application’s menu bar. The Find box opens, with a text box where you can type in what you’re looking for: a product name, an address, a date. Type in your search criterion and click Find. QuickBase takes you to the Search Results page, which lists all matching records.
Tip
To quickly find a record you’ve worked on recently, click Find, and then scan the list of records under Recent, at the bottom of the Find box. QuickBase lists the last eight records you’ve worked on. Click any record to open it.
What if typing a search term into the Find box still doesn’t dig up the record you’re looking for? Try Advanced Find. From the menu bar, click Find→Advanced Find. QuickBase opens the Advanced Find page, where you can tell QuickBase what to search for in specific fields. For example, if you can’t recall the name of the sales lead who called before lunch to cancel her appointment, but you just know her last name begins with a W, it’s not going to help you to search for every record that contains the letter w. But with Advanced Find, you can tell QuickBase to search the Last Name field and return all records that start with a W. You can search more than one field at a time, too, to narrow your results and home in on just the record you’re looking for.
Find a Record You’ve Worked on Recently
If you’ve just added or edited a record and you need to find it, the Dashboard page makes it easy. Say you’ve updated the price list for your office supply company, and then 10 minutes later you realize that you made a mistake: You mixed up the price of a new super-fast, multi-featured photocopier with the price of a case of toner. Before your in-the-field sales reps start giving photocopiers away, you want to fix the error—fast.
If you’re looking for one of the last few records you’ve worked with, click Recent in the menu bar and see which records it lists. But maybe you’ve just modified several dozen records—and Recent can’t show them all. You can still find the record quickly. On the Dashboard page of the application that holds your price list, look in the left-hand reports menu for List Changes. Click it, and the page that opens displays new and recently updated records. From there, click the Edit button to change a record or the Display button to view it.
Create or Modify a Report
You need permission to create and modify reports. If you don’t have permission, you’ll know—the Customize button on the Dashboard page’s menu bar will not have “Create a new” as an option. To get permission to create or change shared reports, email the application’s manager. (To find an application’s manager, look in the Dashboard page’s Info box; click the manager’s name to send an email.)
Create a new report
You can create a new report from an application’s Dashboard page (or from any other page in the application, for that matter). Just follow these steps:
On the menu bar, click Customize→Create a new→Report. (If you’re in a multi-table application, choose the table for which you’re creating the report.)
This opens the Report Builder.
Select the kind of report you want to create: Table, Grid Edit, Summary, Calendar, Chart, Timeline. (Chapter 2 tells you more about each kind of report, including what they look like and how they can present your data.)
A box appears that lets you choose the data you want to display and how you want to display it.
Make your selections, and then click Display.
QuickBase shows you how the new report will look.
If you’re not happy with the displayed report, click the upper-right “Customize this Report” link to return to the Report Builder.
Back in the Report Builder, you can make changes and display the new report again.
When you’re happy with the new report, look at the top of the screen for New Report: Save. Click the Save link.
A box appears, asking you to name the new report and select whether you want it to be a Personal Report or a Shared Report. Personal Reports are for your own viewing pleasure; no other QuickBase users can see them. (If you don’t have permission to save shared reports, Personal Report is your only option.) Shared Reports are available to everyone who has access to the application. If you select Shared Report, the box expands so you can specify which roles have access to your new report and, if you want, write a description to explain what’s in it.
When you’ve filled out the Save Report As box to your satisfaction, click OK.
Your new report is ready to go!
Note
Chapter 2 gives you all the details about the different kinds of reports and how to create them.
Modify a report you’ve created
To change a report that you’ve created and saved, first open the report. In the blue bar at the top of the page, click the type of record the report holds (such as Leads, Units, or Tasks). The menu that appears is divided into Personal Reports (if any) and Shared Reports. Click the name of the report you want to change. When the report opens, click the upper-right “Customize this Report” link. The Report Builder opens. Make the changes you want, just as you would in step 3 of the previous section, and follow the steps from there.
Stay on Top of Things with Email Notifications
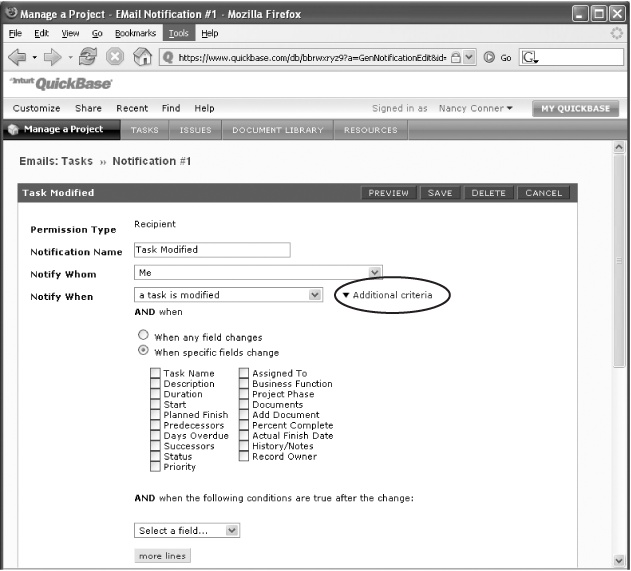
When a record changes, QuickBase flags it with an update icon. But those flags can multiply fast, and you probably care more about some changes than others. If you want to know when a record changes in a specific way—a record is deleted, for example, or someone writes a new response to a survey you designed—you can have QuickBase send you an email notification of the change.
From any page in the application, click Customize→Create a new→Email Notification. (If you’re in a multi-table application, QuickBase asks you which table you want. See Single-Table or Multi-Table? for more on multi-table applications.)
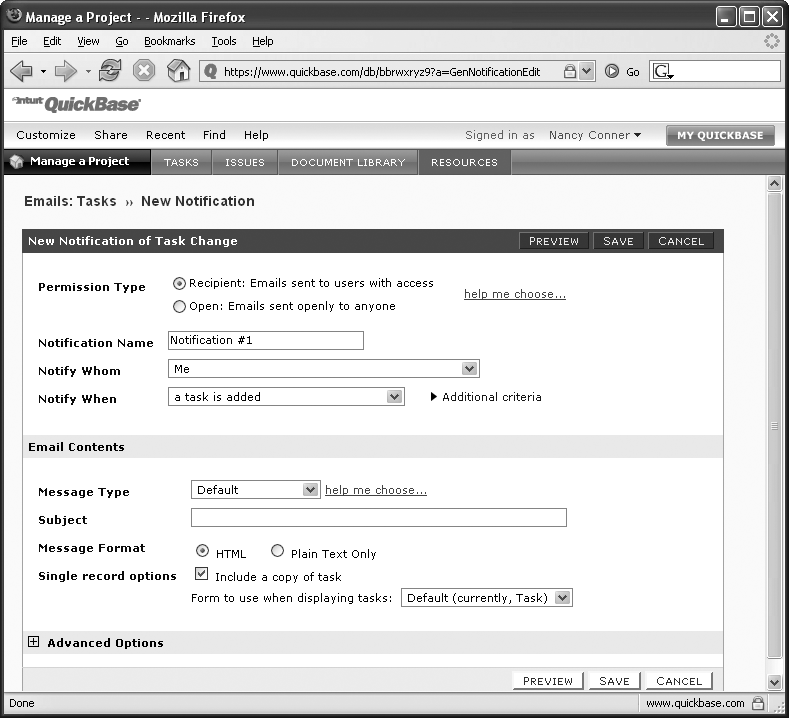
The Emails: New Notification page shown in Figure 1-18 opens.
Type in your information.
In the Notification Name box, give the notification a name, like New Task Added (this makes it a lot easier to manage multiple notifications). Make sure that Notify Whom is set to Me (see Sending Notification Emails to Others to learn about sending email notifications to others). Select when you want to be notified: you can receive a notification when a record is added, modified, or deleted, or any combination of the three. Type in a Subject for the email, or leave it blank for QuickBase to use its usual subject line, which depends on the application and the kind of change you want to know about—if you’ve set up a notification for whenever someone adds a new task to your project management application, for example, the subject line says something like Manage a Project: Tasks — Task #86 Added.
Use QuickBase’s default message (a basic notification regarding the type of change) or select Custom to write your own (Signing Up for Emails for Yourself tells you more about creating custom messages). Next, decide whether you want your message in HTML (which can display graphics) or plain text. Finally, turn on the “Include a copy of record” checkbox if you want QuickBase to include the new or changed record in the email. (In Figure 1-17, this checkbox says “Include a copy of task” because that’s the kind of record you’re dealing with in the Tasks table.) When you’re done, click Preview (to check out the email notification) or Save (to start the notifications rolling in).
Get Help When You Need It
QuickBase is so fast to learn and easy to use that you can be managing records like an old pro in a matter of minutes. Sometimes, though, you have a question and want the answer fast. With QuickBase’s extensive Help files, the help you need is just a click or two away.
QuickBase centralizes its Help resources in the Support Center, shown in Figure 1-21. To get there, click Help→Help & Support. A new window opens, displaying the QuickBase Support Center. At the top of the page is a Search box that lets you get right down to business: Type in your topic and search all of QuickBase’s resources (or select the resource you want—Help Files, KnowledgeBase, and so on—from the drop-down list).
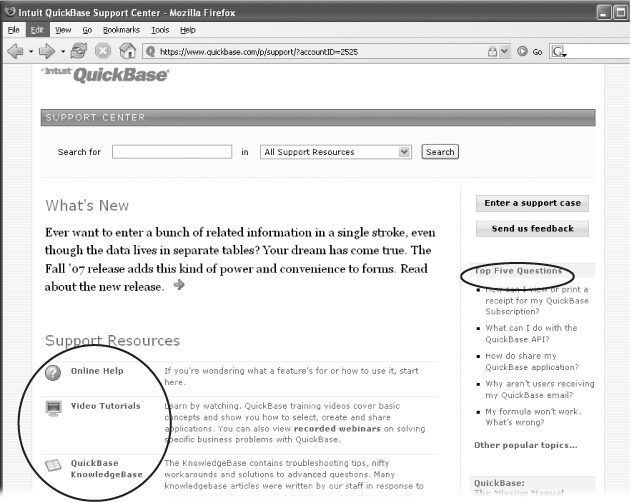
In its Support Resources menu, the Support Center gives you a number of options for finding the help you need:
Online Help. This is a traditional Help file. Click this link to search for help by topic. There’s also a QuickStart Guide that covers the most common QuickBase activities, such as building an application or customizing forms and reports.
Video Tutorials. If you like to see tasks demonstrated before you try them, click this link. It leads to about a dozen videos that show you exactly how to perform frequent QuickBase tasks: add a field or table, create a relationship between tables, customize your application, and more.
Note
You need to have Adobe Flash Player installed on your computer to view QuickBase’s video tutorials. Don’t have Flash? Download the latest version at www.adobe.com/downloads.
QuickBase KnowledgeBase. This page brings together often-asked questions and their answers, written by QuickBase staff. Topics range from beginner (Getting Started, Adding Records, Importing/Exporting) to advanced (Exact Forms, Formulas, the QuickBase API). Check the KnowledgeBase for tips and tricks for working with QuickBase, as well as troubleshooting suggestions.
Tip
If you’re writing formulas to customize your applications, the Knowledge Base can help you get your formulas right. From any page in QuickBase, select Help→Help & Support→QuickBase KnowledgeBase. Then, look at the Table bar (the blue bar at the top of the page) for two helpful buttons: Formula Functions Reference, which explains the various functions you can use in formulas, and Sample Formulas, which shows actual formulas you can borrow, adapt, or steal.
QuickBase Community Forum. Get by with a little help from your QuickBase friends. The Community Forum is where users like you can post questions and get answers from experienced application designers and QuickBase staffers. In the Community Forum, you can post a question or search to see whether your question has already been asked and answered.
Developer Information. If acronyms like API, SDK, and XML are more than random groups of letters to you, you’ll probably be interested in this page, which has links to relevant documentation.
Tip
Looking to hire someone to develop a custom QuickBase application? Check out the Developer Information link (Help→Help & Support→Developer Information). In the left-hand menu, click QuickBase Developers for a list of developers who have experience working with QuickBase. Just be sure to check out any developer thoroughly before you offer a contract; Intuit lists these developers for your convenience but offers no guarantees about their work.
Service Notes. Click this link if you need to know whether any scheduled maintenance is coming up or to see the reason for disrupted service (which doesn’t happen very often—QuickBase averages normal operation better than 99% of the time).
The QuickBase Support Center also offers a quick and easy route to reading this book online: Look in the lower-right part of the page for the QuickBase: The Missing Manual section and click the “Read the book online” link.
Tip
Some applications have a customized Help file, written by the application designer. When you click Help, look for QuickStart Guide on the menu that opens. Not all applications have one, but when it’s there, the QuickStart Guide targets the issues that apply to this particular application—and can save you time searching for answers elsewhere.
Get QuickBase: The Missing Manual now with the O’Reilly learning platform.
O’Reilly members experience books, live events, courses curated by job role, and more from O’Reilly and nearly 200 top publishers.

