
Linux Network Administrator's Guide, 2nd Edition
By Olaf Kirch & Terry Dawson2nd Edition June 2000
1-56592-400-2, Order Number: 4002
506 pages, $34.95
|
|
|
|
|
Linux Network Administrator's Guide, 2nd EditionBy Olaf Kirch & Terry Dawson2nd Edition June 2000 1-56592-400-2, Order Number: 4002 506 pages, $34.95 |
Chapter 15
IPX and the NCP FilesystemContents:
Xerox, Novell, and History
IPX and Linux
Configuring the Kernel for IPX and NCPFS
Configuring IPX Interfaces
Configuring an IPX Router
Mounting a Remote NetWare Volume
Exploring Some of the Other IPX Tools
Printing to a NetWare Print Queue
NetWare Server EmulationLong before Microsoft learned about networking, and even before the Internet was known outside academic circles, corporate environments shared files and printers using file and print servers based on the Novell NetWare operating system and associated protocols.[1] Many of these corporate users still have legacy networks using these protocols and want to integrate this support with their new TCP/IP support.
[1] Novell and NetWare are trademarks of the Novell Corporation.
Linux supports not only the TCP/IP protocols, but also the suite of protocols used by the Novell Corporation's NetWare operating system. These protocols are distant cousins of TCP/IP, and while they perform similar sorts of functions, they differ in a number of ways and are unfortunately incompatible.
Linux has both free and commercial software offerings to provide support for integration with the Novell products.
We'll provide a brief description of the protocols themselves in this chapter, but we focus on how to configure and use free software to allow Linux to interoperate with Novell products.
Xerox, Novell, and History
First, let's look at where the protocols came from and what they look like. In the late 1970s, the Xerox Corporation developed and published an open standard called the Xerox Network Specification (XNS). The Xerox Network Specification described a series of protocols designed for general purpose internetworking, with a strong emphasis on the use of local area networks. There were two primary networking protocols involved: the Internet Datagram Protocol (IDP), which provided a connectionless and unreliable transport of datagrams from one host to another, and the Sequenced Packet Protocol (SPP), which was a modified form of IDP that was connection-based and reliable. The datagrams of an XNS network were individually addressed. The addressing scheme used a combination of a 4-byte IDP network address (which was uniquely assigned to each Ethernet LAN segment), and the 6-byte node address (the address of the NIC card). Routers were devices that switched datagrams between two or more separate IDP networks. IDP has no notion of subnetworks; any new collection of hosts requires another network address to be assigned. Network addresses are chosen such that they are unique on the internetwork in question. Sometimes administrators develop conventions by having each byte encode some other information, such as geographic location, so that network addresses are allocated in a systemic way; it isn't a protocol requirement, however.
The Novell Corporation chose to base their own networking suite on the XNS suite. Novell made small enhancements to IDP and SPP and renamed them IPX (Internet Packet eXchange) and SPX (Sequenced Packet eXchange). Novell added new protocols, such as the NetWare Core Protocol (NCP), which provided file and printer sharing features that ran over IPX, and the Service Advertisement Protocol (SAP), which enabled hosts on a Novell network to know which hosts provided which services.
Table 15.1 maps the relationship between the XNS, Novell, and TCP/IP suites in terms of function. The relationships are an approximation only, but should help you understand what is happening when we refer to these protocols later on.
Table 15.1: XNS, Novell, and TCP/IP Protocol Relationships XNS Novell TCP/IP Features IDP IPX UDP/IP Connectionless, unreliable transport SPP SPX TCP Connection-based, reliable transport NCP NFS File services RIP RIP Routing information exchange SAP Service availability information exchange IPX and Linux
Alan Cox first developed IPX support for the Linux kernel in 1985.[2] Initially it was useful for little more than routing IPX datagrams. Since then, other people, notably Greg Page, have provided additional support.[3] Greg developed the IPX configuration utilities that we'll use in this chapter to configure our interfaces. Volker Lendecke developed support for the NCP filesystem to allow Linux to mount volumes on network-connected NetWare fileservers.[4] He also created tools that allow printing to and from Linux. Ales Dryak and Martin Stover each independently developed NCP fileserver daemons for Linux that allow network-connected NetWare clients to mount Linux directories exported as NCP volumes, just as the NFS daemon allows Linux to serve filesystems to clients using the NFS protocol.[5] Caldera Systems, Inc. offers a commercial and fully licensed NetWare client and server that supports the latest Novell standards, including support for the NetWare Directory Service (NDS).[6]
[2] Alan can be reached at alan@lxorguk.ukuu.org.uk.
[3] Greg can be reached at gpage@sovereign.org.
[4] Volker can be reached at lendecke@namu01.gwdg.de.
[5] Ales can be reached at A.Dryak@sh.cvut.cz. Martin can be reached at mstover@freeway.de.
[6] Information on Caldera can be found at http://www.caldera.com/.
Today, therefore, Linux supports a wide range of services that allow systems to be integrated with existing Novell-based networks.
Caldera Support
Although we don't detail the Caldera NetWare support in this chapter, it is important that we talk about it. Caldera was founded by Ray Noorda, the former CEO of Novell. The Caldera NetWare support is a commercial product and fully supported by Caldera. Caldera provides the NetWare support as a component of their own Linux distribution called Caldera OpenLinux. The Caldera solution is an ideal way of introducing Linux into environments that demand both commercial support and the ability to integrate into existing or new Novell networks.
The Caldera NetWare support is fully licensed by Novell, providing a high degree of certainty that the two companies' products will be interoperable. The two exceptions to this certainty are "pure IP" operation for the client, and NDS server, though neither of these were available at the time of writing. NetWare client and NetWare server are both available. A suite of management tools is also provided that can simplify management of not only your Linux-based NetWare machines, but your Novell NetWare machines, too, by bringing the power of Unix scripting languages to the task. More information on Caldera can be found at their web site.
More on NDS Support
Along with Version 4 of NetWare, Novell introduced a feature called the NetWare Directory Service (NDS). The NDS specifications are not available without a nondisclosure agreement, a restriction that hampers development of free support. Only Version 2.2.0 or later of the ncpfs package, which we'll discuss later, has any support for NDS. This support was developed by reverse engineering the NDS protocol. The support seems to work, but is still officially considered experimental. You can use the non-NDS tools with NetWare 4 servers, provided they have "bindery emulation mode" enabled.
The Caldera software has full support for NDS because their implementation is licensed from Novell. This implementation is not free, however. So you will not have access to the source code and will not be able to freely copy and distribute the software.
Configuring the Kernel for IPX and NCPFS
Configuring the kernel for IPX and the NCP filesystem is simply a matter of selecting the appropriate kernel options at kernel build time. As with many other parts of the kernel, IPX and NCPFS kernel components can be built into the kernel, or compiled as modules and loaded using the insmod command when you need them.
The following options must be selected if you want to have Linux support and route the IPX protocol:
If you want Linux to support the NCP filesystem so it can mount remote NetWare volumes, you must additionally select these options:General setup ---> [*] Networking support Networking options ---> <*> The IPX protocol Network device support ---> [*] Ethernet (10 or 100Mbit) ... and appropriate Ethernet device driversWhen you've compiled and installed your new kernel, you're ready to run IPX.Filesystems ---> [*] /proc filesystem support <*> NCP filesystem support (to mount NetWare volumes)Configuring IPX Interfaces
Just as with TCP/IP, you must configure your IPX interfaces before you can use them. The IPX protocol has some unique requirements; consequently, a special set of configuration tools was developed. We will use these tools to configure our IPX interfaces and routes.
Network Devices Supporting IPX
The IPX protocol assumes that any collection of hosts that can transmit datagrams to each other without routing belong to the same IPX network. All hosts belonging to a single Ethernet segment would all belong to the same IPX network. Similarly (but less intuitively), both hosts supporting a PPP-based serial link must belong to the IPX network that is the serial link itself. In an Ethernet environment, there are a number of different frame types that may be used to carry IPX datagrams. The frame types represent different Ethernet protocols and describe differing ways of carrying multiple protocols on the same Ethernet network. The most common frame types you will encounter are
802.2andethernet_II. We'll talk more about frame types in the next section.The Linux network devices that currently support the IPX protocol are the Ethernet and PPP drivers. The Ethernet or PPP interface must be active before it can be configured for IPX use. Typically, you configure an Ethernet device with both IP and IPX, so the device already exists, but if your network is IPX only, you need to use the ifconfig to change the Ethernet device status to the following:
#ifconfig eth0 upIPX Interface Configuration Tools
Greg Page developed a set of configuration tools for IPX interfaces, which is a precompiled package in modern distributions and may also be obtained in source form by anonymous FTP from http://metalab.unc.edu/ in the /pub/Linux/system/filesystems/ncpfs/ipx.tgz file.
An rc script file usually runs the IPX tools at boot time. Your distribution may already do this for you if you have installed the prepackaged software.
The ipx_configure Command
Each IPX interface must know which IPX network it belongs to and which frame type to use for IPX. Each host supporting IPX has at least one interface that the rest of the network will use to refer to it, known as the primary interface. The Linux kernel IPX support provides a means of automatically configuring these parameters; the ipx_configure command enables or disables this automatic configuration feature.
With no arguments, the ipx_configure command displays the current setting of the automatic configuration flags:
#ipx_configure
Auto Primary Select is OFF Auto Interface Create is OFFBoth the Auto Primary and Auto Interface flags are off by default. To set them and enable automatic configuration, you simply supply arguments like these:
#ipx_configure --auto_interface=on --auto_primary=onWhen the
--auto_primaryargument is set toon, the kernel will automatically ensure that at least one active interface operates as the primary interface for the host.When the
--auto_interfaceargument is set toon, the kernel IPX driver will listen to all of the frames received on the active network interfaces and attempt to determine the IPX network address and frame type used.The auto-detection mechanism works well on properly managed networks. Sometimes network administrators take shortcuts and break rules, and this can cause problems for the Linux auto-detection code. The most common example of this is when one IPX network is configured to run over the same Ethernet with multiple frame types. This is technically an invalid configuration, as an 802.2 host cannot directly communicate with an Ethernet-II host and therefore they cannot be on the same IPX network. The Linux IPX network software listens on the segment to IPX datagrams transmitted on it. From these, it attempts to identify which network addresses are in use and which frame type is associated with each. If the same network address is in use with multiple frame types or on multiple interfaces, the Linux code detects this as a network address collision and is unable to determine which is the correct frame type. You will know this is occurring if you see messages in your system log that look like:
If you see this problem, disable the auto-detection feature and configure the interfaces manually using the ipx_interface command described in the next section.IPX: Network number collision 0x3901ab00 eth0 etherII and eth0 802.3The ipx_interface Command
The ipx_interface command is used to manually add, modify, and delete IPX capability from an existing network device. You should use ipx_interface when the automatic configuration method just described does not work for you, or if you don't want to leave your interface configuration to chance. ipx_interface allows you to specify the IPX network address, primary interface status, and IPX frame type that a network device will use. If you are creating multiple IPX interfaces, you need one ipx_interface for each.
The command syntax to add IPX to an existing device is straightforward and best explained with an example. Let's add IPX to an existing Ethernet device:
The parameters in turn mean:#ipx_interface add -p eth0 etherII 0x32a10103
- -p
This parameter specifies that this interface should be a primary interface. This parameter is optional.
- eth0
This is the name of the network device to which we are adding IPX support.
- etherII
This parameter is the frame type, in this case Ethernet-II. This value may also be coded as
802.2,802.3, orSNAP.- 0x32a10103
This is the IPX network address to which this interface belongs.
The following command removes IPX from an interface:
#ipx_interface del eth0 etherIILastly, to display the current IPX configuration of a network device, use:
#ipx_interface check eth0 etherIIThe ipx_interface command is explained more fully in its manual page.
Configuring an IPX Router
You will recall from our short discussion of the protocols used in an IPX environment that IPX is a routable protocol and that the Routing Information Protocol (RIP) is used to propagate routing information. The IPX version of RIP is quite similar to the IP version. They operate in essentially the same way; routers periodically broadcast the contents of their routing tables and other routers learn of them by listening and integrating the information they receive. Hosts need only know who their local network is and be sure to send datagrams for all other destinations via their local router. The router is responsible for carrying these datagrams and forwarding them on to the next hop in the route.
In an IPX environment, a second class of information must be propagated around the network. The Service Advertisement Protocol (SAP) carries information relating to which services are available at which hosts around the network. It is the SAP protocol, for example, that allows users to obtain lists of file or print servers on the network. The SAP protocol works by having hosts that provide services periodically broadcast the list of services they offer. The IPX network routers collect this information and propagate it throughout the network alongside the network routing information. To be a compliant IPX router, you must propagate both RIP and SAP information.
Just like IP, IPX on Linux provides a routing daemon named ipxd to perform the tasks associated with managing routing. Again, just as with IP, it is actually the kernel that manages the forwarding of datagrams between IPX network interfaces, but it performs this according to a set of rules called the IPX routing table. The ipxd daemon keeps that set of rules up to date by listening on each of the active network interfaces and analyzing when a routing change is necessary. The ipxd daemon also answers requests from hosts on a directly connected network that ask for routing information.
The ipxd command is available prepackaged in some distributions, and in source form by anonymous FTP from http://metalab.unc.edu/ in the /pub/Linux/system/filesystems/ncpfs/ipxripd-x.xx.tgz file.
No configuration is necessary for the ipxd daemon. When it starts, it automatically manages routing among the IPX devices that have been configured. The key is to ensure that you have your IPX devices configured correctly using the ipx_interface command before you start ipxd. While auto-detection may work, when you're performing a routing function it's best not to take chances, so manually configure the interfaces and save yourself the pain of nasty routing problems. Every 30 seconds, ipxd rediscovers all of the locally attached IPX networks and automatically manages them. This provides a means of managing networks on interfaces that may not be active all of the time, such as PPP interfaces.
The ipxd would normally be started at boot time from an rc boot script like this:
No#/usr/sbin/ipxd&character is necessary because ipxd will move itself into the background by default. While the ipxd daemon is most useful on machines acting as IPX routers, it is also useful to hosts on segments where there are multiple routers present. When you specify the-pargument, ipxd will act passively, listening to routing information from the segment and updating the routing tables, but it will not transmit any routing information. This way, a host can keep its routing tables up to date without having to request routes each time it wants to contact a remote host.Static IPX Routing Using the ipx_route Command
There are occasions when we might want to hardcode an IPX route. Just as with IP, we can do this with IPX. The ipx_route command writes a route into the IPX routing table without it needing to have been learned by the ipxd routing daemon. The routing syntax is very simple (since IPX does not support subnetworking) and looks like:
The command shown would add a route to the remote IPX network 203a41bc via the router on our local network 31a10103 with node address 00002a02b102.#ipx_route add 203a41bc 31a10103 00002a02b102You can find the node address of a router by making judicious use of the tcpdump command with the
-eargument to display link level headers and look for traffic from the router. If the router is a Linux machine, you can more simply use the ifconfig command to display it.You can delete a route using the ipx_route command:
#ipx_route del 203a41bcYou can list the routes that are active in the kernel by looking at the /proc/net/ipx_route file. Our routing table so far looks like this:
The route to the 31A10103 network was automatically created when we configured the IPX interface. Each of our local networks will be represented by an /proc/net/ipx_route entry like this one. Naturally, if our machine is to act as a router, it will need at least one other interface.#cat ipx_route
Network Router_Net Router_Node 203A41BC 31A10103 00002a02b102 31A10103 Directly ConnectedInternal IPX Networks and Routing
IPX hosts with more than one IPX interface have a unique network/node address combination for each of their interfaces. To connect to such a host, you may use any of these network/node address combinations. When SAP advertizes services, it supplies the network/node address associated with the service that is offered. On hosts with multiple interfaces, this means that one of the interfaces must be chosen as the one to propagate; this is the function of the primary interface flag we talked about earlier. But this presents a problem: the route to this interface may not always be the optimal one, and if a network failure occurs that isolates that network from the rest of the network, the host will become unreachable even though there are other possible routes to the other interfaces. The other routes are never known to other hosts because they are never propagated, and the kernel has no way of knowing that it should choose another primary interface. To avoid this problem, a device was developed that allows an IPX host to be known by a single route-independent network/node address for the purposes of SAP propagation. This solves our problem because this new network/node address is reachable via all of the host interfaces, and is the one that is advertised by SAP.
To illustrate the problem and its solution, Figure 15.1 shows a server attached to two IPX networks. The first network has no internal network, but the second does. The host in diagram Figure 15.1 would choose one of its interfaces as its primary interface, let's assume 0000001a:0800000010aa, and that is what would be advertised as its service access point. This works well for hosts on the 0000001a network, but means that users on the 0000002c network will route via the network to reach that port, despite the server having a port directly on that network if they've discovered this server from the SAP broadcasts.
Figure 15.1: IPX internal network
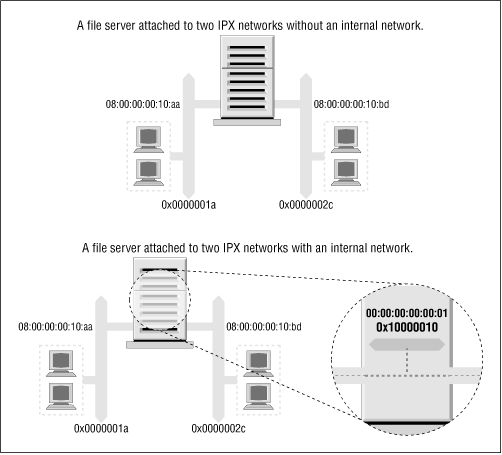
Allowing such hosts to have a virtual network with virtual host addresses that are entirely a software construct solves this problem. This virtual network is best thought of as being inside the IPX host. The SAP information then needs only to be propagated for this virtual network/node address combination. This virtual network is known as an internal network. But how do other hosts know how to reach this internal network? Remote hosts route to the internal network via the directly connected networks of the host. This means that you see routing entries that refer to the internal network of hosts supporting multiple IPX interfaces. Those routes should choose the optimal route available at the time, and should one fail, the routing is automatically updated to the next best interface and route. In Figure 15.1, we've configured an internal IPX network of address 0x10000010 and used a host address of 00:00:00:00:00:01. It is this address that will be our primary interface and will be advertised via SAP. Our routing will reflect this network as being reachable via either of our real network ports, so hosts will always use the best network route to connect to our server.
To create this internal network, use the ipx_internal_net command included in Greg Page's IPX tools package. Again, a simple example demonstrates its use:
This command would create an IPX internal network with address 10000010 and a node address of 000000000001. The network address, just like any other IPX network address, must be unique on your network. The node address is completely arbitrary, as there will normally be only one node on the network. Each host may have only one IPX Internal Network, and if configured, the Internal Network will always be the primary network.#ipx_internal_net add 10000010 000000000001To delete an IPX Internal Network, use:
#ipx_internal_net delAn internal IPX network is of absolutely no use to you unless your host both provides a service and has more than one IPX interface active.
Mounting a Remote NetWare Volume
IPX is commonly used to mount NetWare volumes in the Linux filesystem. This allows file-based data sharing between other operating systems and Linux. Volker Lendecke developed the NCP client for Linux and a suite of associated tools that make data sharing possible.
In an NFS environment, we'd use the Linux mount command to mount the remote filesystem. Unfortunately, the NCP filesystem has unique requirements that make it impractical to build it into the normal mount. Linux has an ncpmount command that we will use instead. The ncpmount command is one of the tools in Volker's ncpfs package, which is available prepackaged in most modern distributions or in source form from ftp.gwdg.de in the /pub/linux/misc/ncpfs/ directory. The version current at the time of writing is 2.2.0.
Before you can mount remote NetWare volumes, you must ensure your IPX network interface is configured correctly (as described earlier). Next, you must know your login details on the NetWare server you wish to mount; this includes the user ID and password. Lastly, you need to know which volume you wish to mount and what local directory you wish to mount it under.
A Simple ncpmount Example
A simple example of ncpmount usage looks like this:
This command mounts all volumes of the#ncpmount -S ALES_F1 -U rick -P d00-b-gud /mnt/breweryALES_F1fileserver under the /mnt/brewery directory, using the NetWare loginrickwith the passwordd00-b-gud.The ncpmount command is normally setuid to root and may therefore be used by any Linux user. By default, that user owns the connection and only he or the root user will be able to unmount it.
NetWare embodies the notion of a volume, which is analogous to a filesystem in Linux. A NetWare volume is the logical representation of a NetWare filesystem, which might be a single disk partition be spread across many partitions. By default, the Linux NCPFS support treats volumes as subdirectories of a larger logical filesystem represented by the whole fileserver. The ncpmount command causes each of the NetWare volumes of the mounted fileserver to appear as a subdirectory under the mount point. This is convenient if you want access to the whole server, but for complex technical reasons you will be unable to re-export these directories using NFS, should you wish to do so. We'll discuss a more complex alternative that works around this problem in a moment.
The ncpmount Command in Detail
The ncpmount has a large number of command line options that allow you quite a lot of flexibility in how you manage your NCP mounts. The most important of these are described in Table 15.2.
Table 15.2: ncpmount Command Arguments Argument Description -S server
The name of the fileserver to mount.
-U user_name
The NetWare user ID to use when logging in to the fileserver.
-P password
The password to use for the NetWare login.
-n This option must be used for NetWare logins that don't have a password associated with them.
-C This argument disables automatic conversion of passwords to uppercase.
-c client_name This option allows you to specify who owns the connection to the fileserver. This is useful for NetWare printing, which we will discuss in more detail later.
-u uid The Linux user ID that should be shown as the owner of files in the mounted directory. If this is not specified, it defaults to the user ID of the user who invokes the ncpmount command.
-g gid The Linux group ID that should be shown as the owner of files in the mounted directory. If this is not specified, it will default to the group ID of the user who invokes the ncpmount command.
-f file_mode This option allows you to specify the file mode (permissions) that files in the mounted directory should have. The value should be specified in octal, e.g.,
0664. The permissions that you will actually have are the file mode permissions specified with this option masked with the permissions that your NetWare login ID has for the files on the fileserver. You must have rights on the server and rights specified by this option in order to access a file. The default value is derived from the currentumask.-d dir_mode This option allows you to specify the directory permissions in the mounted directory. It behaves in the same way as the -f option, except that the default permissions are derived from the current
umask. Execute permissions are granted where read access is granted.-V volume This option allows you to specify the name of a single NetWare volume to mount under the mount point, rather than mounting all volumes of the target server. This option is necessary if you wish to re-export a mounted NetWare volume using NFS.
-t time_out This option allows you to specify the time that the NCPFS client will wait for a response from a server. The default value is 60mS and the timeout is specified in hundredths of a second. If you experience any stability problems with NCP mounts, you should try increasing this value.
-r retry_count The NCP client code attempts to resend datagrams to the server a number of times before deciding the connection is dead. This option allows you to change the retry count from the default of 5.
Hiding Your NetWare Login Password
It is somewhat of a security risk to be putting a password on the command line, as we did with the ncpmount command. Other active, concurrent users could see the password if they happen to be running a program like top or ps. To reduce the risk of others seeing and stealing NetWare login passwords, ncpmount is able to read certain details from a file in a user's home directory. In this file, the user keeps the login name and password associated with each of the fileservers he or she intends to mount. The file is called ~/.nwclient and it must have permissions of
0600to ensure that others cannot read it. If the permissions are not correct, the ncpmount command will refuse to use it.The file has a very simple syntax. Any lines beginning with a # character are treated as comments and ignored. The remainder of the lines have the syntax:
The fileserver is the name of the fileserver supporting the volumes you wish to mount. The userid is the login name of your account on that server. The password field is optional. If it is not supplied, the ncpmount command prompts users for the password when they attempt the mount. If the password field is specified as the - character, no password is used; this is equivalent to thefileserver/userid password-ncommand-line argument.You can supply any number of entries, but the fileserver field must be unique. The first fileserver entry has special significance. The ncpmount command uses the
-Scommand-line argument to determine which of the entries in ~/.nwclient to use. If no server is specified using the-Sargument, the first server entry in ~/.nwclient is assumed, and is treated as your preferred server. You should place the fileserver you mount most frequently in the first position in the file.A More Complex ncpmount Example
Let's look at a more complex ncpmount example involving a number of the features we've described. First, let's build a simple ~/.nwclient file:
Make sure its permissions are correct:# NetWare login details for the Virtual Brewery and Winery # # Brewery Login ALES_F1/MATT staoic1 # # Winery Login REDS01/MATT staoic1 #$chmod 600 ~/.nwclientLet's mount one volume of the Winery's server under a subdirectory of a shared directory, specifying the file and directory permissions such that others may share the data from there:
This command, in combination with the ~/.nwclient file shown, would mount the$ ncpmount -S REDS01 -V RESEARCH -f 0664 -d 0775 /usr/share/winery/data/RESEARCHvolume of theREDS01server onto the /usr/share/winery/data/ directory using the NetWare login ID ofMATTand the password retrieved from the ~/.nwclient file. The permissions of the mounted files are0664and the directory permissions are0775.Exploring Some of the Other IPX Tools
The ncpfs package contains a number of useful tools that we haven't described yet. Many of these tools emulate the tools that are supplied with NetWare. We'll look at the most useful ones in this section.
Server List
The slist command lists all of the fileservers accessible to the host. The information is actually retrieved from the nearest IPX router. This command was probably originally intended to allow users to see what fileservers were available to mount. But it has become useful as a network diagnosis tool, allowing network admins to see where SAP information is being propagated:
$ slist
NPPWR-31-CD01                               23A91330  000000000001
V242X-14-F02                                A3062DB0  000000000001
QITG_284ELI05_F4                            78A20430  000000000001
QRWMA-04-F16                                B2030D6A  000000000001
VWPDE-02-F08                                35540430  000000000001
NMCS_33PARK08_F2                            248B0530  000000000001
NCCRD-00-CD01                               21790430  000000000001
NWGNG-F07                                   53171D02  000000000001
QCON_7TOMLI04_F7                            72760630  000000000001
W639W-F04                                   D1014D0E  000000000001
QCON_481GYM0G_F1                            77690130  000000000001
VITG_SOE-MAIL_F4R                           33200C30  000000000001
slist accepts no arguments. The output displays the fileserver name, the IPX network address, and the host address.
Send Messages to NetWare Users
NetWare supports a mechanism to send messages to logged-in users. The nsend command implements this feature in Linux. You must be logged in to the server to send messages, so you need to supply the fileserver name and login details on the command line with the destination user and the message to send:
#nsend -S vbrew_f1 -U gary -P j0yj0y supervisor "Join me for a lager before we do the print queues!"Here a user with login name
garysends a tempting invitation to the person using thesupervisoraccount on theALES_F1fileserver. Our default fileserver and login credentials will be used if we don't supply them.Browsing and Manipulating Bindery Data
Each NetWare fileserver maintains a database of information about its users and configuration. This database is called the bindery. Linux supports a set of tools that allow you to read it, and if you have supervisor permissions on the server, to set and remove it. A summary of these tools is listed in Table 15.3.
Table 15.3: Linux Bindery Manipulation Tools Command Name Command Description nwfstime Display or set a NetWare server's date and time
nwuserlist List users logged in at a NetWare server
nwvolinfo Display info about NetWare volumes
nwbocreate Create a NetWare bindery object
nwbols List NetWare bindery objects
nwboprops List properties of a NetWare bindery object
nwborm Remove a NetWare bindery object
nwbpcreate Create a NetWare bindery property
nwbpvalues Print a NetWare bindery property's contents
nwbpadd Set the value of a NetWare bindery property
nwbprm Remove a NetWare bindery property
Printing to a NetWare Print Queue
The ncpfs package contains a small utility called nprint that sends print jobs across an NCP connection to a NetWare print queue. This command creates the connection if it doesn't currently exist and uses the ~/.nwclient file that we described earlier to hide the username and password from prying eyes. The command-line arguments used to manage the login process are the same as those used by the ncpmount, so we won't go through those again here. We will cover the most important command-line options in our examples; refer to the nprint(1) manual page for details.
The only required option for nprint is the name of the file to print. If the filename specified is - or if no filename is specified at all, nprint will accept the print job from
stdin. The most important nprint options specify the fileserver and print queue to which you wish the job to be sent. Table 15.4 lists the most important options.
Table 15.4: nprint Command-Line Options Option Description -S server_name The name of the NetWare fileserver supporting the print queue to which you wish to print. Usually it is convenient for the server to have an entry in ~/.nwclient. This option is mandatory.
-q queue_name The print queue to which to send the print job. This option is mandatory.
-d job_description Text that will appear in the print console utility when displaying the list of queued jobs.
-l lines The number of lines per printed page. This defaults to 66.
-r columns The number of columns per printed page. This defaults to 80.
-c copies The number of copies of the job that will be printed. The default is 1.
A simple example using nprint would look like:
This command would print two copies of the file /home/matt/ethylene.ps to the printer named$ nprint -S REDS01 -q PSLASER -c 2 /home/matt/ethylene.psPSLASERon theREDS01fileserver using a username and password obtained from the ~/.nwclient file.Using nprint with the Line Printer Daemon
You will recall we previously mentioned that the -c option for the ncpmount is useful for printing. At last we'll explain why and how.
Linux usually uses BSD-style line printer software. The line printer daemon (lpd) is a daemon that checks a local spool directory for queued jobs that are to be printed. lpd reads the printer name and some other parameters from the specially formatted spool file and writes the data to the printer, optionally passing the data through a filter to transform or manipulate it in some way.
The lpd daemon uses a simple database called /etc/printcap to store printer configuration information, including what filters are to be run. lpd usually runs with the permissions of a special system user called lp.
You could configure nprint as a filter for the lpd to use, which allows users of your Linux machine to output directly to remote printers hosted by a NetWare fileserver. To do this, the lp user must be able to write NCP requests to the NCP connection to the server.
An easy way to achieve this without requiring the lp user to establish its own connection and login is to specify lp as the owner of a connection established by another user. A complete example of how to set up the Linux printing system to handle print jobs from clients over NetWare is listed in three steps:
Write a wrapper script.
The /etc/printcap file doesn't permit options to be supplied to filters. Therefore, you need to write a short script that invokes the command you want along with its options. The wrapper script could be as simple as:
#!/bin/sh
# p2pslaser - simple script to redirect stdin to the
# PSLASER queue on the REDS01 server
#
/usr/bin/nprint -S REDS01 -U stuart -q PSLASER
#
Store the script in the file /usr/local/bin/p2pslaser.
Write the /etc/printcap entry.
We'll need to configure the p2pslaser script we created as the output filter in the /etc/printcap. This would look something like:
pslaser|Postscript Laser Printer hosted by NetWare server:\
:lp=/dev/null:\
:sd=/var/spool/lpd/pslaser:\
:if=/usr/local/bin/p2pslaser:\
:af=/var/log/lp-acct:\
:lf=/var/log/lp-errs:\
:pl#66:\
:pw#80:\
:pc#150:\
:mx#0:\
:sh:
Add the -c option to the ncpmount.
ncpmount -S REDS01 .... -c lp ....Our local user stuart must specify the lp user as the owner of the connection when he mounts the remote NetWare server.
Now any Linux user may choose to specify
pslaseras the printer name when invoking lp. The print job will be sent to the specified NetWare server and spooled for printing.Managing Print Queues
The pqlist command lists all of the print queues available to you on the specified server. If you do not specify a fileserver on the command line using the -S option, or a login name and password, these will be taken from the default entry in your ~/.nwclient file:
#pqlist -S vbrew_f1 -U guest -n
Server: ALES_F1 Print queue name Queue ID ------------------------------------------------------------ TEST AA02009E Q2 EF0200D9 NPI223761_P1 DA03007C Q1 F1060004 I-DATA 0D0A003B NPI223761_P3 D80A0031Our example shows a list of the print queues available to the
guestuser on theALES_F1fileserver.[7][7] It looks like the system administrators had been sampling some of the Virtual Brewery's wares before they chose some of those print queue names. Hopefully your print queue names are more meaningful!
To view the print jobs on a print queue, use the pqstat command. It takes the print queue name as an argument and lists all of the jobs in that queue. You may optionally supply another argument indicating how many of the jobs in the queue you'd like to list. The following sample output has been compressed a bit to fit the width of this book's page:
$ pqstat -S ALES_F1 NPI223761_P1

Server: ALES_F1     Queue: NPI223761_P1          Queue ID: 6A0E000C
   Seq  Name      Description                    Status   Form  Job ID
------------------------------------------------------------------------
     1  TOTRAN    LyX document - proposal.lyx    Active      0  02660001
We can see just one print job in the queue, owned by user
TOTRAN. The rest of the options include a description of the job, its status, and its job identifier.The pqrm command is used to remove print jobs from a specified print queue. To remove the job in the queue we've just obtained the status of, we'd use:
$ pqrm -S ALES_F1 NPI223761_P1 02660001The command is pretty straightforward but is clumsy to use in a hurry. It would be a worthwhile project to write a basic script to simplify this operation.
NetWare Server Emulation
There are two free software emulators for NetWare fileservers under Linux. lwared was developed by Ales Dryak and mars_nwe was developed by Martin Stover. Both of these packages provide elementary NetWare fileserver emulation under Linux, allowing NetWare clients to mount Linux directories exported as NetWare volumes. While the lwared server is simpler to configure, the mars_nwe server is more fully featured. The installation and configuration of these packages is beyond the scope of this chapter, but both are described in the IPX-HOWTO.
Back to: Sample Chapter Index
Back to: Linux Network Administrator's Guide, 2nd Edition
© 2001, O'Reilly & Associates, Inc.
webmaster@oreilly.com