Learning Debian GNU/Linux
By Bill McCarty1st Edition September 1999
1-56592-705-2, Order Number: 7052
360 pages, $34.95 , Includes CD-ROM
|
|
|
|
|
Learning Debian GNU/LinuxBy Bill McCarty1st Edition September 1999 1-56592-705-2, Order Number: 7052 360 pages, $34.95 , Includes CD-ROM |
11.4 PPP Client
The Linux PPP client lets your Linux system connect to the Internet via a PPP server, much the same way Dial-Up Networking lets your Microsoft Windows system do so. Behind the scenes, wvdial calls on the services of the PPP client to connect to a PPP server. However, it's possible to use the Linux PPP client directly, without the aid of wvdial. Doing so gives you access to the many options provided by PPP, which can prove helpful if your networking needs are too sophisticated to be met by wvdial's simple fire-and-forget mechanism. Even if you're content with wvdial, you'll benefit from understanding the PPP client. For example, you'll find it much easier to troubleshoot PPP problems if you understand the functions performed by the PPP client on behalf of wvdial.
11.4.1 Specifying PPP Options
The Linux PPP client requires several configuration files. Rather than build these files manually, you can use pppconfig, a program that leads you through a dialog and then creates the proper configuration files based on your responses. Login as
root, and issue the command:pppconfigFigure 11.1 shows pppconfig's main menu, which the program displays whenever you start it. Notice that pppconfig lets you create a connection - the term by which it refers to a complete set of configuration parameters - but it does not let you edit an existing connection. To change a connection, you must edit the configuration files manually. It's usually simpler to forego editing a connection, creating a new connection instead.
Figure 11.1: The pppconfig main menu
To create a new connection, use the arrow keys to highlight Next or Create, and then press Enter.
If pppconfig determines that the file /etc/resolv.conf does not exist or does not specify one or more nameservers (DNS servers), it will display the screen shown in Figure 11.2, which asks you to specify nameservers. You should do so, therefore highlight Yes and press Enter.
Figure 11.2: Request to specify nameservers
Figure 11.3 shows the screen used to specify the primary nameserver. To specify the primary nameserver, type its IP number and press Enter. Your ISP should be able to tell you what IP number to specify.
Figure 11.3: Specifying the primary nameserver
You can also specify the IP number of a secondary nameserver, as shown in Figure 11.4. Simply type the IP number and press Enter. Your ISP should be able to provide you with the IP number of the secondary namesever; if you don't know the IP number, leave it blank.
Figure 11.4: Specifying the secondary nameserver
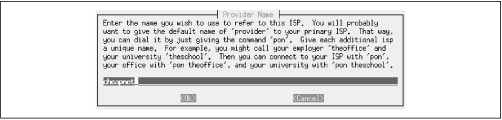
Figure 11.5 shows the next screen displayed by pppconfig, which asks for a name by which to refer to this connection. If your /etc/resolv.conf file already specified one or more nameservers, pppconfig displays this screen after its initial screen. Choose a connection name you'll be able to recall, backspace over the default connection name, type your connection name, and press Enter. You may find it convenient to use the domain name of your ISP as the connection name.
pppconfig equivocates by sometimes referring to a connection, sometimes to an ISP (Internet Service Provider), and sometimes to a provider. The term connection is more accurate in this context, because you may have several ways of connecting to a particular ISP - for example, the ISP may have several dial-up numbers. Each way of connecting to an ISP can be configured as a distinct pppconfig connection.
Figure 11.5: Specifying the connection (provider) name
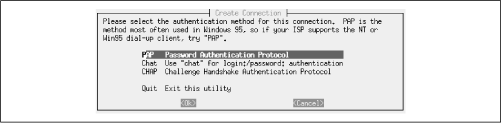
Next, pppconfig asks what method your ISP uses to authenticate your access to its network, as shown in Figure 11.6. PAP (Password Authentication Protocol) is currently the most popular method; however, some ISPs continue to use other methods. The technical support staff of many ISPs cannot tell what authentication method their system uses. So, you may have to guess; if so, initially guess PAP. If you find you cannot establish a connection, you can try the alternative values. Select the desired authentication method and press Enter.
Figure 11.6: Specifying the authentication method
Next, you must specify your login password, as shown in Figure 11.7. Type the password and press Enter.
Figure 11.7: Specifying the password
Next, pppconfig asks you to specify some basic connection properties. Press Enter to exit the Configuration screen and the Manager User Configuration screen, shown in Figure 11.8, appears. Type the login username assigned to you by your ISP and press Enter. Your login username may differ from your actual username, so be sure to use your login username.
Figure 11.8: Specifying the username
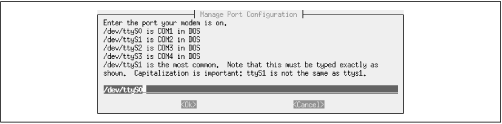
Next, you must specify the device that corresponds to your modem, as shown in Figure 11.9. Type the name of the device file, paying careful attention to capitalization, and press Enter.
Figure 11.9: Specifying the modem device
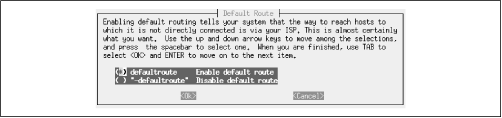
The program next asks whether you want it to establish a default route when it makes a connection, as shown in Figure 11.10. You almost certainly do, so accept the default choice - Enable Default Route - by using the arrow keys to highlight Ok and pressing Enter.
Figure 11.10: Enabling a default route
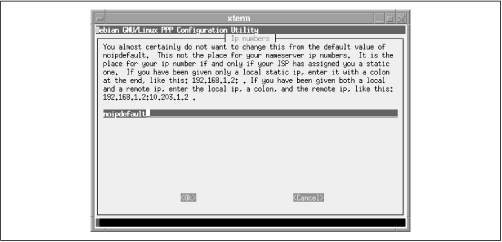
Figure 11.11 shows the next pppconfig screen, which requests information on your computer's network address (IP number). Most ISPs assign your computer a different network address each time you establish a connection. Some ISPs give you the option of having a static network address, meaning that your computer's network address is always the same.
Figure 11.11: Specifying your computer's network address
Unless your ISP has assigned your computer a static network address, simply press Enter. If your computer has a single static network address, type the address followed by a colon and press Enter. If it has separate local and remote network addresses, type the local address, a colon, and the remote address; then press Enter.
Next, you must specify your modem's speed, as shown in Figure 11.12. This refers to the speed of the connection between your modem and your system, not to the speed of the connection between your modem and your ISP, which is normally a smaller value. Unless you have a particular reason for doing otherwise, you should accept the default speed of 115200 by pressing Enter.
Figure 11.12: Specifying the modem speed
Next, as shown in Figure 11.13, pppconfig lets you specify a modem initialization string, which it will send to the modem before establishing a connection. Simply press Enter to accept the default initialization string, which works correctly for most modems and situations.
Figure 11.13: Specifying a modem initialization string
Next, as shown in Figure 11.14, you must specify the number your modem should dial to reach your ISP. Type the number without spaces or punctuation. With the number, include any necessary prefix or suffix digits just as you would dial them yourself - for example, the 1 and area code needed to access a long distance number.
Figure 11.14: Specifying the phone number
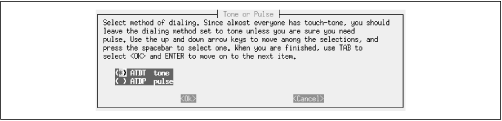
Next, as shown in Figure 11.15, you must specify whether your phone line accepts tone dialing or pulse dialing. Most U.S. phone lines accept tone dialing; unless you're certain your line does not, specify tone dialing, highlight Ok, and press Enter.
Figure 11.15: Specifying tone or pulse dialing
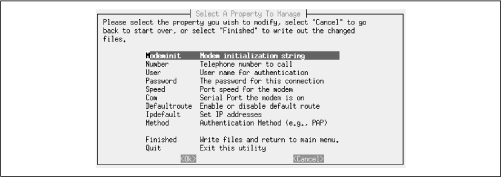
Next, pppconfig gives you the opportunity to review and change your entries. Press Enter to exit the Properties screen. Figure 11.16 shows the screen that appears. To view or change an entry, highlight the entry and press Enter. When you're satisfied that your entries are correct, highlight Finished and press Enter.
Figure 11.16: Reviewing and changing entries
pppconfig writes the PPP configuration files according to your specifications. Press Enter to exit the Finished screen. Unless you want to specify another connection, highlight Quit and press Enter to exit the main menu.
11.4.2 Establishing a PPP Connection
Finally, you're ready to establish a PPP connection. While logged in as
root, issue the following command:pon connectionWhere
connectionis the connection name you earlier specified in pppconfig.You can monitor the progress of the operation by issuing the following command in a separate virtual console:
tail -f /var/log/messagesThis command continually displays messages as they're posted to the system log file. Because PPP writes log entries that describe its progress, the command lets you see what PPP is doing. When you're done viewing log entries, type Ctrl-C to exit the tail command.
You can see even more detail by using the command:
tail -f /var/log/ppp.logYou can verify that the PPP connection has been established by issuing the following command:
ifconfigIf the output of the command includes a description of a PPP connection, the connection was successfully established. To verify that the connection is operational, issue the ping command:
ping www.oreilly.comTo terminate the connection, type the command:
poffIf your connection failed, you should check the following before contacting your ISP or other Linux users for support:
When you want to terminate the PPP connection, you can click on the Disconnect button of the dialog box you used to establish the connection.
 |
 |
 |
| 11.3 Using wvdial |
 | 11.5 Web Browser |
Back to: Learning Debian GNU/Linux
© 2001, O'Reilly & Associates, Inc.